Do you want to add closed captions to your videos but don’t know where to start? No worries. We can help with that!
Adding closed captions can make your content visible in the search results. Your videos become more accessible to those who cannot hear. They also increase the watch time by 12%. This can help you drive more engagements.
Writing captions for YouTube videos can be challenging and time-consuming, but we’re here to make it a whole lot easier!
That said, this article provides an in-depth guide on how to write closed captions for YouTube. We’ll explore what closed captions are and how you can write, optimize, and add them to YouTube videos.
Ready for it? Let’s go!
In this article
Part 1. What is a Closed Caption, and Why Use it for YouTube Videos?
Closed captions are textual copies of the video’s audio content. They include the video dialogue, speaker names, background noises, and other relevant descriptions of the video content. Viewers can turn them on or off.
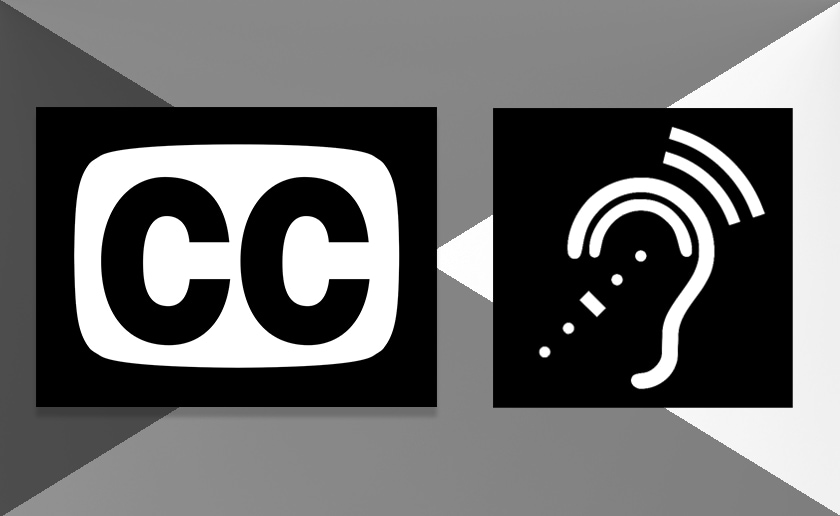
CC text was created to make the video accessible to those with hearing disabilities. But today, these captions serve various additional purposes as well. Let’s briefly look at what these are.
-
Enhanced accessibility
Over two-thirds of adults have hearing loss. Adding captions ensures a broader audience can easily consume your content.
-
Great for SEO
CC text helps search engines recognize the relevant keywords in your video content. This can increase your content’s reach and rank your videos higher in the search results.
-
Increased Engagement
Closed captions can help you as a content creator by driving more engagement. They can increase the watch time and retention rate by 80%.
-
Better User Experience
Captions also provide an excellent way to watch YouTube videos without sound in public. This ensures that anyone can watch and interact with your content wherever they are. Furthermore, they can also aid in learning information retention.
These are some ways you can benefit from CC text. Now, let’s see how these differ from open captions.
Closed Captions vs. Open Captions
What’s the difference between closed and open captions? Well, Closed and open captions both serve the same purpose. However, they differ in some key functionalities. Let’s break it down:
| Feature | Open Captions | Closed Captions |
| Visibility | Always visible | Can be turned on or off |
| Placement | Burned into the video | Separate text over the video |
| Editing | Cannot be edited without editing the video | Can be easily edited |
| Search Engine Recognition | Not recognized by search engines | Recognized by search engines (good for SEO) |
Captions are also confused with subtitles. Keep reading to discover how these two differ before discussing how to write captions on YouTube.
Part 2. Captions or Subtitles: Which Should You Add to YouTube Videos?
Ever wondered whether captions and subtitles are the same thing? Which one should you be using for your YouTube videos? Subtitles and captions are often used interchangeably. But they are not the same. They differ in their purpose of use.
-
Captions
Captions are the carbon copy of what’s being said in a video. They aim to make the video’s audio content easier to understand. So, in captions, you’ll find all the sounds of the video described in a text form.
-
Subtitles
Subtitles are intended to increase a video’s global impact. They assume the audience can hear but not interpret the audio due to the language barrier. That said, subtitles mostly translate a video’s audio content.
Which One to Choose?
Let’s help you decide which one to choose for your YouTube content.
- For Accessibility: Use captions to make your videos available to a broader community. It includes those who cannot hear or prefer to watch videos without sound.
- For Global Reach: Aiming to reach an international audience? Subtitles are the way to go! You can translate the video’s audio to break the language barrier.
Let’s move forward now and explore how to write captions on YouTube videos.
Part 3. What are the Different Ways to Add Captions to YouTube Videos?
YouTube can automatically add closed captions for your videos. However, these can be inaccurate. So, adding your own closed captions is a more reliable solution.
YouTube Studio offers three ways to add and write closed captions yourself. Here’s a brief look at each of these methods.
Uploading Caption Files
The first way you can add closed captions to YouTube videos is by uploading your own caption files. This option is helpful for those who know how to write closed captions for YouTube professionally. This means understanding how to format, structure, and add timestamps for captions.
Using YouTube Auto Sync
Already have a script for your YouTube videos? You can copy and paste it into the Auto Sync tool in YouTube Studio. It uses advanced voice recognition technology to sync the script to the video’s audio automatically. However, you must still differentiate the speakers and add text for background sounds.
Manually Writing with YouTube
Want to take matters into your own hands? You can manually type captions as you watch the video. YouTube offers different shortcuts to make this process easier. However, writing captions manually still takes a great deal of time and effort.
Luckily, you won’t have to spend hours on tedious manual writing. Continue below for a faster solution for writing captions for YouTube!
Part 4. How to Write and Edit Your YouTube Captions Quickly?
Looking for a faster and easier way to write captions for YouTube? Wondershare Virbo is your answer! It is an advanced AI-powered tool that automatically adds captions to your videos in minutes.
No need for time-consuming typing and optimizing your captions. Virbo uses advanced AI technology to recognize and convert video sounds into written text. Plus, it can align the captions with specific timestamps!

Key Features of Wondershare Virbo
Let’s look at the standout features Virbo has to offer.
- Write captions automatically: It uses AI integration to automatically create captions for your videos.
- Add captions to videos: It directly adds captions to your videos without the need for manual editing.
- Translate YouTube videos: Vribo lets you translate your videos and add related captions from over 40 languages.
- Generate video scripts: Create an entire script for YouTube videos with AI. You can also optimize it as needed.
- Create videos from scratch: Generate videos with 300+ AI avatars and video templates in minutes!
- Cross-platform solution:You can use Vribo on all platforms, including desktop, mobile, and online.
Ready to use Virbo to write captions for YouTube videos? Let’s see how to use it below!
Steps to Write Captions with Wondershare Virbo
First, download and install Wondershare Virbo on your Windows PC or just visit its web version. Then, use the instructions below to find out how to write captions for YouTube videos in minutes!
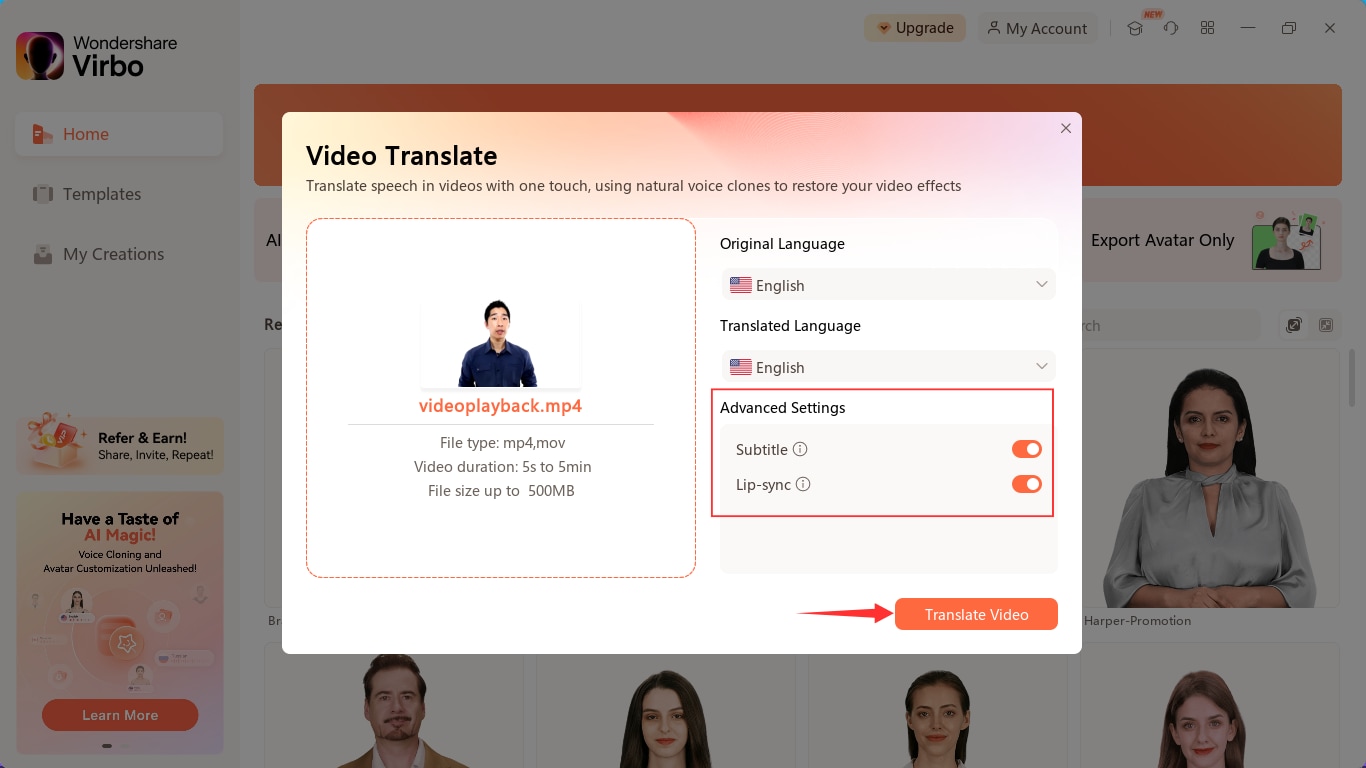
Step 1. Open Virbo and select the “Video Translator” tool from the top. A new window will pop up on your screen.

Step 2. Read through the video requirement. Click the “Click to upload video” button to import and add captions to the video.
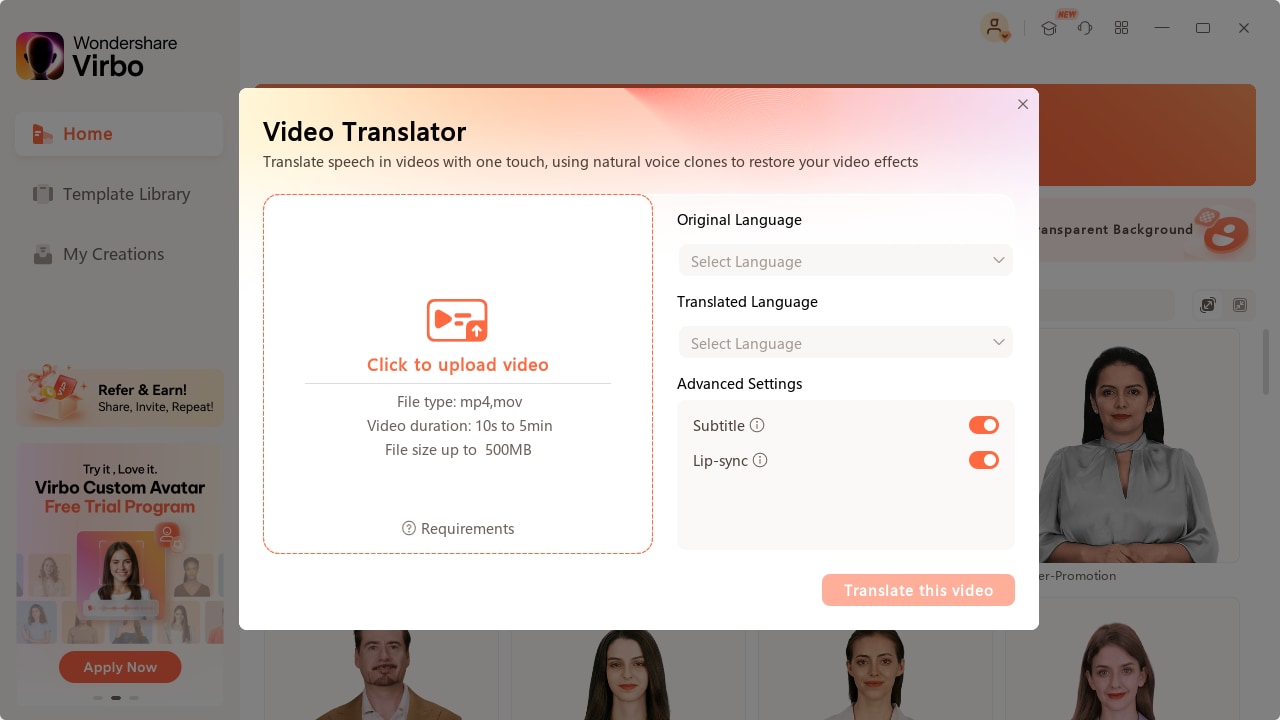
Step 3. Click the dropdown arrow under “Original Language” to select the language of the video. Then click the “Translated Language” dropdown and select the original video language again.
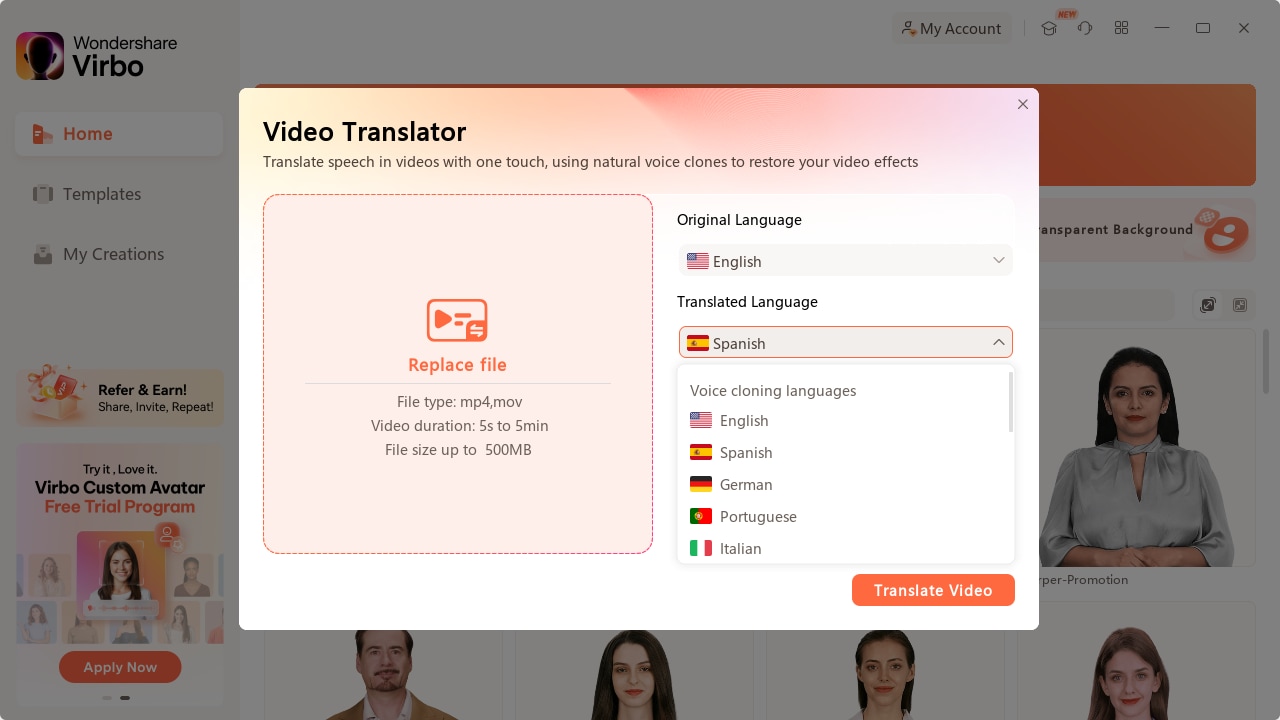
Step 4. Go to the “Advanced Settings” and turn the toggle on for “Subtitle.” You can also turn on lip-sync if you wish but it is optional for adding captions.
Step 5. Click “Translate Video.” This will automatically recognize the video language and add subtitles.
You can also edit your video captions with Virbo. Let’s see how with the guide below.
Steps to Edit Captions with Wondershare Virbo
Already have written captions or a script for the video? You can add that to your video using Virbo and edit it to make it look attractive. Before following the steps below, you can download Virbo on your PC or just visit its web version by clicking the buttons below.
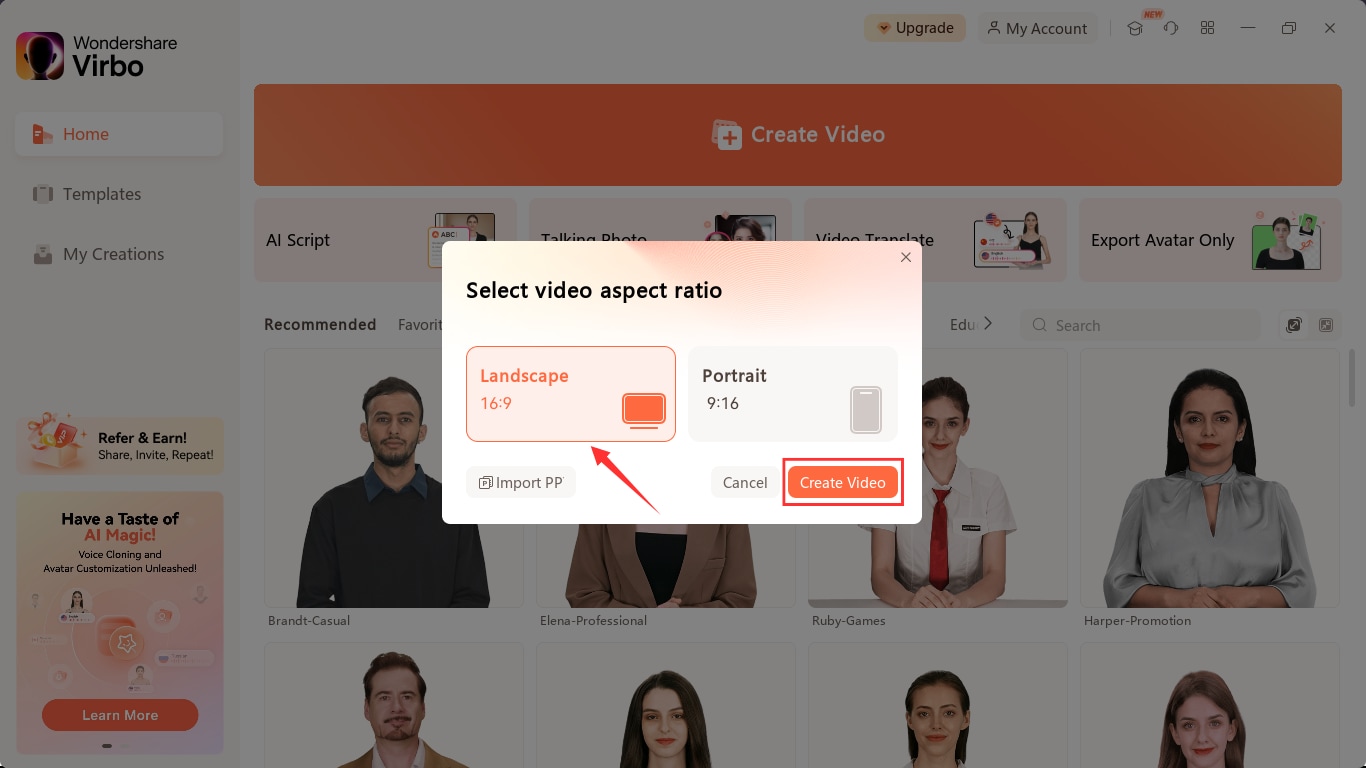
Step 1. Open Virbo on your PC and click “Create Video.” Then, select the orientation type for the video. You can choose to create a horizontal or portrait video.
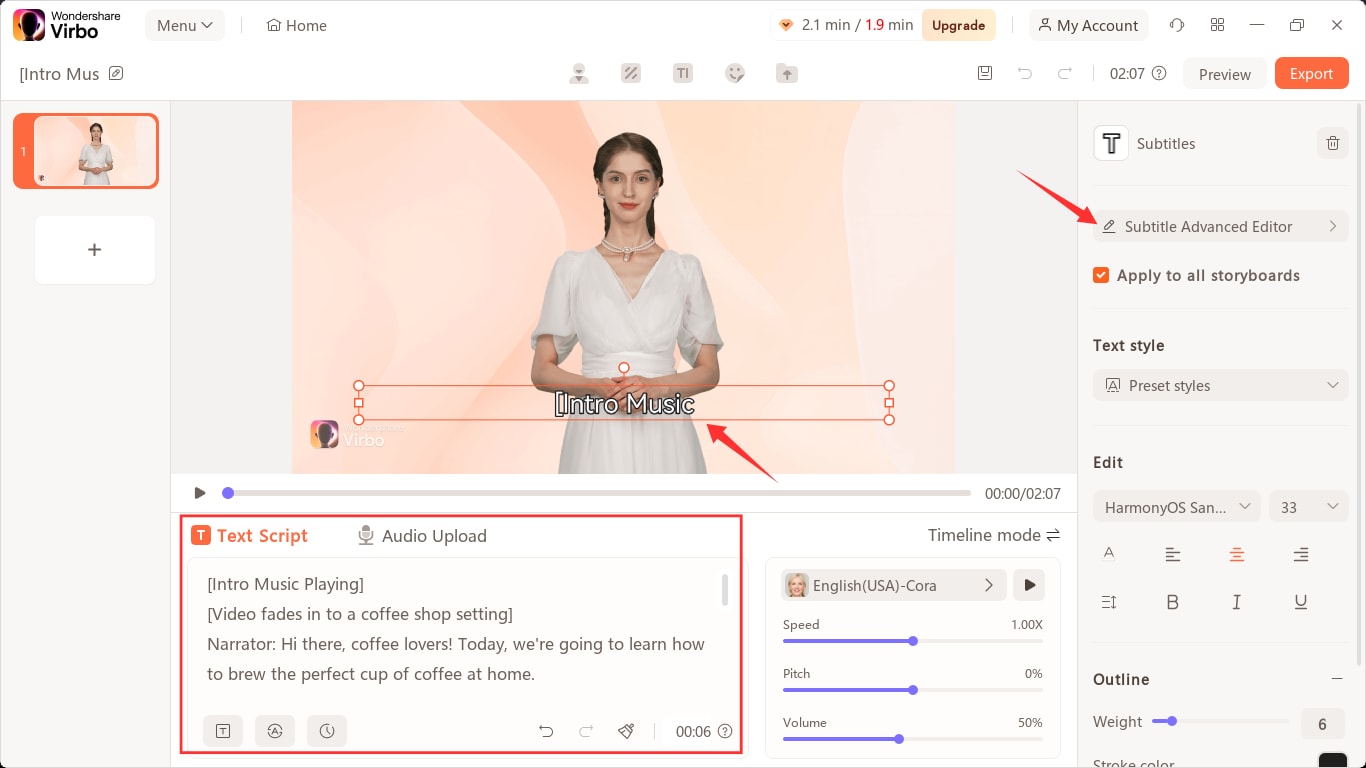
Step 2. Copy and paste your video captions into the text field under “Text Script.” Click on the captions shown in the video to access the editing options.
Step 3. Click “Subtitle Advanced Editor.” This will open up a new window with various editing options.
Step 4. Click on the captions on the right side and start editing them. You can adjust the timestamps and the dialogue.
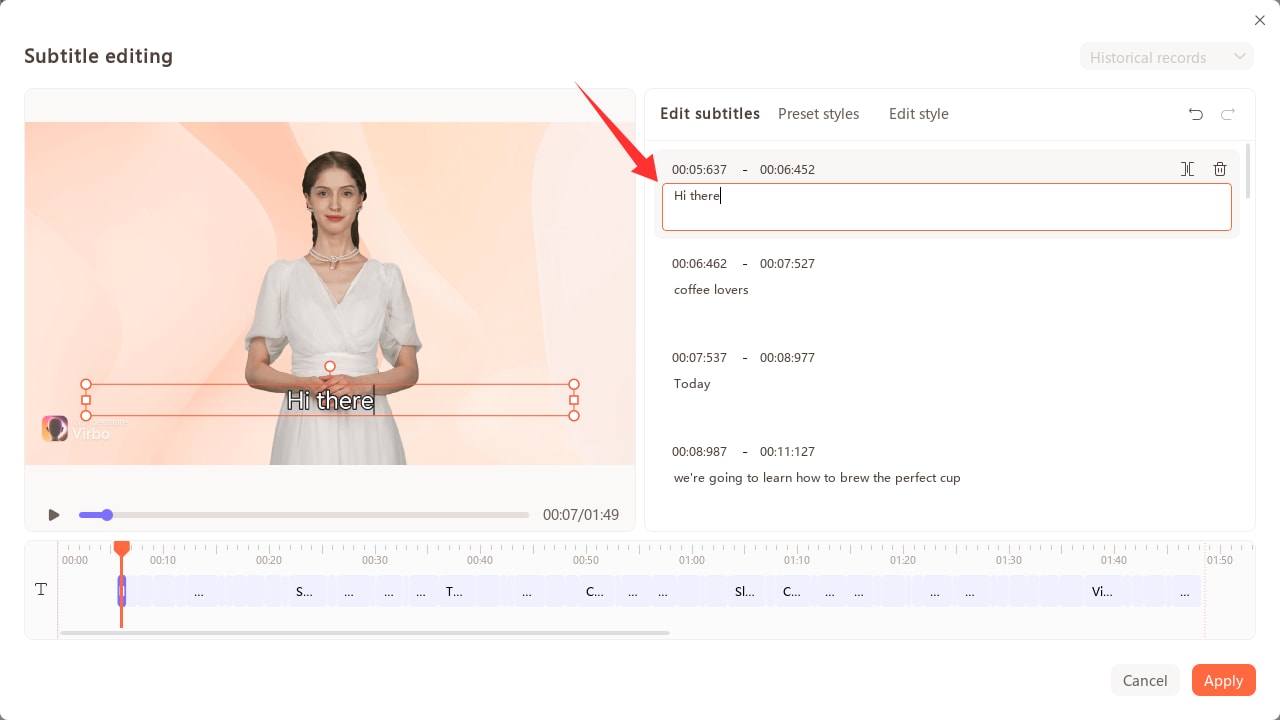
Step 5. Go to the “Preset Styles” tab above the captions to access different text styles. Choose your preferred style and click “Apply” once done.
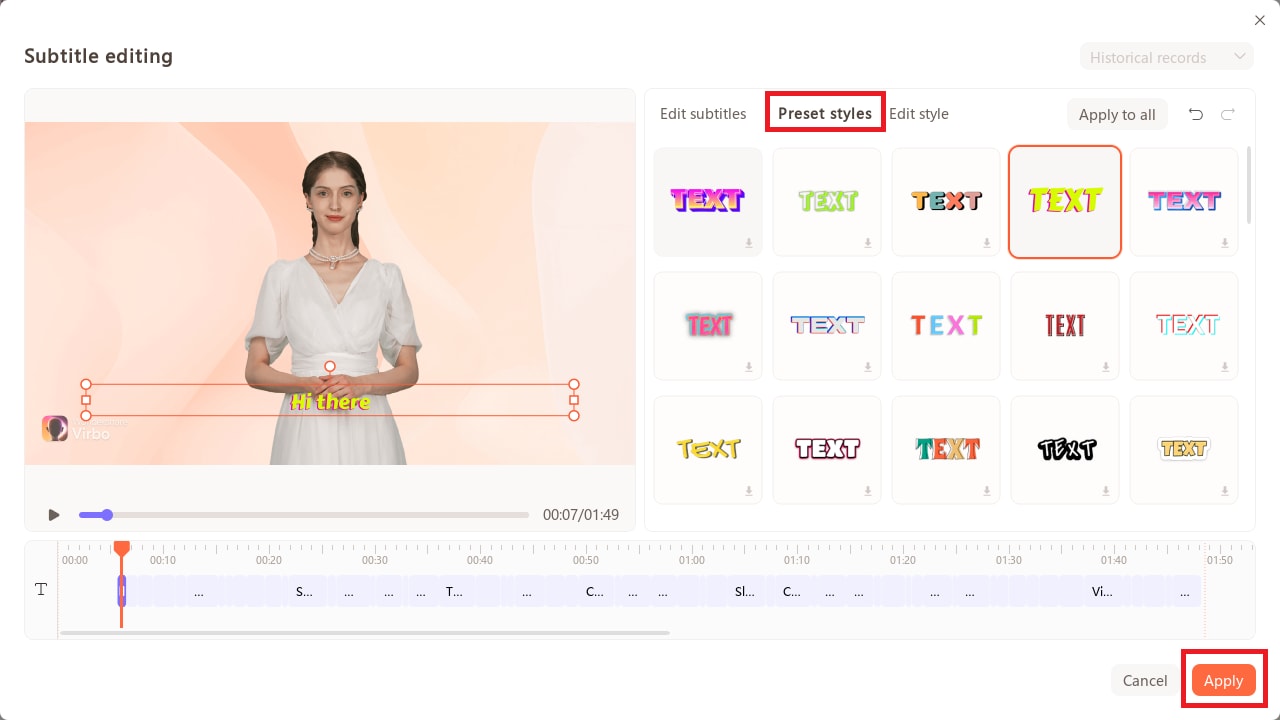
And that’s how to write captions for a YouTube video. Now, export the video to your device and upload it to YouTube!
Part 5. How do you manually write closed captions for YouTube videos?
You can also write the YouTube closed captions yourself. This can be time-consuming and needs significant effort. You will need to use a text editor like Notepad or MS Word to write the captions as a text file.
Let’s see how to write captions for YouTube videos with this method.
Step 1. Open Notepad on your computer and type a number for each caption you will write in individual lines.
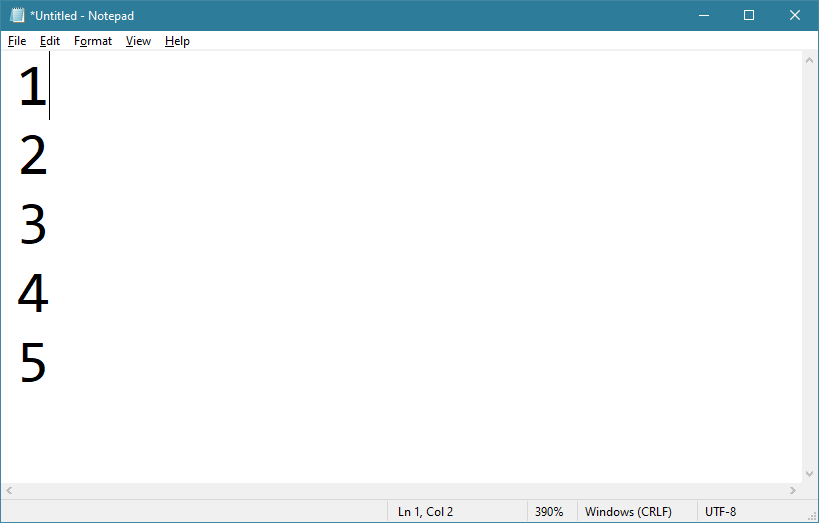
Step 2. Start a new line from number 1 and write the time the caption will appear in the video. Use the HH:MM:SS,MS format for this. Here, H stands for hours, M for minutes, S for seconds, and MS for milliseconds.
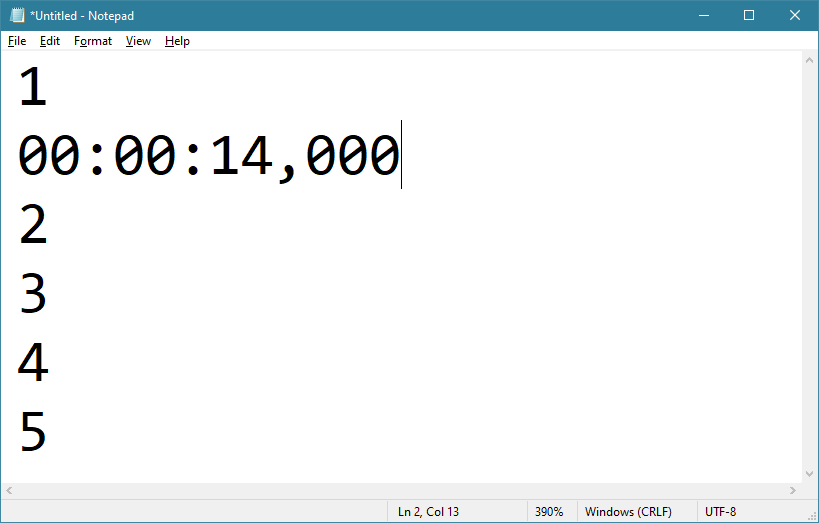
Step 3. Type “-->” on the same line after adding a space next to the time. Add another space and write the time when you want the caption to disappear.
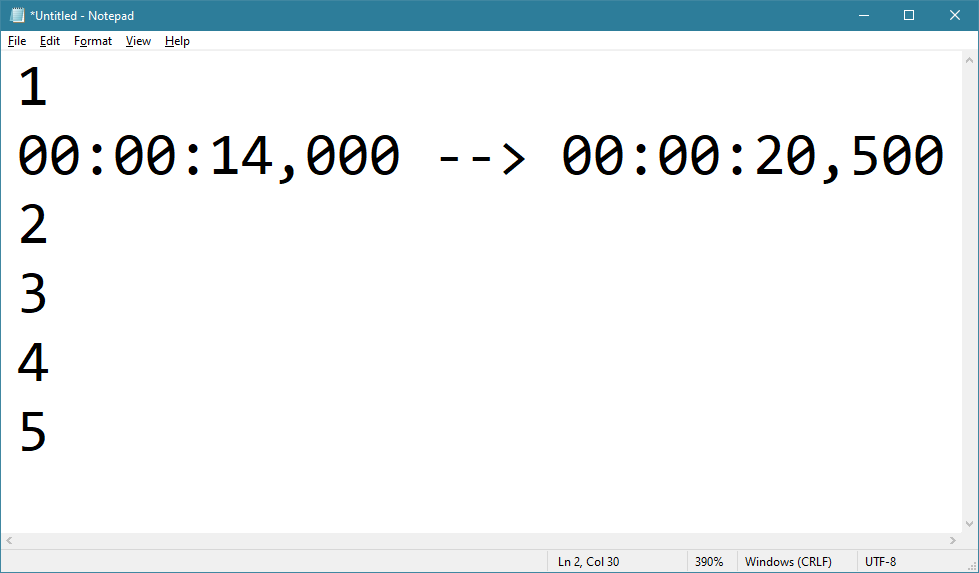
Step 4. Start a new line and start writing the caption for the timestamp you wrote.
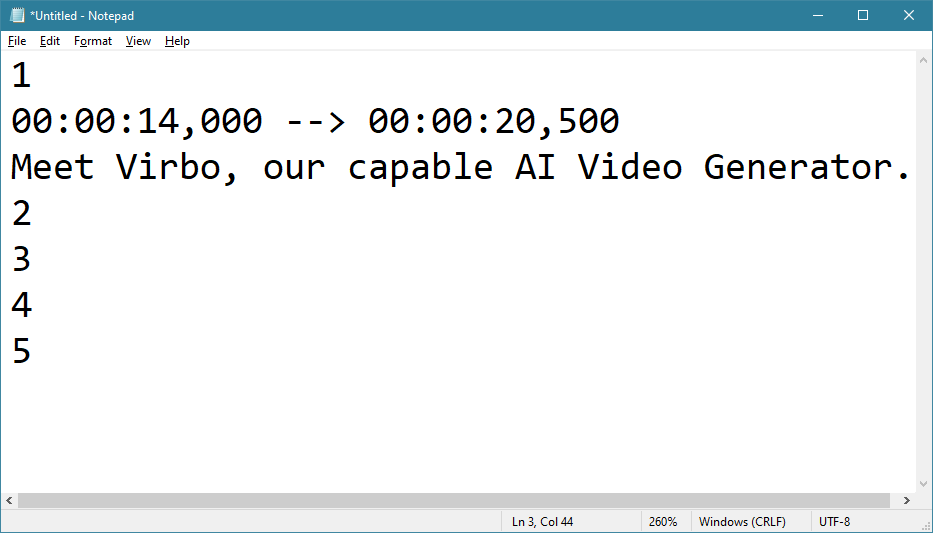
Step 5. Similarly, add the captions for all the other numbers. Then click “File” and choose “Save As” to export the file as a TXT file.
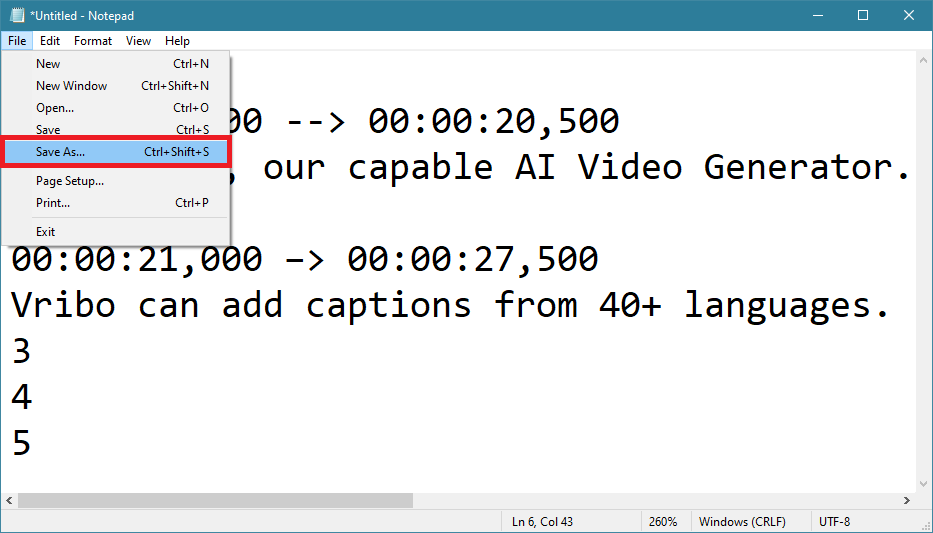
Convert the .txt file to .srt using an online SRT converter and upload it to YouTube. With that, you’re all done learning how to write captions for a YouTube video.
This process can take hours for longer videos. And you may still need to edit the captions and adjust their timing with YouTube. In contrast, an automatic solution like Virb can do the job in minutes!
Part 6. Best Practices to Add YouTube Closed Captions
Now you know the ins and outs of how to write closed captions for YouTube videos! But do you know how to optimize them so they are helpful for your viewers? Don’t worry! Here are the guidelines you can follow.
Make sure they’re readable
Double-check your captions to ensure they are adequately capitalized and punctuated. This will help convey your message more effectively, particularly to those who cannot hear.
Check the grammar
Incorrect grammar can leave a wrong impression on the audience. People are less likely to take you seriously if your captions do not follow the general grammar rules.
Differentiate the speakers
Identify the speakers clearly for videos with a group of people or even two of them. Depending on the video type, you could write the person’s name or speaker 1, speaker 2, etc.
Describe the sounds
Don’t forget to describe the background sounds in brackets. This can make your content more enjoyable for people with hearing disabilities.
Add translations
Add translations for your video captions to increase your global reach. You can do it easily with YouTube or use a translator like Wondershare Virbo, which has extensive language support.
Still have questions about how to write captions on YouTube videos? See if our FAQs help you out!
Conclusion
We have provided a complete guide on how to write closed captions for YouTube videos. Closed captions are beneficial in various ways. They can increase your content’s reach and make your videos accessible to a broader audience.
You can write captions for YouTube manually. You can also use an AI-powered tool like Wondershare Virbo. It is effortless to use and requires no technical knowledge. Plus, you can add captions, edit them, and create YouTube videos all on one platform!


