
We came across an Apple discussion where a user sought advice on how to convert a live photo to a still image. This user explained that he hadn't realized Live Photo mode was enabled on his iPhone, so all his photos were live photos as a result. This unintended setting caused his photos to consume significantly more storage space than standard still ones.
We believe this is a common issue for many users, as it's easy to overlook the Live Photo setting when capturing photos. To help those who face the same problem, we are going to help with some clear and simple solutions for converting live photos to still images!
In this article
Method 1. Turn Off Live Photos Feature
The first method that we would like to introduce when it comes to converting a life photo to a still photo is turning off the live photo feature on your iPhone. This method is straightforward and can be done directly on your iPhone without needing any additional apps or tools.
If you're considering giving this method a try, here's how:
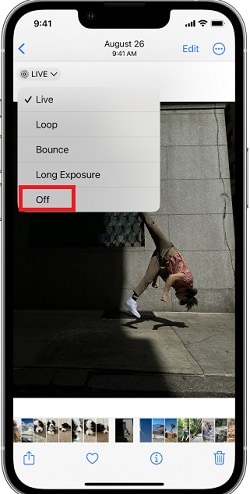
Step 1. Open the Live Photo in your Photos app.
Step 2. Click on the Live Photo icon at the top of the screen.
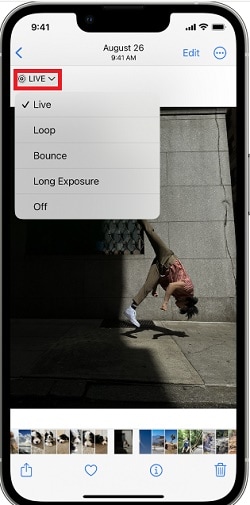
Step 3. Finally, tap "Off" to save the changes, and your Live Photo will be converted to a still image.
Method 2. Take a Screenshot of Live Photo
Another simple way to convert a Live Photo to a still image is by taking a screenshot of the Live Photo. Similar to the first method, this method is easy and does not require any additional apps or tools.
You can choose the exact frame you want to capture from the Live Photo, although it can be time-consuming for multiple photos, and the screenshot may not be as high-quality as the original photo. Here's what you need to do:
Step 1. Open the Live Photo you want to convert in the Photos app on your iPhone.
Step 2. Pause the Live Photo
Once you’ve opened your photo, tap and hold on the Live Photo to pause it at the desired moment. This will ensure you capture the frame you want.
Step 3. Take the screenshot
Press the side button and the volume up button at the same time on your iPhone or screenshot through the AssistiveTouch. You should see a flash, indicating that the screenshot has been captured. The screenshot will be saved automatically to your photo library as a still image.
Method 3. Duplicate the Live Photo as a Still Photo
Another method on how to change a live photo to a still image involves duplicating the Live Photo and saving the duplicate as a still photo. This can be easily done within the Photos app on your iPhone.
The best thing about using this method is it allows you to retain the original Live Photo while also creating a still image, providing flexibility in managing your photo library. However, it's important to note that if you keep both the Live Photo and its duplicate as a still image, it may occupy more storage space on your device.
For those looking to explore this option, here are the steps to follow:
Step 1. Select the Live Photo that you wish to convert into a still image in the Photos app on your iPhone.
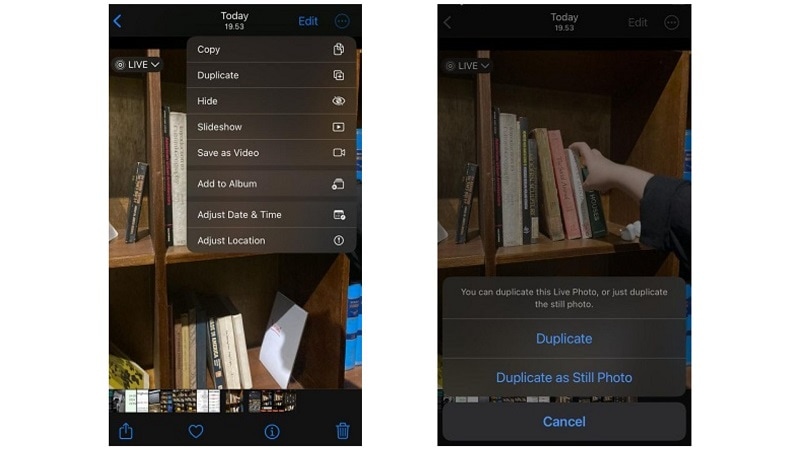
Step 2. Choose the three-dot icon or Share
Tap on the three-dot icon (or tap on the "Share" if you own an older iPhone) to open the sharing options. Scroll down and select "Duplicate" from the list of actions.
Step 3. Duplicate as Still Photo
And then, simply choose the "Duplicate as Still Photo" option. This will create a duplicate copy of the Live Photo.
Method 4. Make Key Photo from the Live Photo
To turn an iPhone Live Photo into a normal still image, you can also use a method of picking a keyframe from the Live Photo and saving it as a still picture. This is done using the "Key Photo" feature in the Photos app on your iPhone.
Like taking a screenshot, choosing a key photo lets you select the exact moment you want to capture as a still image. However, keep in mind that picking the right keyframe might be tricky, and the process requires manual effort.
If you're inclined to use this method, here's a breakdown of how it works:
Step 1.Open the Photos app on your iPhone and select the Live Photo you want to convert.
Step 2. Choose the Key Frame
Simply click on the "Edit" button and tap on the Live Photo at the bottom (white circle).
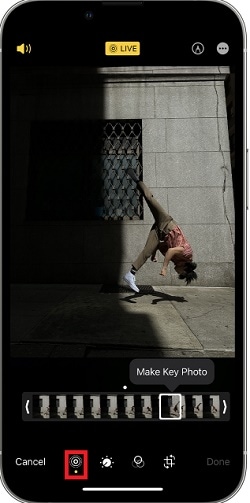
Step 3.Select the Key Photo
Slide the scrubber along the timeline to find the frame you want to use as the still image. Once you find it, tap the "Make Key Photo" option. A small dot should appear on the selected frame.

Step 4. Save the Key Photo
After setting the keyframe, tap on the Live button at the top to turn off Live Photo. After that, click on the "Done" button to save the key photo as a still image in your photo library.
Method 5. Convert Live Photo to Still with the Files App
Finally, the last method that we would like to recommend is using the files app to convert your Live Photo to a still one. This approach entails extracting a frame from the Live Photo and saving it as a standalone still image file.
While it effectively preserves the original content and quality, the process may be slightly more complex compared to the methods mentioned earlier.
For anyone contemplating using this approach, here's a simple guide:
Step 1. Access Live Photos
The first thing you need to do is to access the Photos app on your iPhone then navigate to the "Albums" tab and tap on "Live Photos." As an alternative, you can also choose Live Photos from the main library.
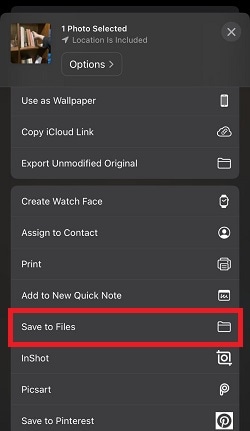
Step 2. Select Live Photos and save it to Files
Next, press the "Select" option and choose one or more Live Photos that you want to convert to still images. Once you've finished choosing, click on the Share icon and select "Save to Files." Choose the location where you want to save the photos, such as "Downloads," and tap "Save." The Live Photos will be converted to images, but they won't show in the Photos app yet.
Step 3. Open the Files app on your iPhone and go to the folder where you saved the converted photos.
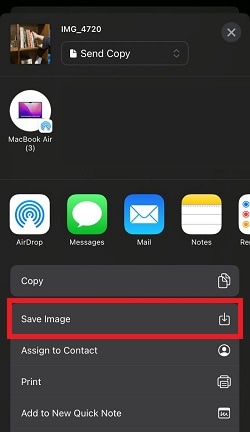
Step 4. Select photos and save images
Now, simply click on the three-dot icon and tap on "Select." Choose the photos you previously saved. Lastly, tap on the Share icon and select "Save images" from the menu. And finally, the converted Live Photos will now appear in the Apple Photos app on your iPhone.
Bonus: How to Make Your Photo Move and Talk without Live Photo
After exploring five easy ways to convert your Live Photos to still images, you might find yourself with a collection of static photos that you wish to add some dynamic flair to. While converting Live Photos to still ones can help you save storage space, you don't have to lose all the fun that animated pictures like Live Photos have. You can make your images move and talk using Virbo's Live Photo Converter!
With its talking photo feature, you can create a live video that can convey messages in a fun way by recording and typing the text you want your photo to say. It will add realistic mouth movements and facial expressions that synchronize with the audio.
Here's a step-by-step guide on how does it work:
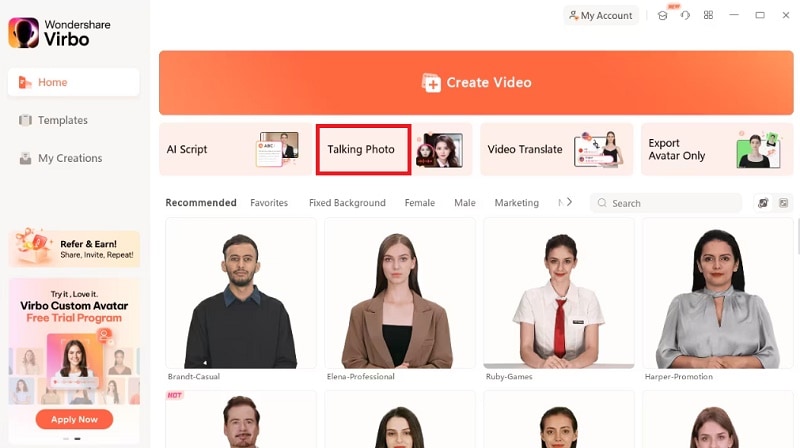
Step 1. Launch Wondershare Virbo and access its talking photo feature.
Wondershare Virbo is accessible on iOS, Android, desktop, and online platforms. But for this tutorial, we will use the desktop tool since it has a smoother experience. Once download Wondershare Virbo on your computer, find and select the "Talking Photo" feature to proceed.
Get App Free Get Started Online
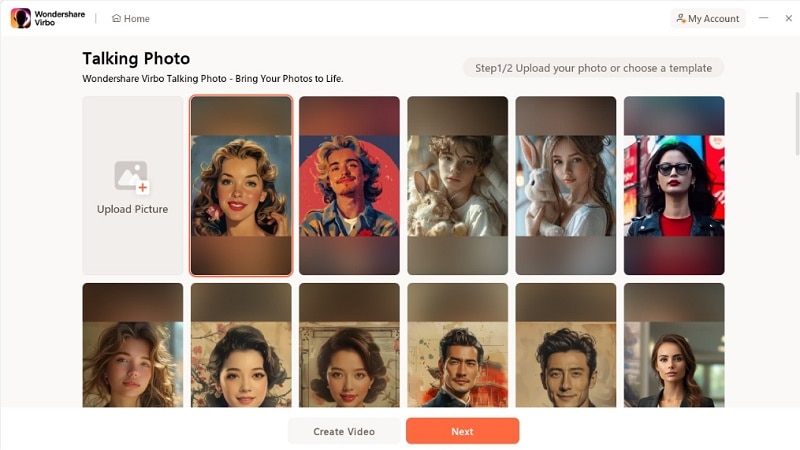
Step 2. Upload your still photo.
Once you're in the talking photo feature, you'll be presented with a selection of templates that you can use. To upload your photo, simply choose the "Upload Picture" option and then click "Create Video" to proceed.
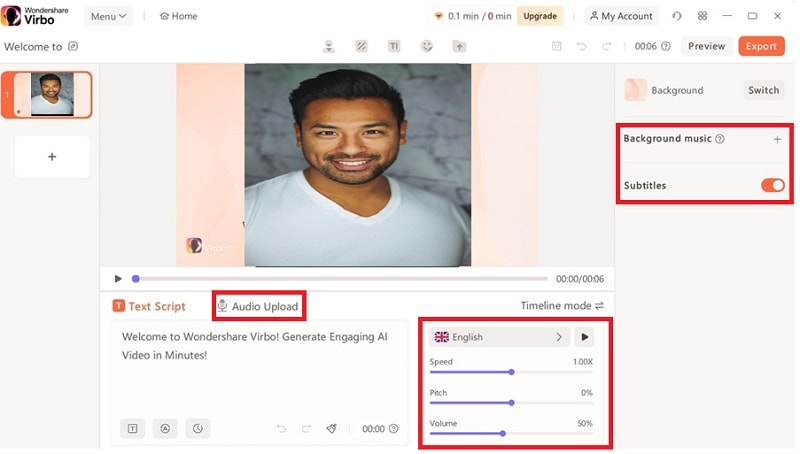
Step 3. Write your text and set a voiceover.
You can add a voiceover script by writing the text on the presented tab, or upload an audio file using 'Audio Upload'. Then, customize the language, playback speed, pitch, and volume of the audio. You can also choose background music from the options provided or upload your own. Enable the "Subtitles" option to add subtitles for a more accessible viewing experience.
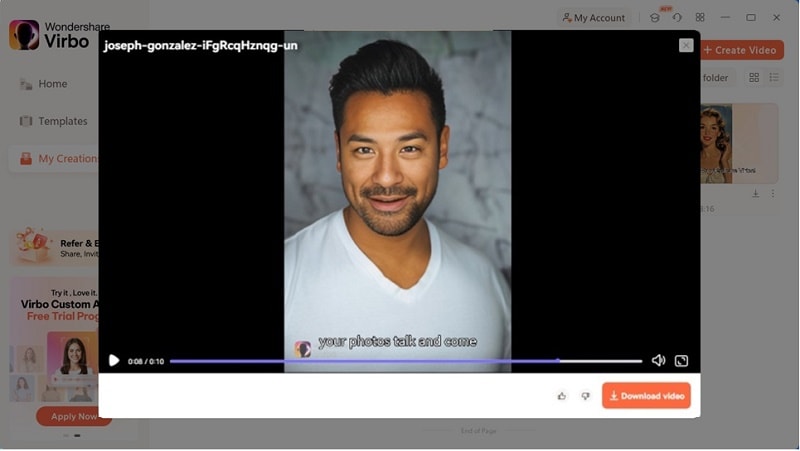
Step 4. Convert image to live video
After you've completed editing your talking photo, simply click on "Export Video" to generate it. Once the process is complete, you can locate the resulting talking photo in the "My Creations" section. Here, you'll be able to view your creation and click on "Download Video" to save it directly to your device.
Get App Free Get Started Online
Conclusion
Converting Live Photos to still images can significantly save storage space and streamline your photo management. This common issue, as highlighted by an Apple discussion user, can be easily resolved with the five methods we've outlined.
However, if you miss the dynamic aspect of Live Photos, you don't have to compromise entirely on the fun. With the Wondershare Virbo app, you can breathe new life into your still images. Its talking photo feature allows you to add realistic mouth movements and facial expressions, and even create engaging talking images by recording or typing the text you want them to say. This way, you can enjoy having efficient storage and animated, interactive photos.
Get App Free Get Started Online