Creating video content is already difficult enough. You have to invest quite a lot of time and effort into coming up with content ideas, planning out your shoots, producing your videos, and editing every last detail to ensure everything is perfect.
Adding captioning to it all can be overwhelming. Still, it seems that every content creator on YouTube is doing it – or is that true?
Are content creators typing out captions manually, or does YouTube automatically add subtitles to all videos? Can you enable YouTube automatic captions for your content? Let’s find out.
In this article
Can YouTube Generate Subtitles/Captions Automatically?
First things first – does YouTube automatically caption videos? The answer is both “yes” and “no”. Yes, YouTube does have speech recognition technology that enables it to create captions for most types of video content. But no, the option is not always available.
Primarily, if you want to have automatic YouTube subtitles as a content creator, you’ll first need to enable them through your profile (we’ll get into the details of how to do that in a moment).
Secondly, even if you do enable this option, it might not always work. Automatic subtitles for YouTube videos might not appear if your videos are too long or if your sound quality is subpar. They also might not work (or at least not work well) if you have overlapping speech during discussions, for instance, or if you’re using multiple languages in your videos.
Speaking of languages, automatic subtitles on YouTube are only available in a handful of them – English, Spanish, German, Dutch, French, Italian, Portuguese, Japanese, Korean, and Russian. If your content is in any other language, you won’t be able to add subtitles to your YouTube video automatically.
Benefits of Having Captions/Subtitles on YouTube Videos

Considering that they can be a bit fussy at times, you might be wondering if there’s even a point to automatic closed captioning on YouTube. If you want to ensure viewer satisfaction, there certainly is. Some of the main benefits include:
- Reaching a wider audience – those hard of hearing and those who might not speak your native language well will be able to enjoy your content just like any other viewer;
- Offering greater viewer convenience – many regular viewers can’t or won’t watch videos with audio on, so offering subtitles will prove to be most convenient for them;
- Increasing engagement – it’s easier for most viewers to follow along with your video and understand your content when they have access to subtitles. The subtitles can retain their focus and increase their engagement with your content;
- Retaining viewers – with both audio and visual content, viewers get more immersed in your videos and are more likely to come back for more;
- Improving SEO – as of yet, search engines don’t process audible information and, therefore, don’t use it to determine your ranking. If you add subtitles and include text-based keywords and key phrases, you’ll make it easier for search engine crawlers to identify what your videos are about and rank you better.
All things considered, it’s much better for you and your viewers to add automatic subtitles to your YouTube videos than to leave them blank.
How to Add Automatic Captions/Subtitles on YouTube
Provided that your videos are of appropriate length and in a language supported by YouTube’s speech recognition technology, enabling captions is a breeze.
Here’s how to get automatic subtitles on your YouTube content:
Step 1: Sign in to your YouTube account and click on your profile picture in the upper right-hand corner;
Step 2: Click on YouTube Studio;

Step 3: Go to Content and find the video you want to add subtitles to;
Step 4: Click the Details icon;

Step 5: Scroll down the details page and click Show More;
Step 6: Under Language and captions certification, select the language used in the video and click Save;

Your video should now have automatic YouTube subtitles. You can double-check to see if everything works well.
How to Edit Automatic Captions/Subtitles on YouTube
Even if the sound quality of your video is flawless, you might have to make some changes to YouTube’s automatic captions. Here’s how to edit auto-captions on YouTube:
Step 1: Go to YouTube Studio > Content and select your video;
Step 2: In the panel on the left-hand side under Your Video, scroll down to Subtitles;

Step 3: Under Subtitles, select Edit > Duplicate and Edit > Continue;
Step 4: Edit the existing draft, and when you’re done, click Publish.

As a general rule of thumb, you’ll need to wait one or two days after initially publishing your video to be able to edit the automatic captions.
How to Enable Automatic Captions as a Viewer
While content creators have to fiddle about a bit to automatically add subtitles to their YouTube videos, the viewers can enable this option in just a few clicks.
Here’s how to add automatic captions to YouTube videos as a viewer:
Step 1: Sign in to your YouTube account and click on your Profile picture in the upper right-hand corner;
Step 2: Scroll down and click on Settings;

Step 3: Go to Playback and Performance;
Step 4: Next to Subtitles and Closed Captions, check the boxes by Always show captions and Include auto-generated captions (when available);

Next time you’re watching a YouTube video, the captions should automatically turn on if available. You can enable or disable them on a specific video by clicking on the CC icon in the lower right-hand corner.
The Accuracy of YouTube’s Automatic Captions/Subtitles
While they’re certainly convenient, YouTube’s automatic captions have one major flaw – they’re notoriously inaccurate. Not only are countless punctuation mistakes all but guaranteed, but the automatic subtitles are also prone to embarrassing mistakes that could harm your viewership.
Therefore, if you want to enjoy any of the actual benefits of including subtitles in your YouTube content, you’ll always want to thoroughly edit the captions as soon as possible. Unfortunately, that could take a couple of days, as mentioned.
A Better Alternative: Generating Subtitles With an AI Video Translator
If you don’t want to deal with the inaccurate automatic YouTube captions, you’ll need to create subtitles of your own. Don’t worry; you don’t have to do so manually, especially with the help of Wondershare Virbo.
Wondershare Virbo is an all-around video generator with powerful AI capabilities that will help you create engaging content with the utmost ease. It’s feature-packed yet lightweight, making it the perfect solution for YouTube content creators.
You can use it to create custom AI avatars, generate AI scripts, create AI talking photos, add automatic video narration, and so much more. What’s best, you can use it to automatically create captions and translate your YouTube videos in over 40 different languages in just a few clicks:
Step 1: Download Wondershare Virbo or just head to the Virbo online version by clicking the buttons below and register your account;
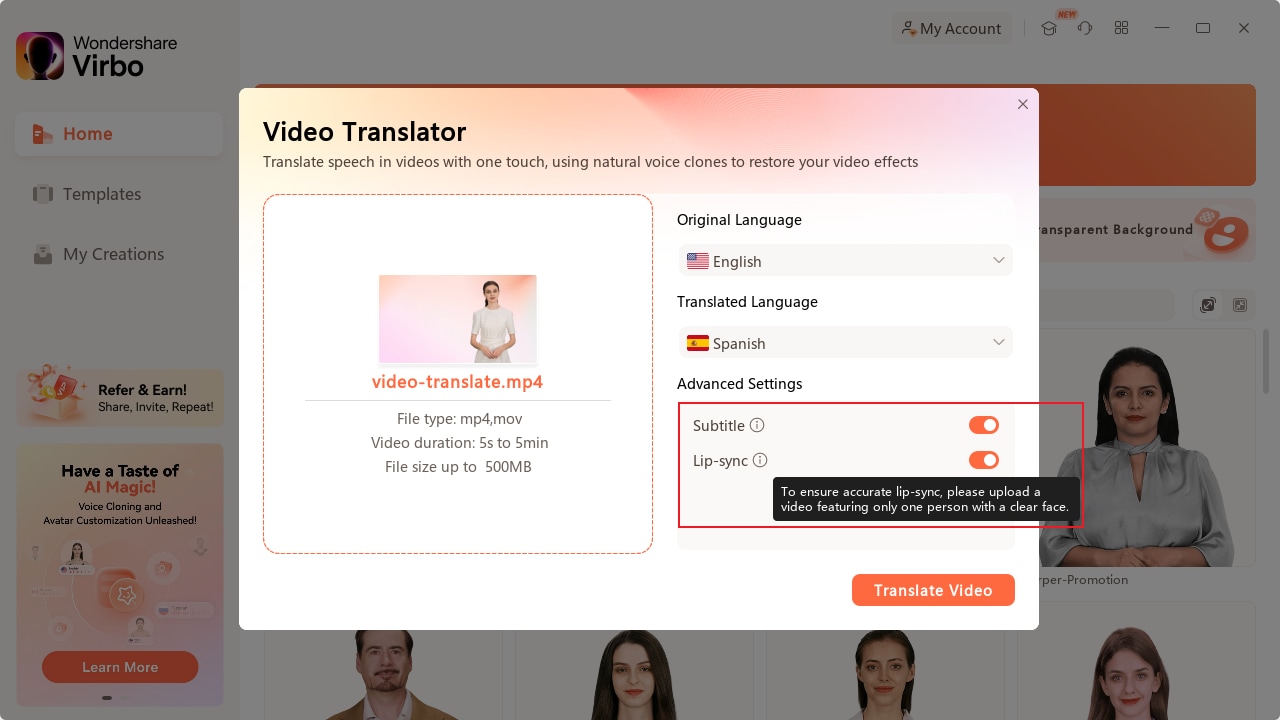
Step 2: Select Video Translator from the main menu;
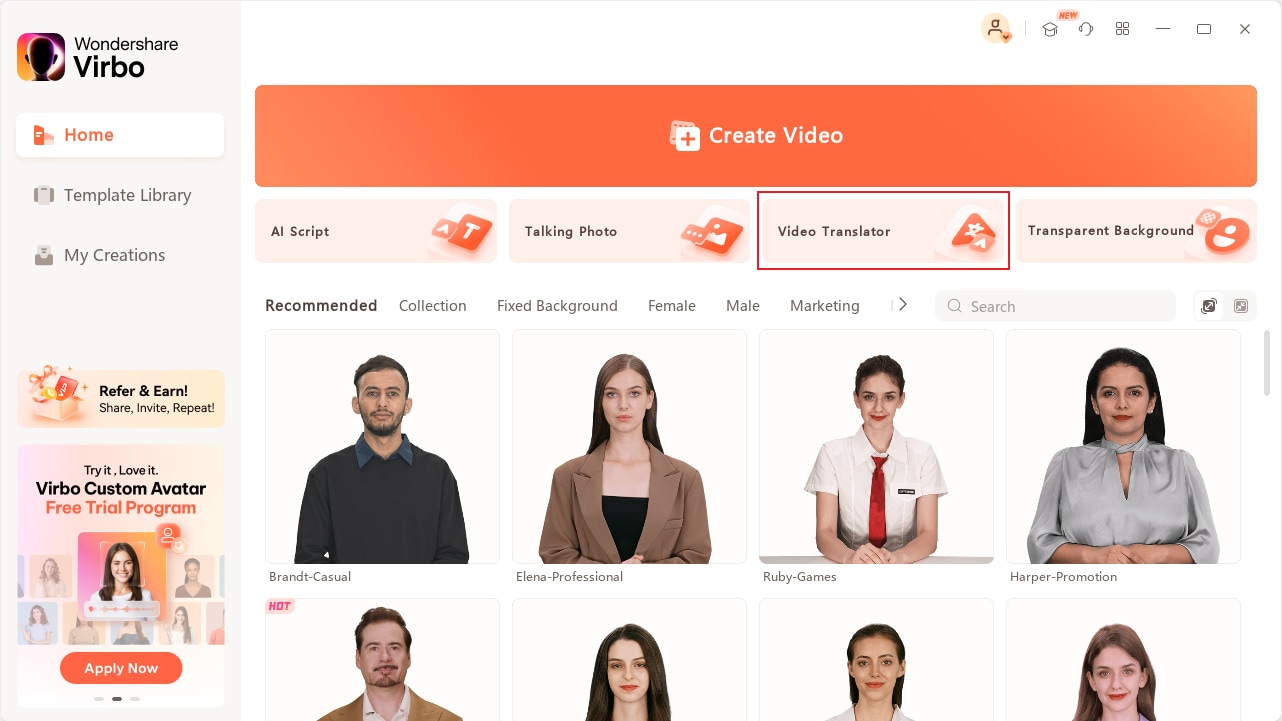
Step 3: Upload your video;
Step 4: Specify the Original Language of your video and your preferred Translated Language (they can be the same);
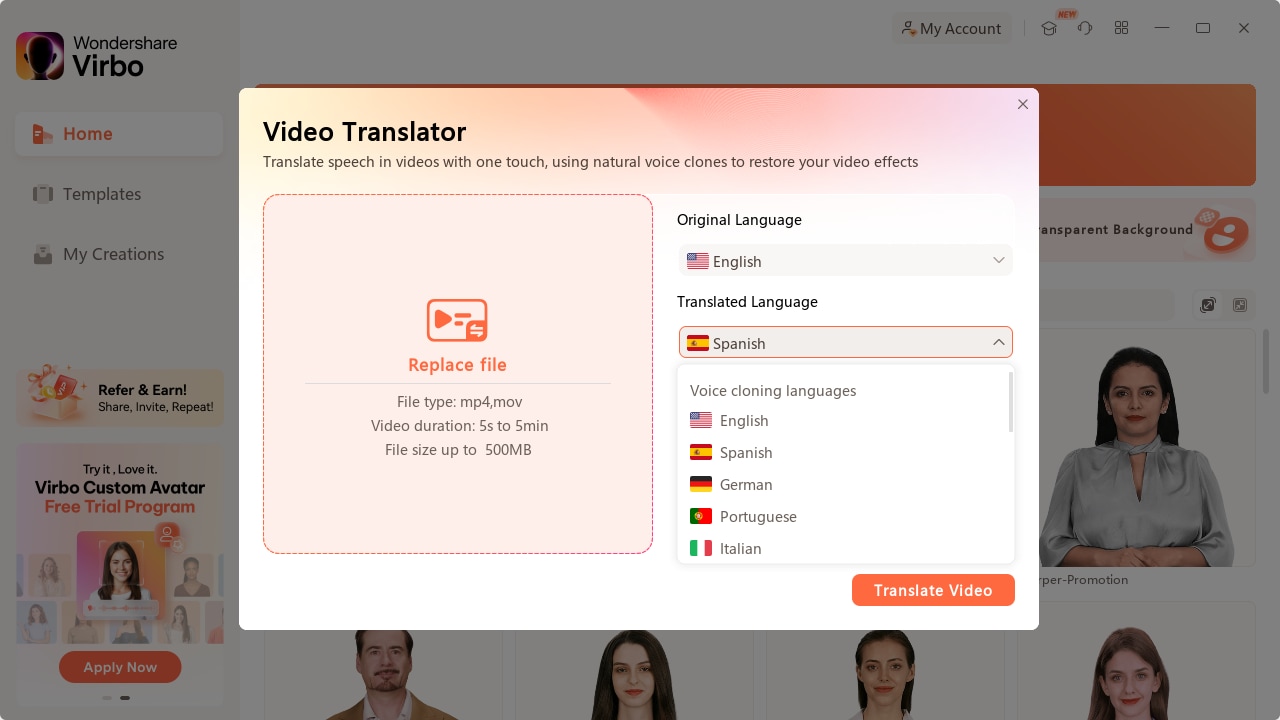
Step 5: Adjust advanced settings as needed and click Translate Video.
Depending on the length of your video, its overall quality, and the language(s) you’ve selected, the translation could take some time. Let Virbo complete the translation process then export your completed video.
Generating Automatic Captions With DemoCreator
If you rarely find yourself needing subtitles in multiple different languages, a better alternative for you might be Wondershare DemoCreator. It’s an advanced video recorder and editor that comes packed with useful tools that can assist you every step of the way as you’re creating and perfecting your content.
With DemoCreator by your side, you can record webcam videos with ease, capture your screen activity, create gameplay content, video presentations, and so much more. Its editor is even more impressive, allowing you to make your videos truly your own. Add over 50,000 creative assets, use convenient annotations, change the sound of your voice, and apply beauty filters to stand out to your viewers.
Once you’re done creating your content, generate accurate automatic subtitles in over 90 different languages! DemoCreator used advanced speech recognition to minimize errors and ensure your captions need minimal editing.
Here’s how to add automatic captions and subtitles using Wondershare DemoCreator:
Step 1: Download DemoCreator and register your account;
Step 2: Navigate to the Video Editor;
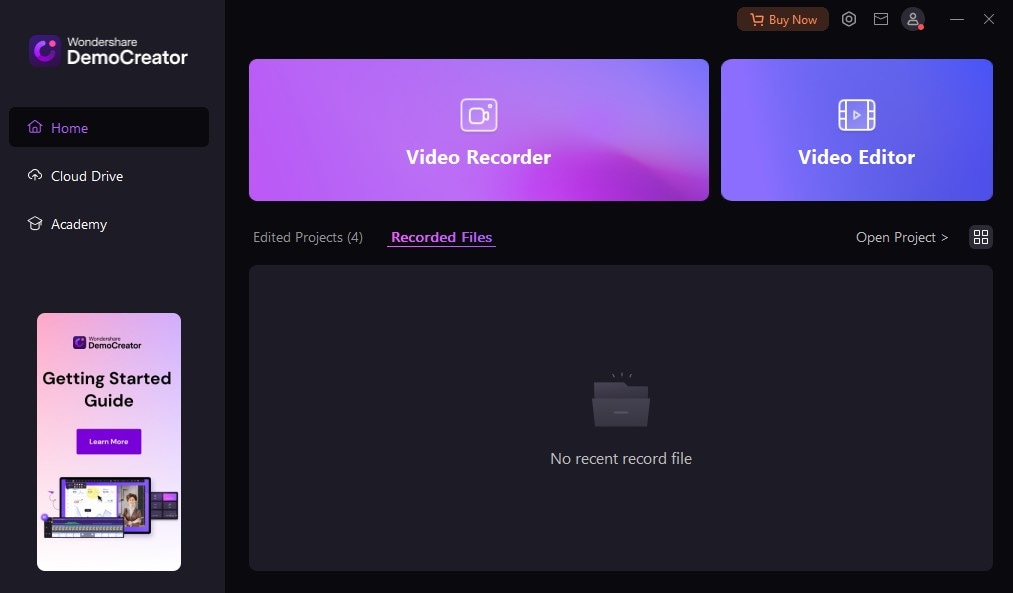
Step 3: Import your video and drag it to the timeline;
Step 4: Click the Speech-to-Text icon, select Auto Subtitles, and specify the language used in your video;
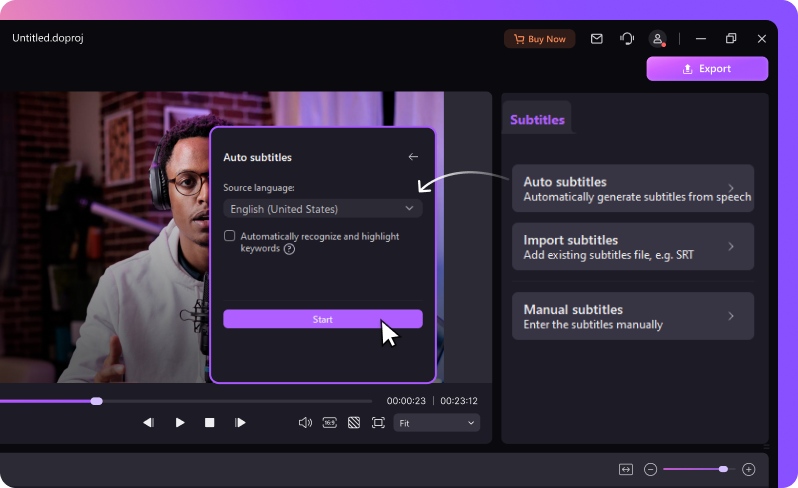
Step 5: Check the box to Automatically recognize and highlight keywords (if needed) and click Start;
Step 6: If you want, customize the subtitle style and export the video with embedded captions.
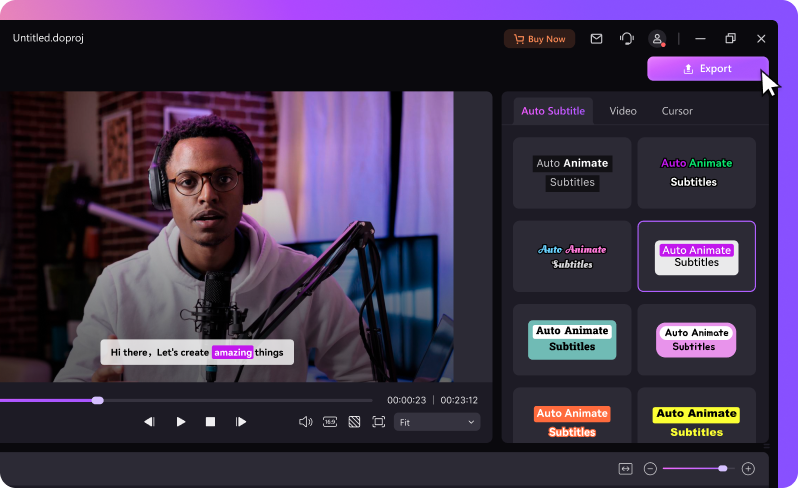
Although DemoCreator offers high transcription accuracy, it’s always in your best interest to double-check the captions before saving the video. After all, if there is excessive background noise in your video or the audio isn’t clear, there could be some minor mistakes that require editing.
Once you’re satisfied with the captions, you can then directly upload your video to YouTube (or any other platform) and reap the benefits.
Conclusion
YouTube’s automatic captions can be highly beneficial for both content creators and viewers. However, they’re only available in a handful of languages, and they’re often highly inaccurate. If you want flawless captions and subtitles for your content, you’ll be much better off using advanced alternatives like Wondershare Virbo or DemoCreator.


