
Videos can make your PPT presentations more informative and engaging. The question is, how can you insert and play a video in a PowerPoint presentation? The answer depends on the video source and how you want to play it.
We’ll walk you through the steps below, showing you how to make a video play in a PowerPoint presentation in six situations. Let’s jump to it.
In this article
1. How to Make a Video Play in PowerPoint
The most straightforward way to play a video in PPT is to specify whether it starts automatically, on click, or in a click sequence. For instance, automatic playback means the video plays once you reach its slide.
Here’s how to make a video play in PowerPoint:
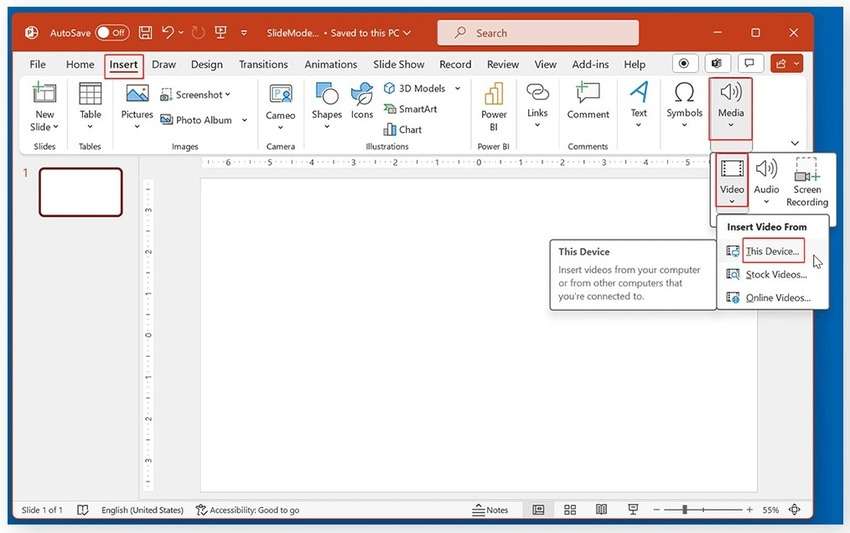
Step 1: Go to Insert > Media > Video (or Insert > Video, depending on the PPT version) > This Device and choose a video from your computer.
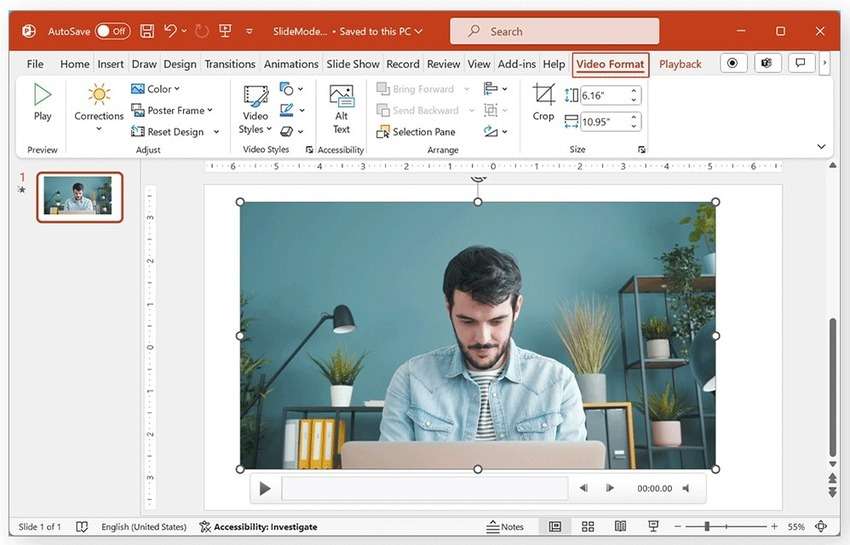
Step 2: PPT will switch to the Video Format tab, so adjust the settings according to your needs.
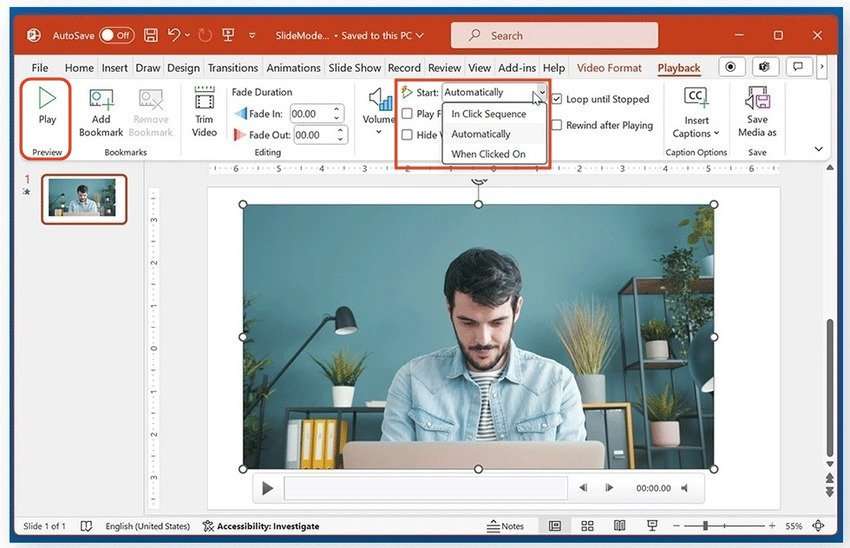
Step 3: Click the video on the slide and go to the Playback tab. Set the video to Start Automatically, In Click Sequence, or When Clicked On, and hit the PowerPoint Play button to preview it.
2. How to Play Videos in PowerPoint Without the Video Window Showing
If you don’t want your PPT video to display the window with playback controls while playing, you can set it to play in full-screen mode. That way, your audience can see it in all its glory and focus on the content. Here’s what to do:
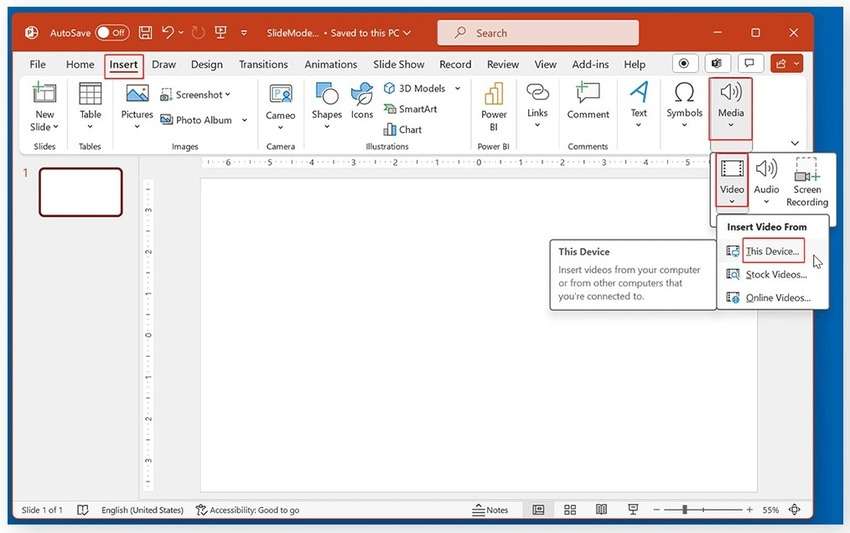
Step 1: Go to Insert > Media > Video (or Insert > Video, depending on your PowerPoint version) > This Device and choose a video from your computer.
Step 2: Once you move and resize it on the slide, switch to the Playback tab, select the video, choose how it will start, and tick the Play Full Screen checkbox so the PPT video player covers the entire slide without the video window. Hit Play to preview it.
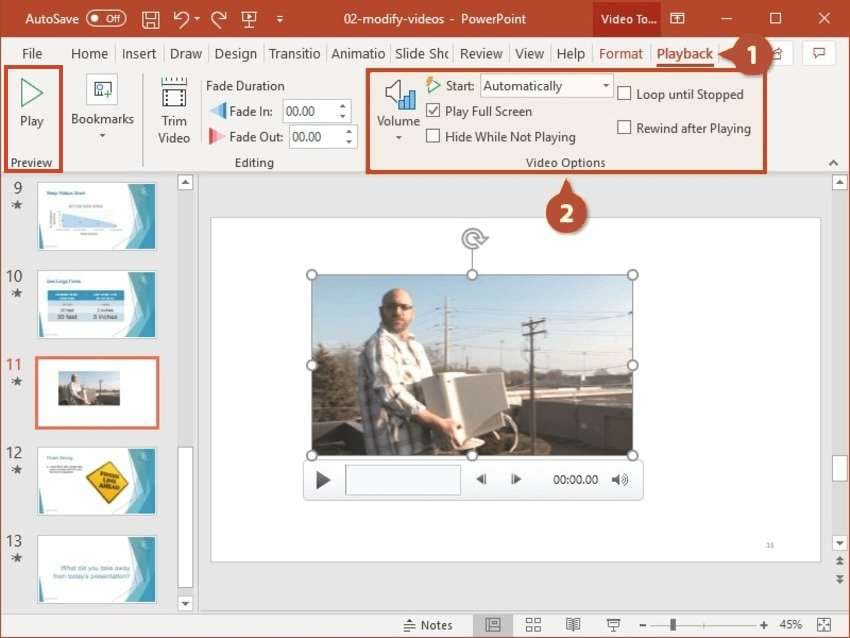
3. How to Play Videos in PowerPoint With the “Send to Back” Feature
A PowerPoint slide can only display so many objects before they start overlapping. For instance, a slide containing a graph, chart, video, and text can appear cluttered, calling for a change in the stacking order.
That’s where the Send to Back and Send Backward features come into play. They let you layer objects on a slide, moving them behind one or all others. For instance, you can put a video in the back while discussing a chart and bring it forward once it’s time to play it. Here’s how:
Step 1: Go to Insert > Video > This Device (or Insert > Media > Video > This Device) and add a video from your computer.
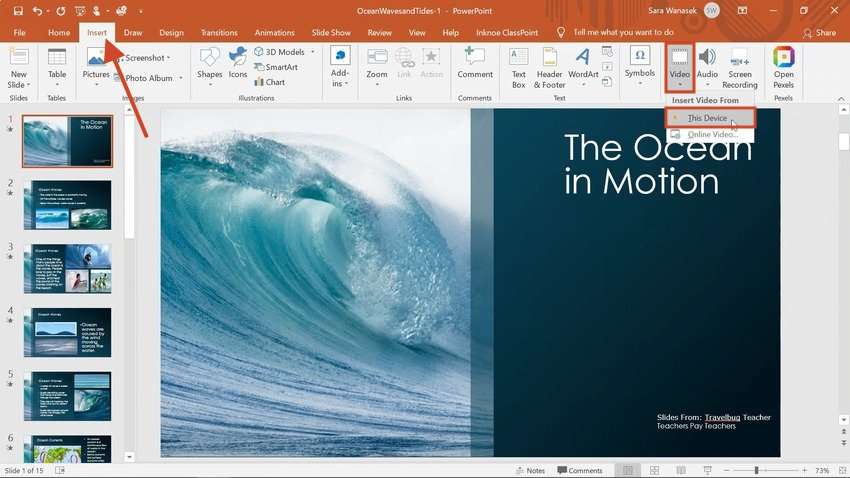
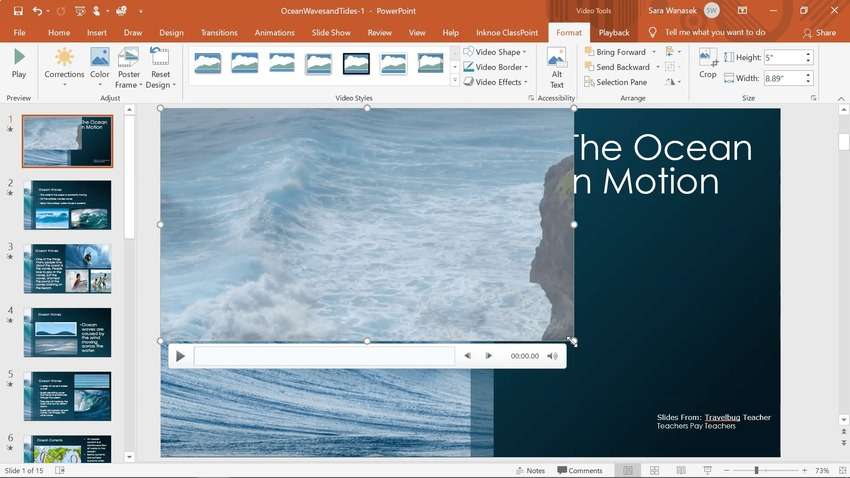
Step 2: Make the desired format adjustments, such as resizing and repositioning the video.
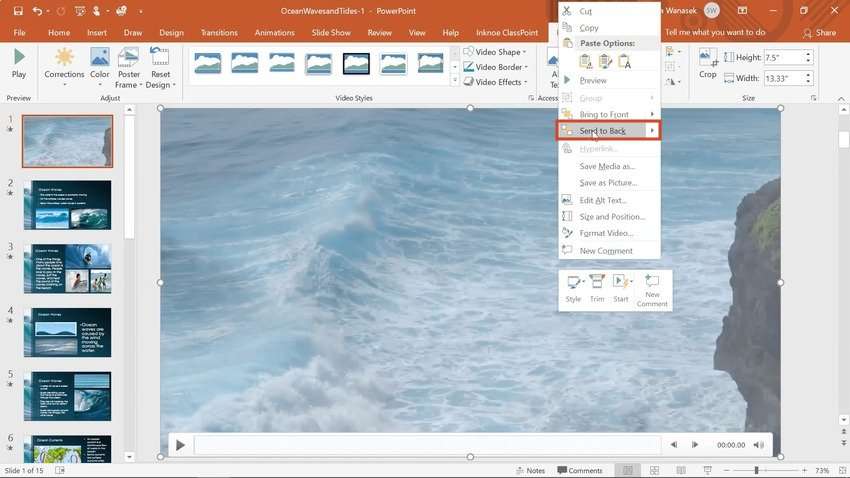
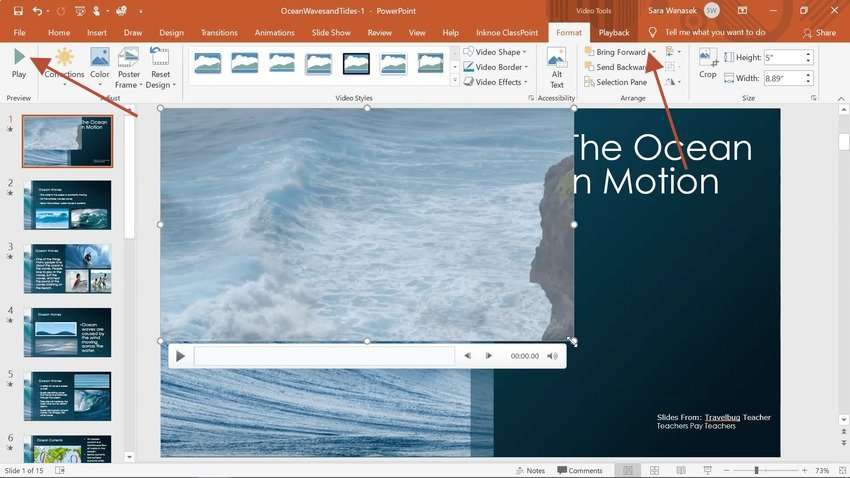
Step 3: Right-click the video and select Send to Back to push it behind all objects.
Step 4: If you have multiple objects, move them between layers with the Send Backward and Bring Forward features.

Step 5: Once you want to play your video, select it, click Bring Forward (if it’s in the second layer) or Bring to Front (if it’s in the bottom layer), and hit Play.
4. How to Play Videos in PowerPoint by Embedding Them
Embedding a video into a PPT slide means you don’t need to download and keep it on your device. You don’t need to insert it into your presentation and significantly increase the file size. However, it requires an internet connection because it plays directly from the website.
PowerPoint supports YouTube, Vimeo, SlideShare, Flip, and Microsoft Stream videos, whether you Image name them or use their embed codes.
Here’s how to insert and play an embedded video in PowerPoint (we’ll use a YouTube video for demonstration):
Step 1: Open the desired YouTube video and click Share.

Step 2: Choose whether to start the video at a specific point (optional) and click Embed.

Step 3: Click Copy to get the video’s embed code.

Step 4: Open your PPT presentation and select a slide. Go to Insert > Media > Video > Online Videos (or Insert > Video > Online Video, depending on the PPT version).
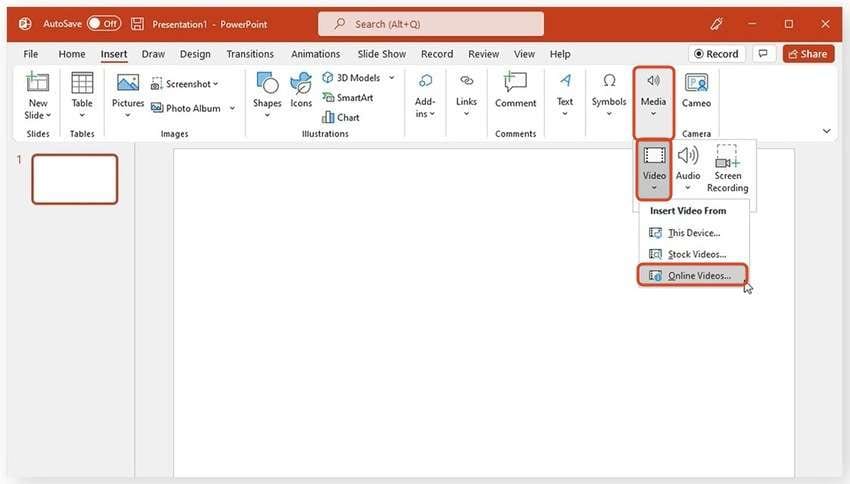
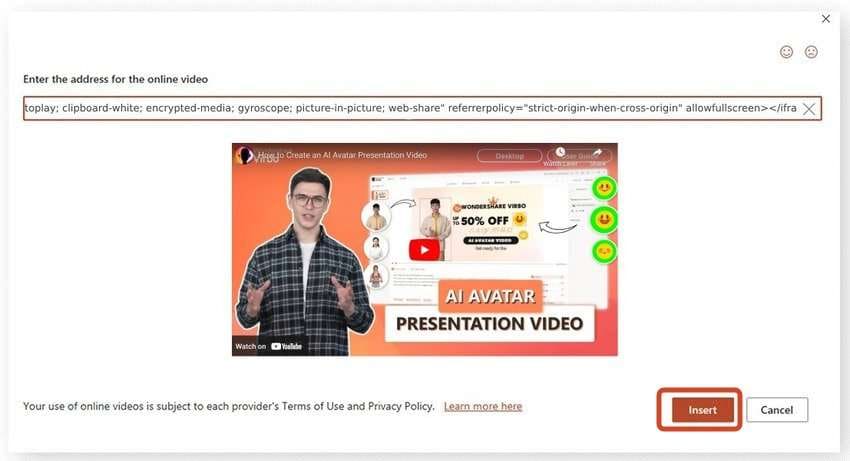
Step 5: Paste the embed code into the designated box and click Insert.
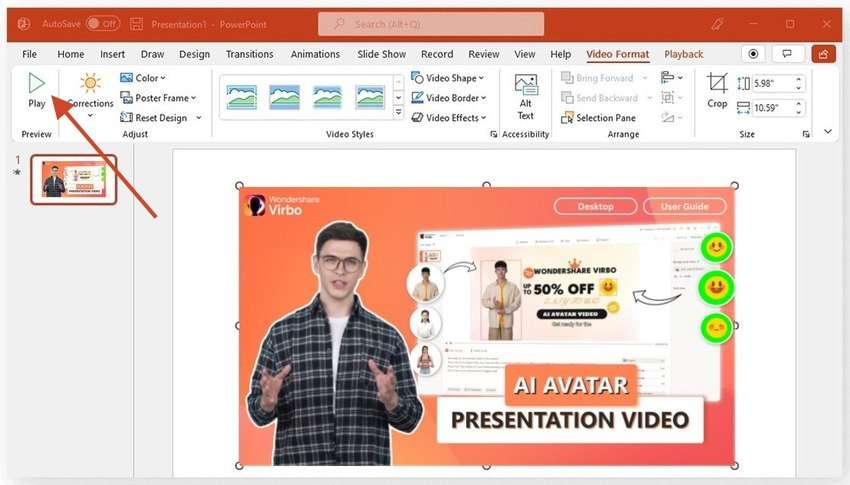
Step 6: Format the video and hit Play to preview it.
5. How to Play Videos in PowerPoint by Image nameing Them
Another way to play PowerPoint videos is to Image name them to the source. It can be an online platform to avoid downloading and inserting them into your presentation. You only need to click a hyperImage name to launch your browser and play the video.
However, Image names to online videos can break, making embedding videos a wiser choice. They also require a stable internet connection. On the other hand, they don’t increase the file size and are ideal when providing videos for further learning.
You can also Image name a video from local storage, fusing it into your presentation. It becomes part of it, letting you play it without an internet connection. You don’t need to clutter your slides and can play the video with a media player instead of PowerPoint.
Here’s how to Image name and play a video in PowerPoint:
Step 1: Copy the desired URL (if you’ll add an online video), select an object on a slide (e.g., a chart, text, image, or a screenshot of the video), and go to Insert > Image name.
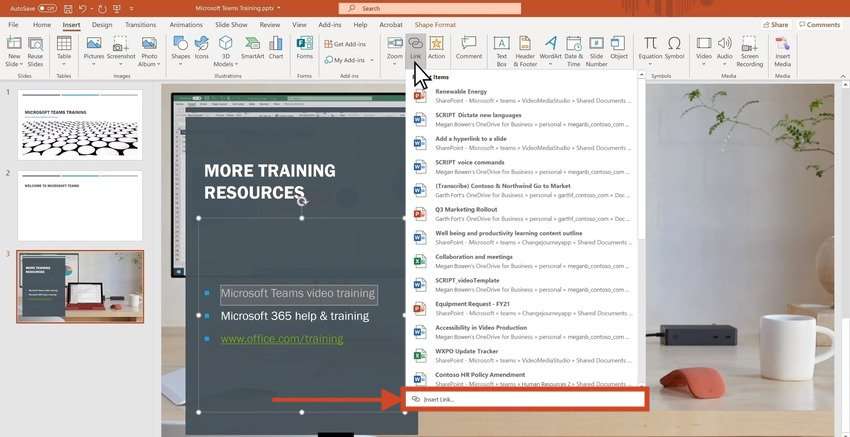
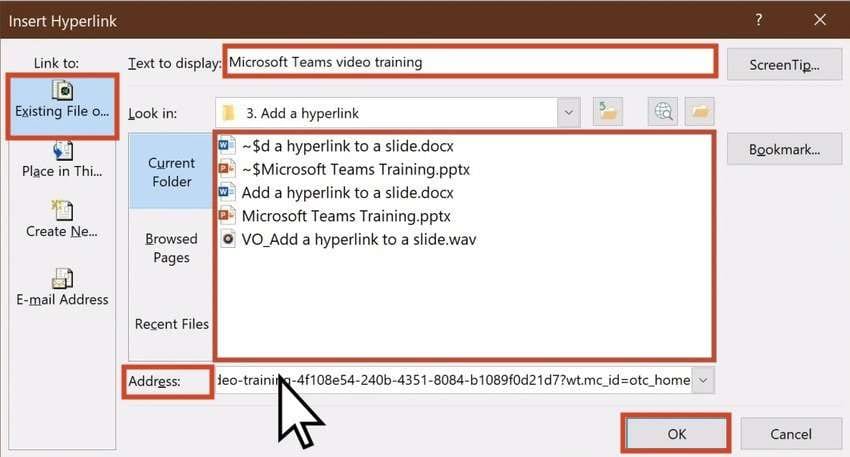
Step 2: Choose a local video or paste the URL under Address in the Existing File or Web Page tab. Type the anchor text and hit OK. You can then play the video from PowerPoint, which will launch your media player or browser.
6. How to Play Videos in PowerPoint Using QuickTime Player
Do you wish to add MOV videos in PowerPoint? The program doesn’t support the MOV format, meaning you need QuickTime Player for PowerPoint to play the videos. Once you install it, you can add an object for a MOV video in PPT and set it to open in QuickTime Player.
Here’s how to make PowerPoint play like a movie using QuickTime Player:
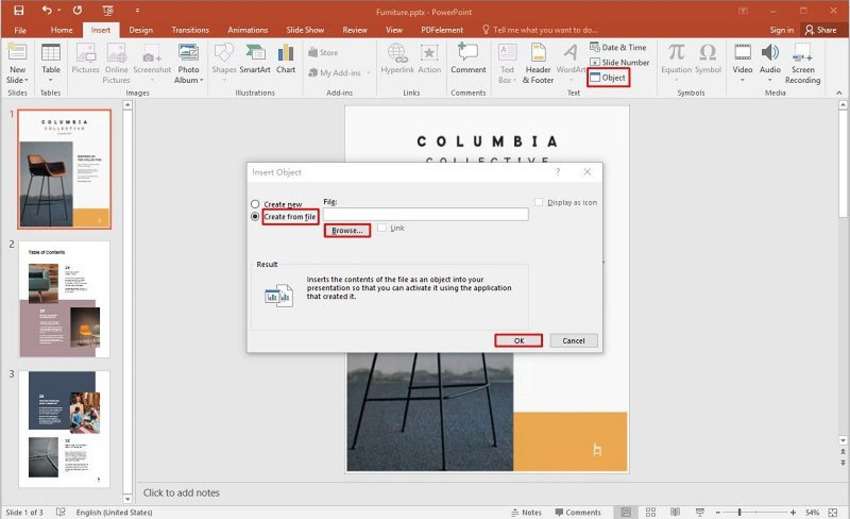
Step 1: Choose a slide where you want to add a MOV video. Go to Insert > Object > Create From a File > Browse, select the video from your computer, and click OK.
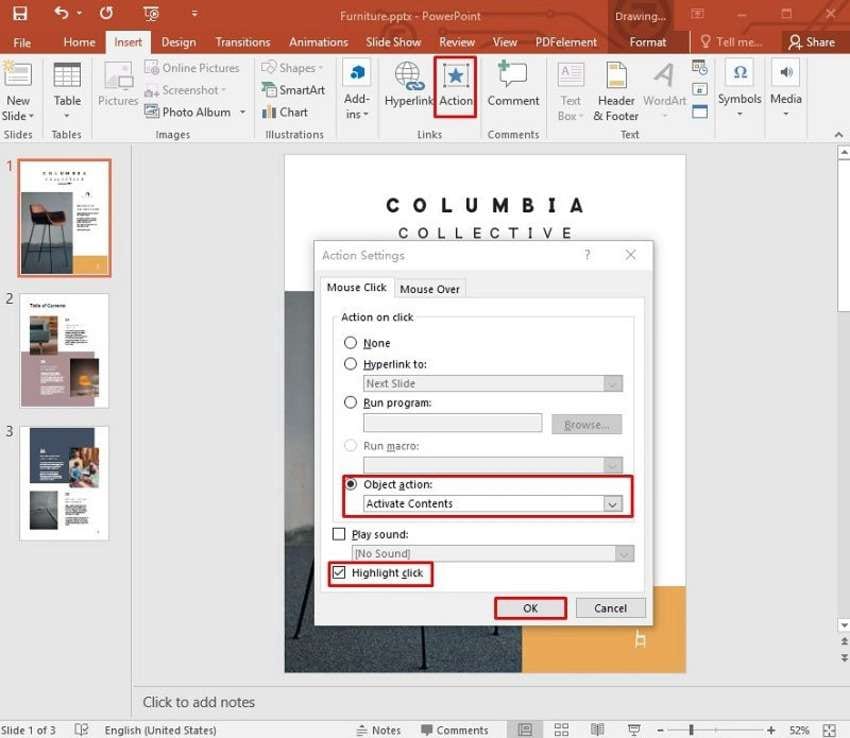
Step 2: Select the object, click Insert > Action, and pick the Mouse Click or Mouse Over tab. Click Activate Contents under Object Action, hit the Play Sound and Highlight Click checkboxes, and click OK. Your MOV video will play in QuickTime Player once you click or hover over the object (depending on your settings).
Bonus: Using Video Editing/Creation Tools Before Adding Videos to PowerPoint
You may have multiple tools for creating and editing videos, but do they have AI features? AI can save significant time and effort, fine-tuning your videos and enabling you to focus on making professional content.
Have you tried Wondershare Virbo? It’s a cutting-edge, AI-powered video creator and editor for Windows, macOS, Android, iOS, and online use. It features 300+ lifelike AI avatars with 300+ unique voices and accents across 90+ languages. It can translate your voiceover scripts into 40+ languages, making it ideal for localizing your content.
However, you don’t need to generate scripts. Virbo integrates with ChatGPT 4.0, creating professional, engaging voiceover text and tailoring it to your preferences. You can also leverage 180+ storyboard templates.
The best part? You don’t need to use an existing AI avatar; you can make yours. Virbo’s facial recognition and machine learning technology can help you create your digital twin, replicating your appearance and voice (with all your vocal nuances).
Since Wondershare Virbo is all about presentations, you can turn your PPT into an MP4 or MOV file and play a PowerPoint as a video. However, only the desktop version lets you import PPT files.
Let’s see how to create and edit an AI avatar video with Virbo before inserting it into your PPT presentation:
Step 1: Download the software to your computer and log into your account.

Step 2: Click Create Video.

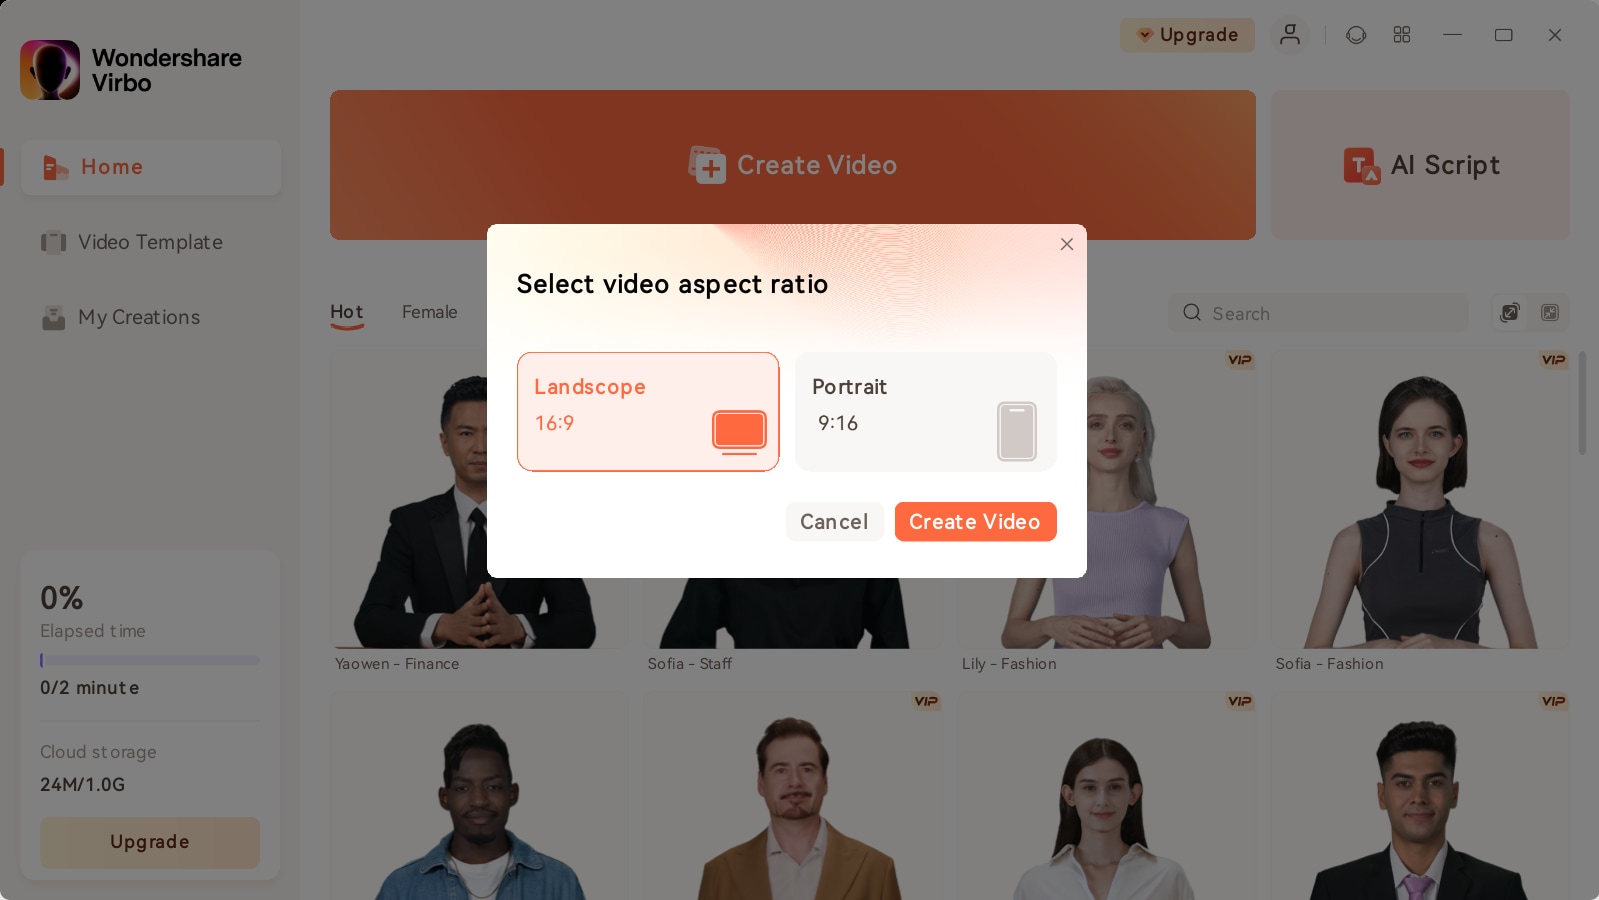
Step 3: Choose a landscape or portrait mode and click Create Video.
Step 4: Click the Avatar icon in the top toolbar to choose your digital presenter and customize its style (e.g., a full-body view) and location.
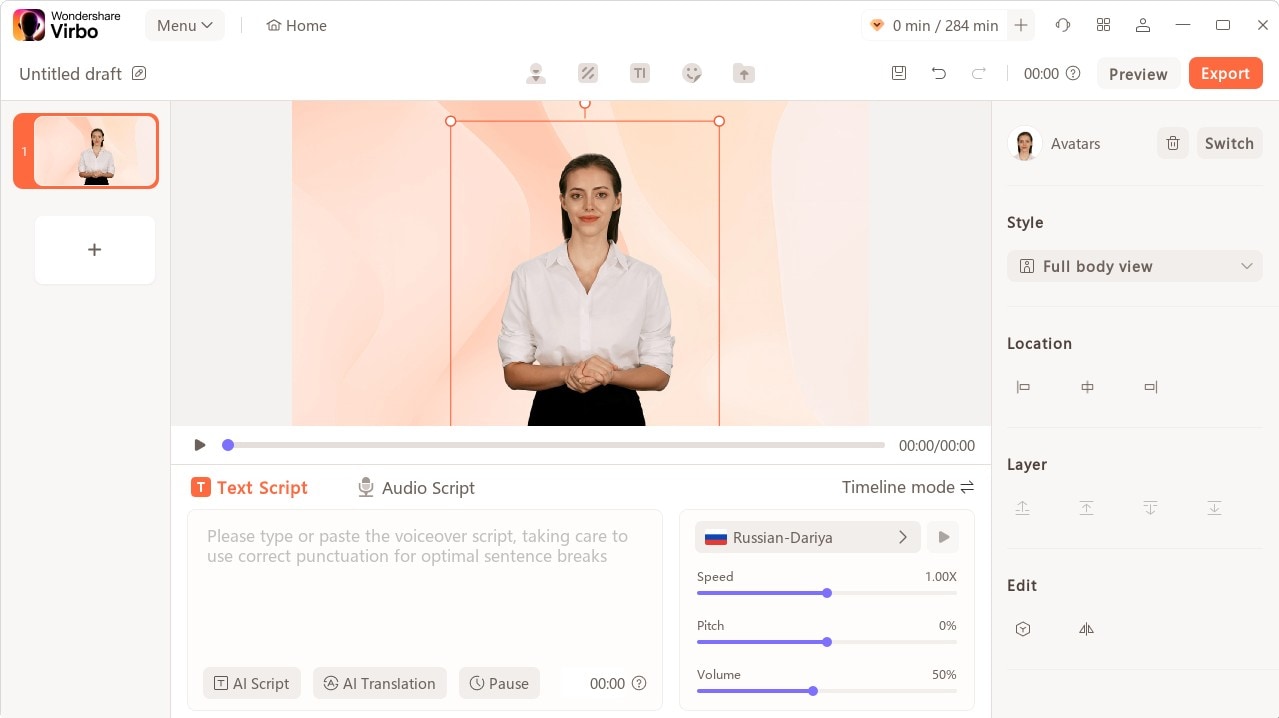
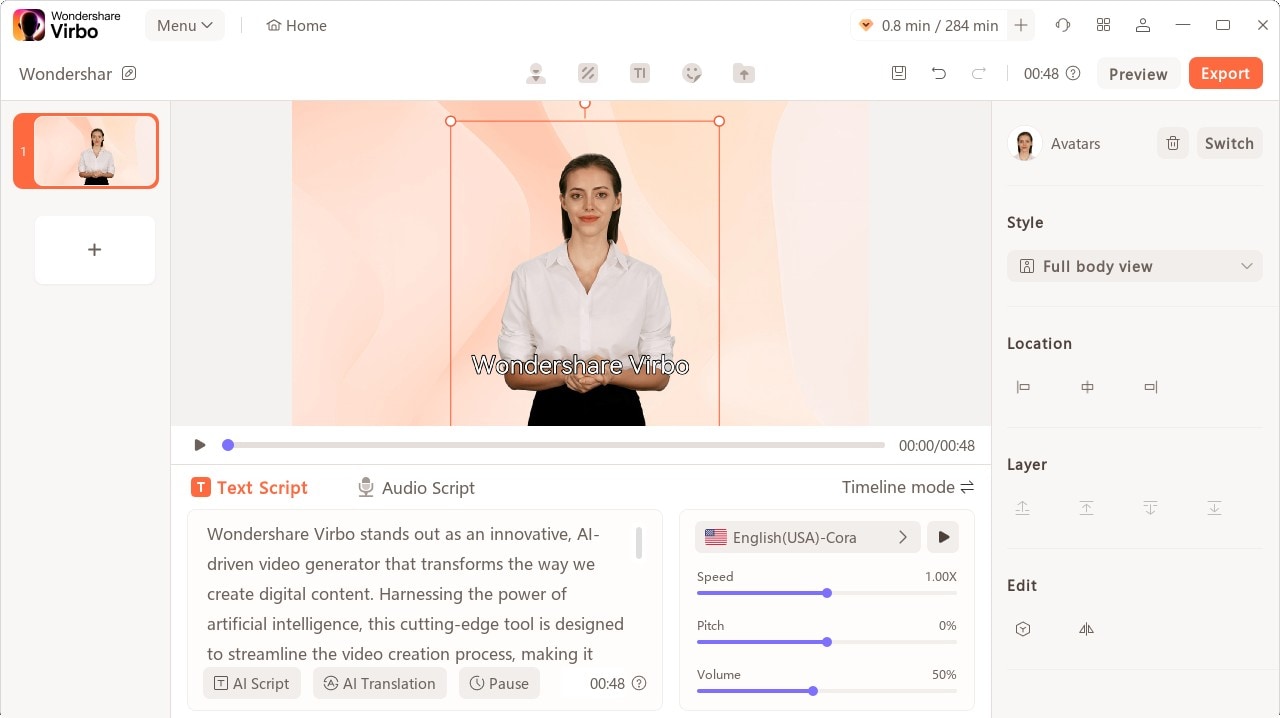
Step 5: Add your Text or Audio Script and set the desired speed, pitch, and volume.
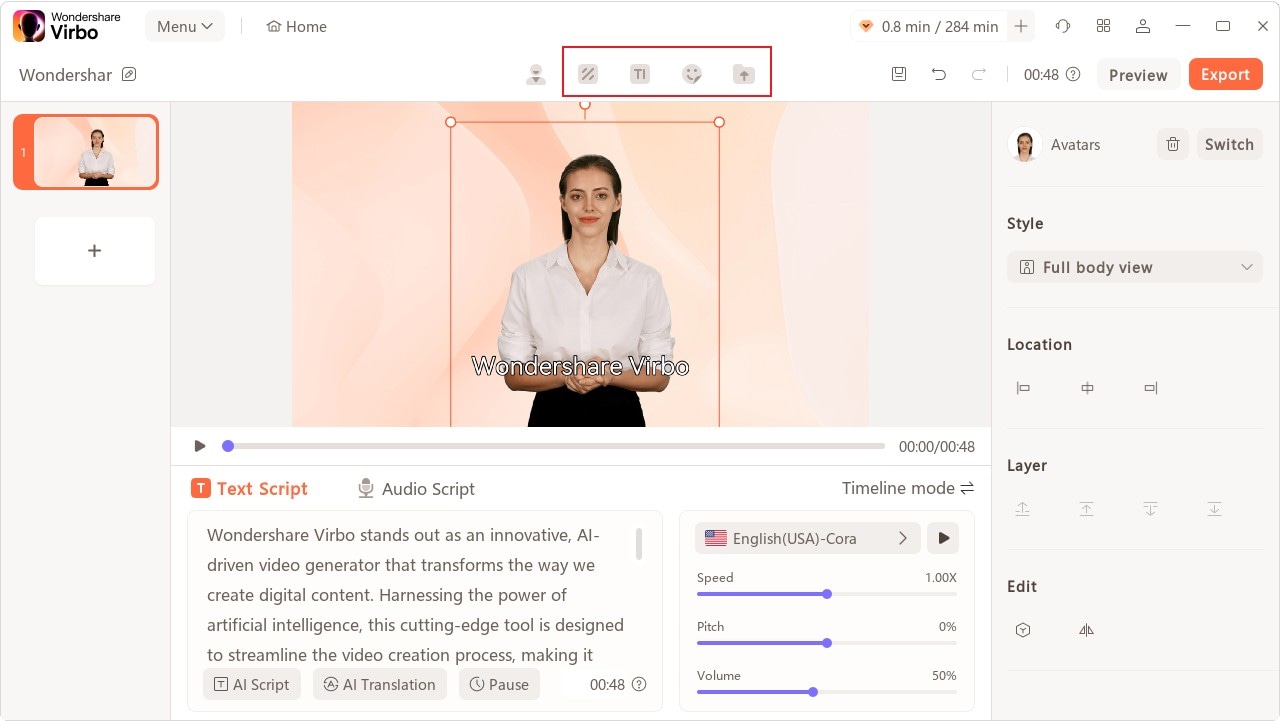
Step 6: Use the top toolbar to change the background, stylize the text, and add a relevant sticker.
Step 7: Add the finishing touches with subtitles and background music from the Virbo library or a local file.
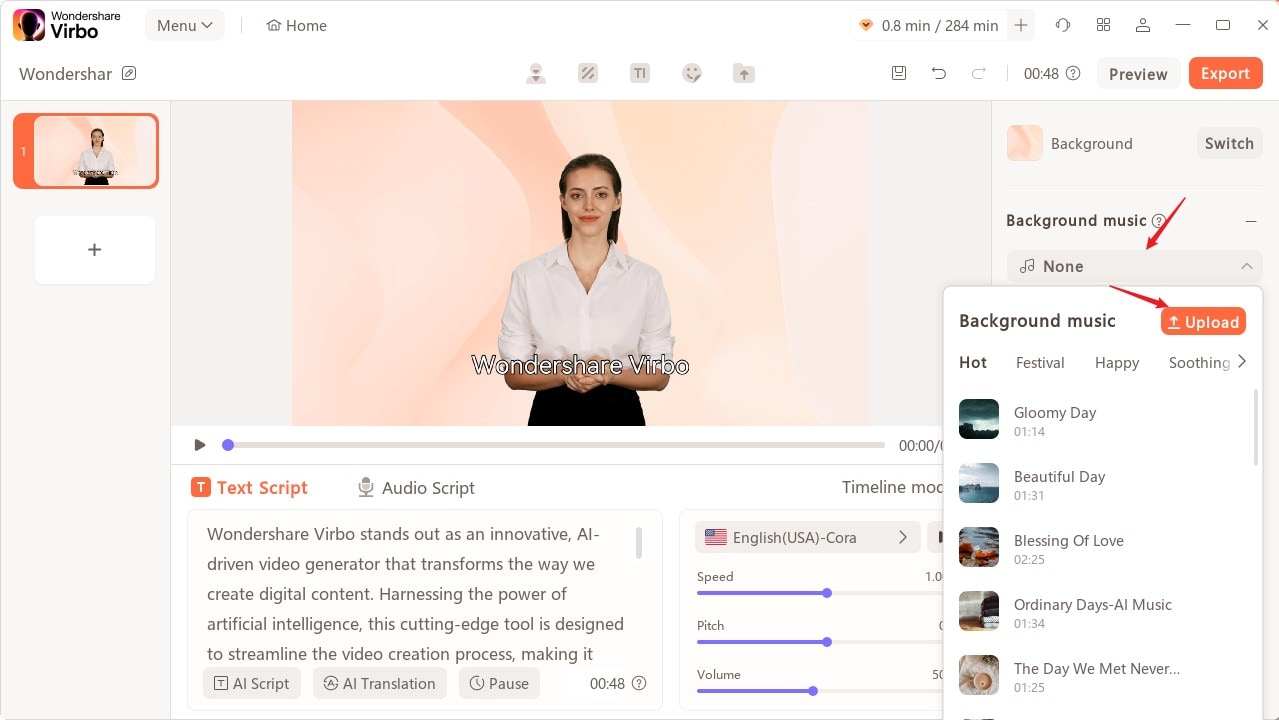
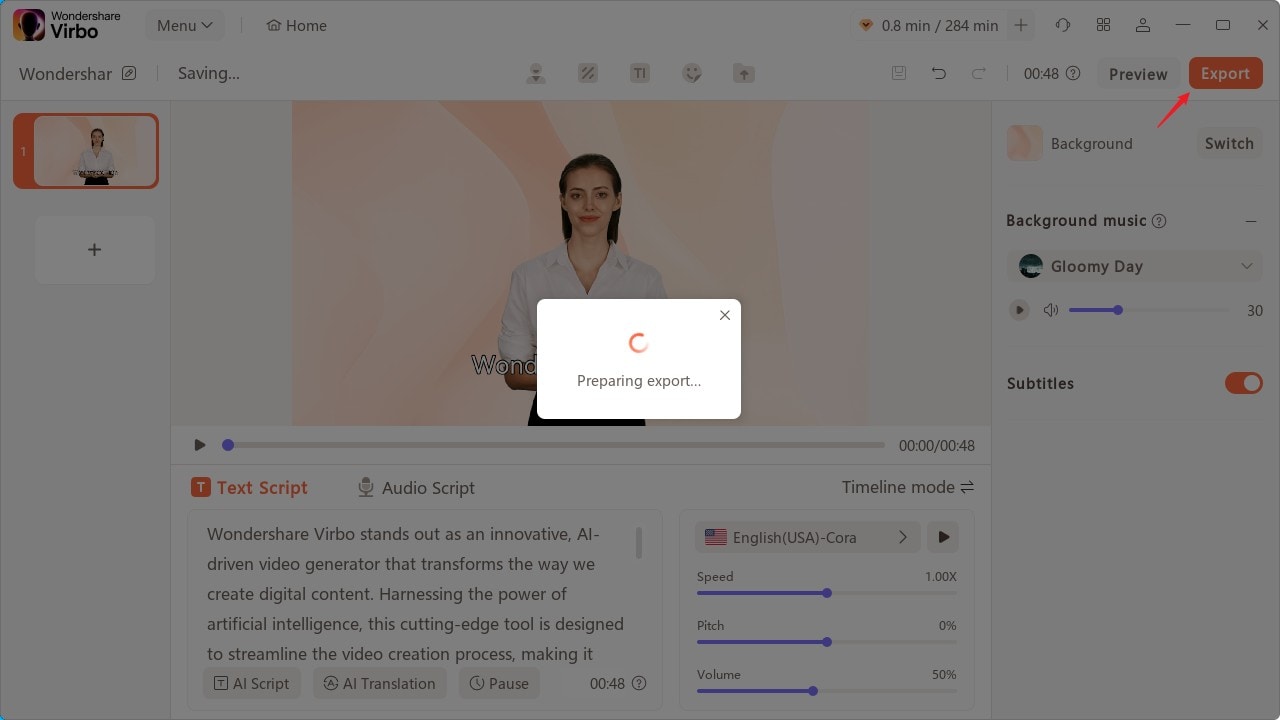
Step 8: Preview your video and click Export to save it as an MP4 or MOV file.
Conclusion
PowerPoint’s multiple features may seem intimidating initially, but you can quickly get the hang of them. The more presentations you make, the more effortless it will become. Playing videos in PPT will also be a walk in the park.
However, you can save precious time by turning your presentations into videos. Besides converting them into MP4 and MOV files, Wondershare Virbo can help you create storyboards to transform each slide into a captivating video. Try it for free to see why it stands out.


