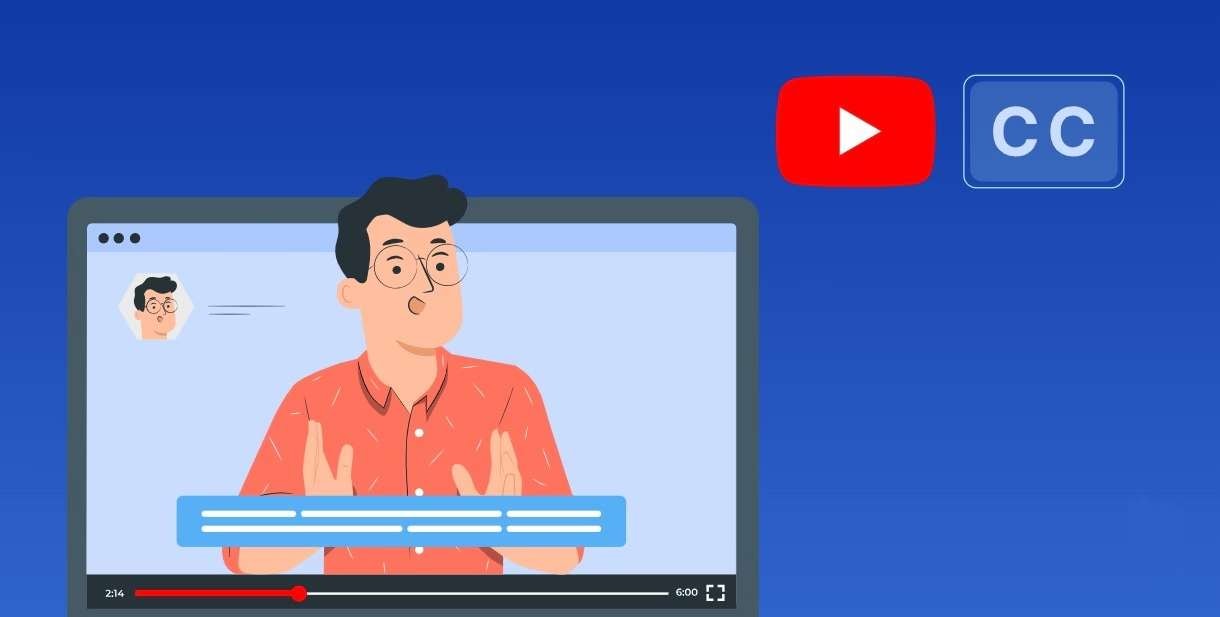
Many users watch YouTube videos with low volume, on mute, or in public. As a result, if a video doesn’t contain textual elements, most viewers will find it uninteresting and skip it, hurting your channel’s engagement and viewership.
That’s where captions for YouTube come in. These elements improve your video content’s engagement and SEO ratings, enhance the user experience, and make your YouTube videos tremendously more accessible to a higher number of users.
Today’s guide will explore YouTube video subtitles in more detail and teach you how to add captions to videos on YouTube. Stick around and learn everything you need to know about improving your video content on this massively popular video-sharing platform.
In this article
What Is a Caption in YouTube?
Captions for YouTube are textual elements that accompany the platform’s videos and further enhance their verbal communication. These elements contain both dialogue and descriptions of sounds (the latter is usually in brackets like [wind whistling through a window] or [door creaking]), making them incredibly beneficial for users who are hard of hearing or deaf.
Captions vs. Subtitles: Which should you add to your YouTube videos?
While the two terms are frequently used interchangeably, captions and subtitles aren’t the same things.
On the one hand, you have captions that handle dialogue and descriptions of audio tracks and help users with hearing difficulties. They can be open or closed, depending on whether they were embedded into the video (open captions) or created as a separate track that users can turn on and off (closed captions).
On the other hand, subtitles are translation-based elements that accommodate viewers who don’t speak the language used in the video. They’re similar to closed captions, meaning they can be turned on and off, but they don’t contain descriptions of sounds and are often in a different language than the audio.
Your choice between captions and subtitles depends on whether you’re trying to make your content more accessible for hard-of-hearing users or making videos in another language.
How to Quickly Generate a YouTube Video With Captions
Using a dedicated video creation toolkit with an automatic captioning feature is the simplest and most effective way to handle captions for YouTube. That’s precisely where Wondershare Virbo, an AI-powered tool for Windows, Android, iOS, and the web, can shine and make your captioning tasks seamless.
This robust app has over 300 AI-made avatars with different styles and tones and 460+ ultra-realistic and human-sounding AI voices, making it indispensable for video content creation. The app can automatically generate captions for YouTube or handle YouTube video subtitles with its Video Translate feature.
Here’s how to add captions to YouTube videos with Wondershare Virbo:
Step 1: Download and install the Virbo on your computer or you can just head to Virbo online version.
Step 2: Launch the app and tap the Video Translate button.
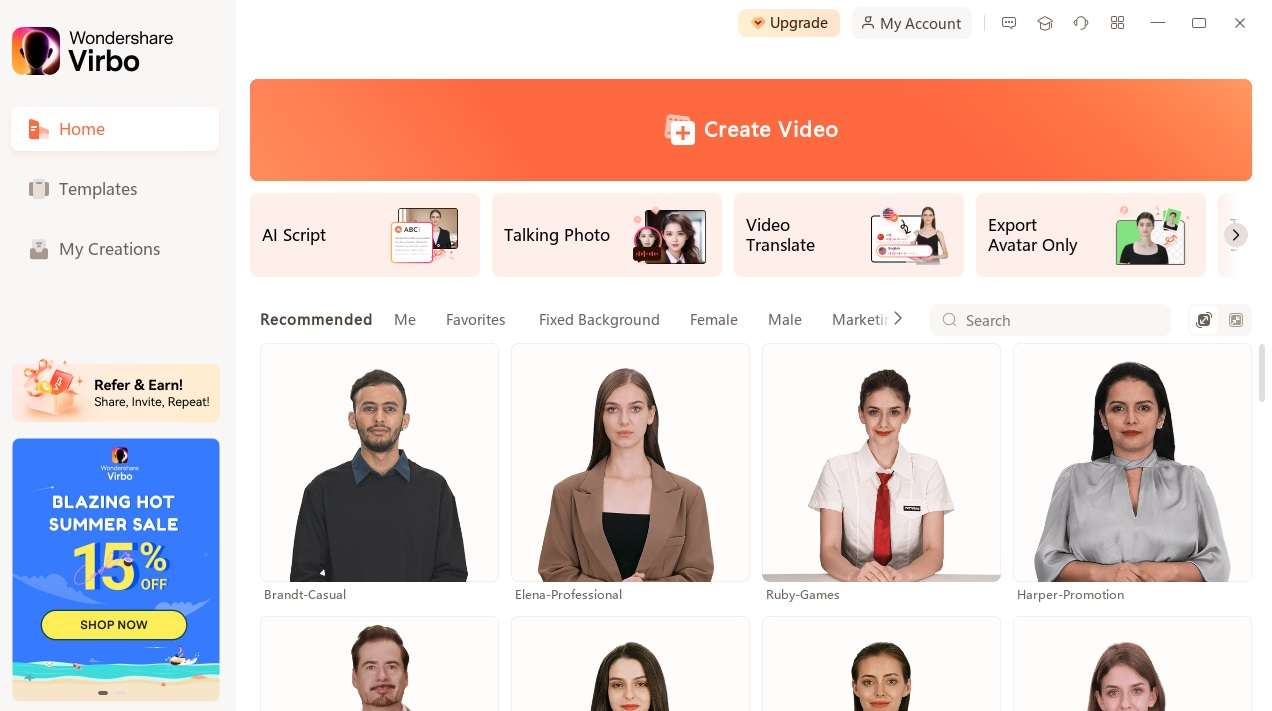
Step 3: Upload a video file of up to 500 MB and 5 minutes long.
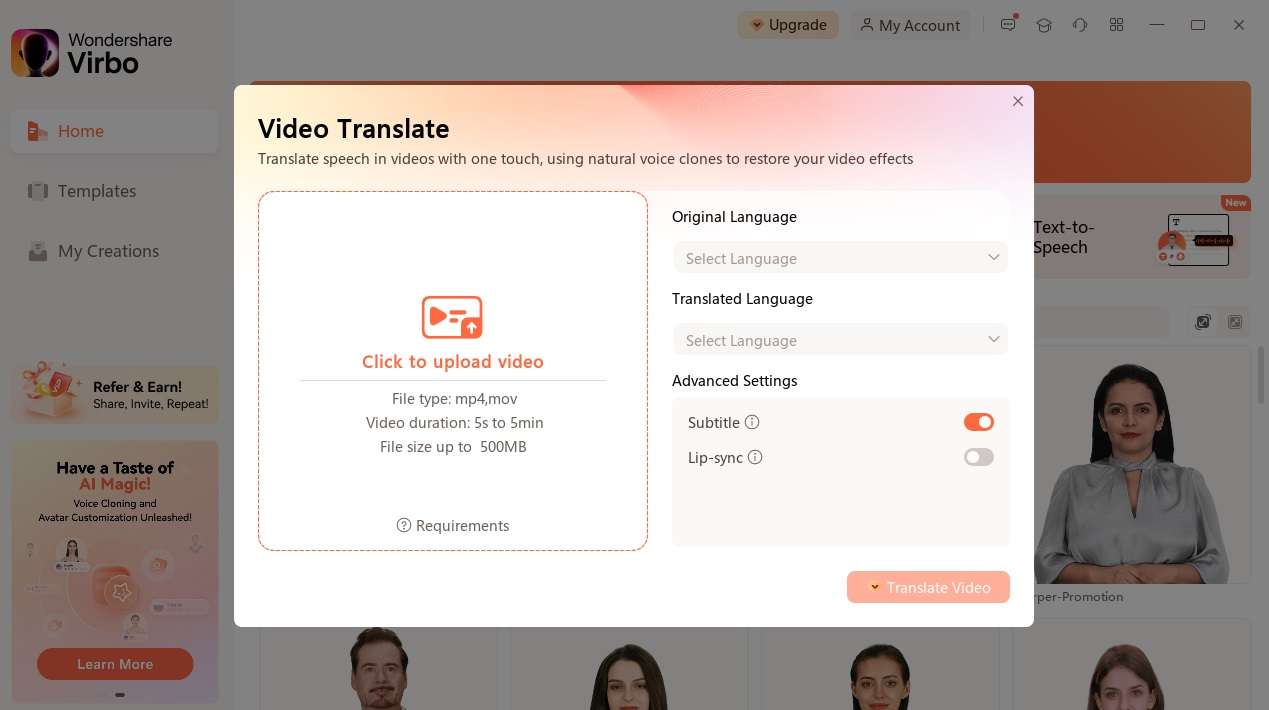
Step 4: Select the video’s language, choose a language to translate the video to, and adjust the Advanced Settings to your preferences.
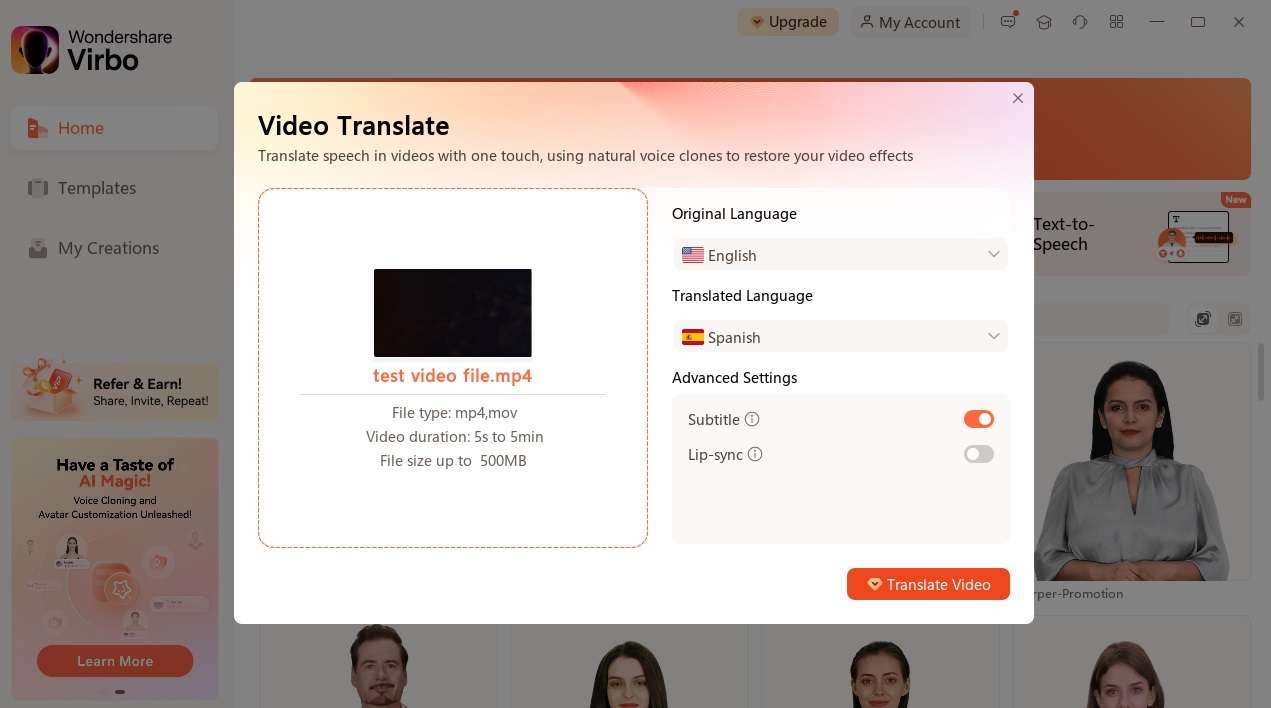
Step 5: When ready, tap the Translate Video button, and Virbo will automatically generate YouTube video subtitles for you.
Step 6: Edit the video to your liking by adjusting the captions and other elements. When you’re done, hit Export to save the clip.
In addition to video translation, Virbo can handle other speech-to-text operations, including extracting subtitles from MP3 and WAV audio files or MP4 videos and recording your audio. The program also supports dozens of languages, so you can create engaging YouTube subtitles or effortlessly handle captions for YouTube.
How to Add Subtitles and Closed Captions on YouTube Videos in YouTube Studio
Another way to handle captions for YouTube or video subtitles is through the video-sharing platform’s YouTube Studio tool. As its name suggests, this website serves like a content creator’s studio, allowing them to adjust every video aspect, including subtitles.
Here’s how to add captions on YouTube via the Studio app:
Step 1: Head to YouTube Studio and log in with your Google/YouTube account.
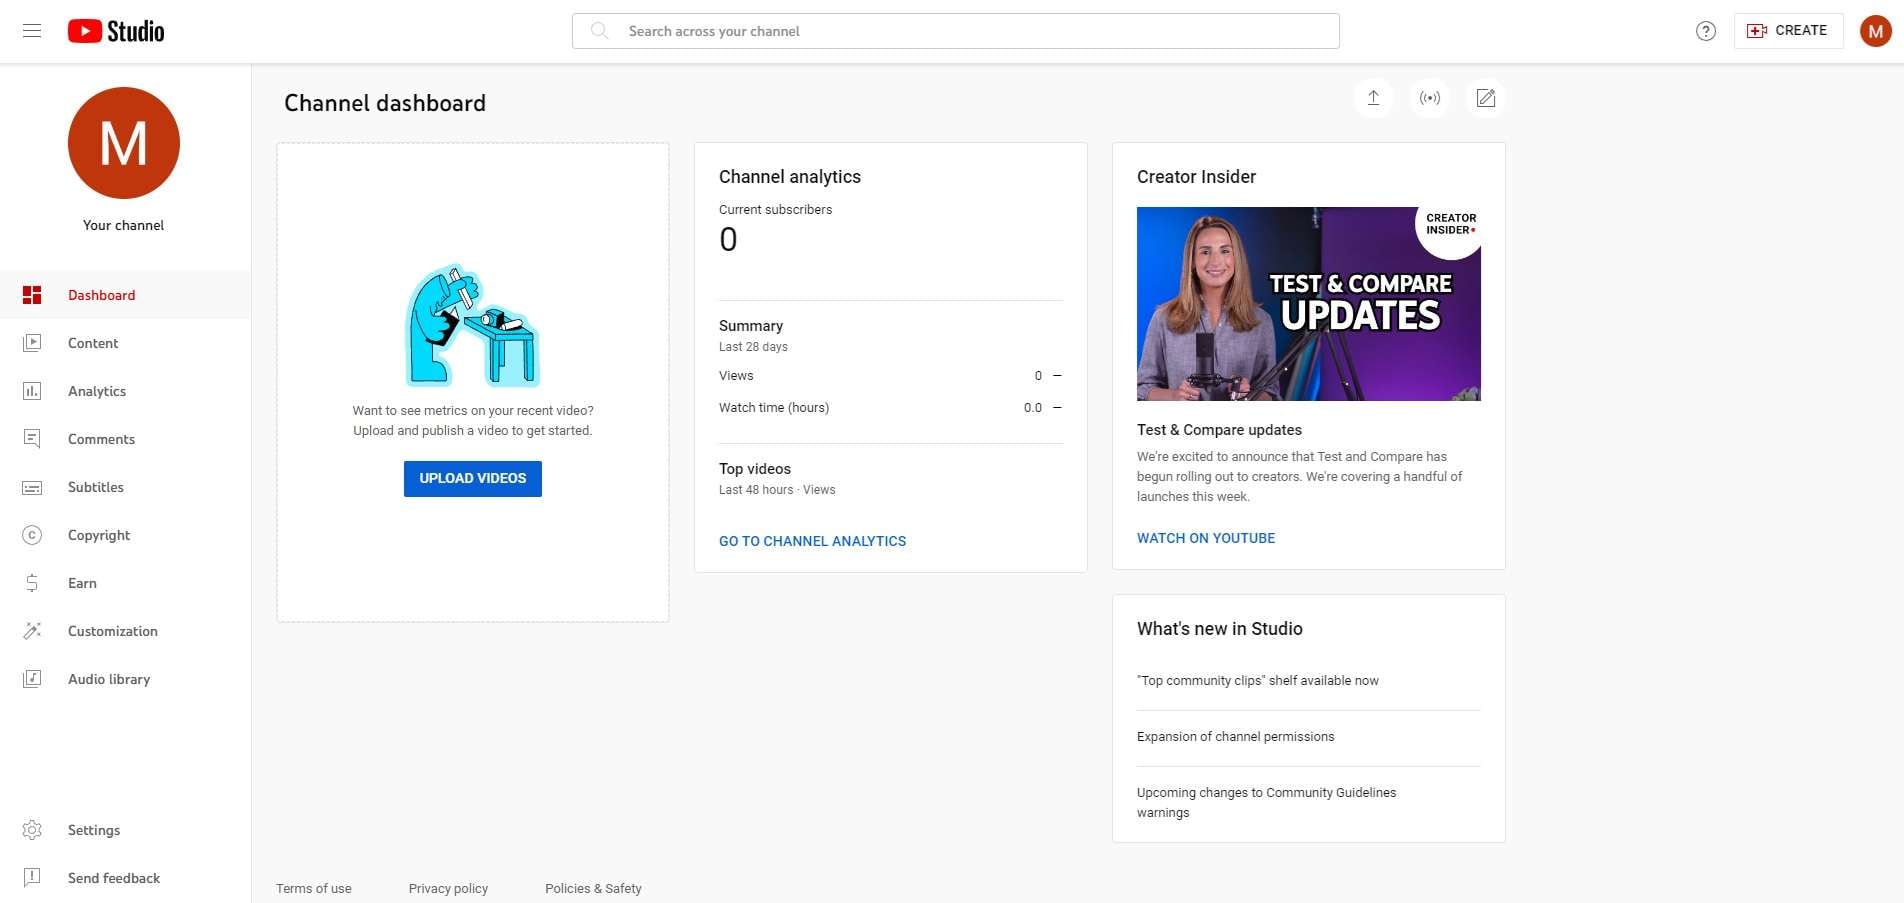
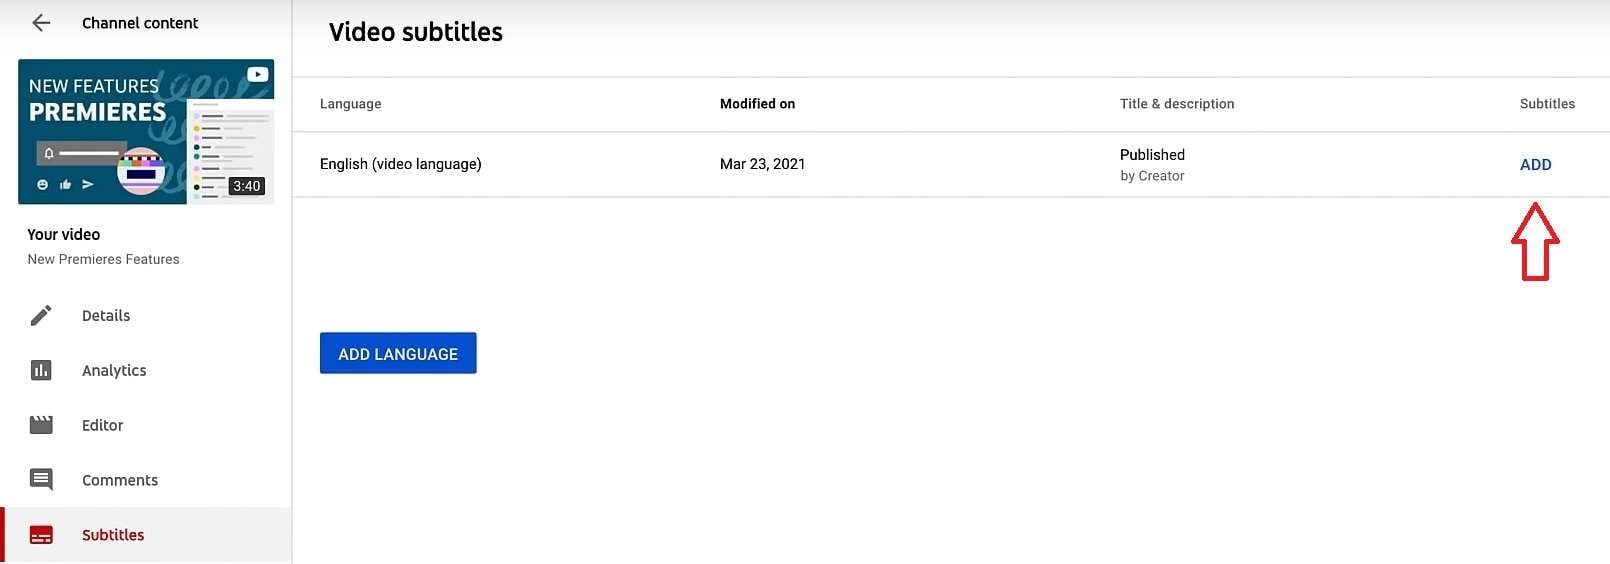
Step 2: Navigate to Subtitles and click a video to which you want to add closed captions.
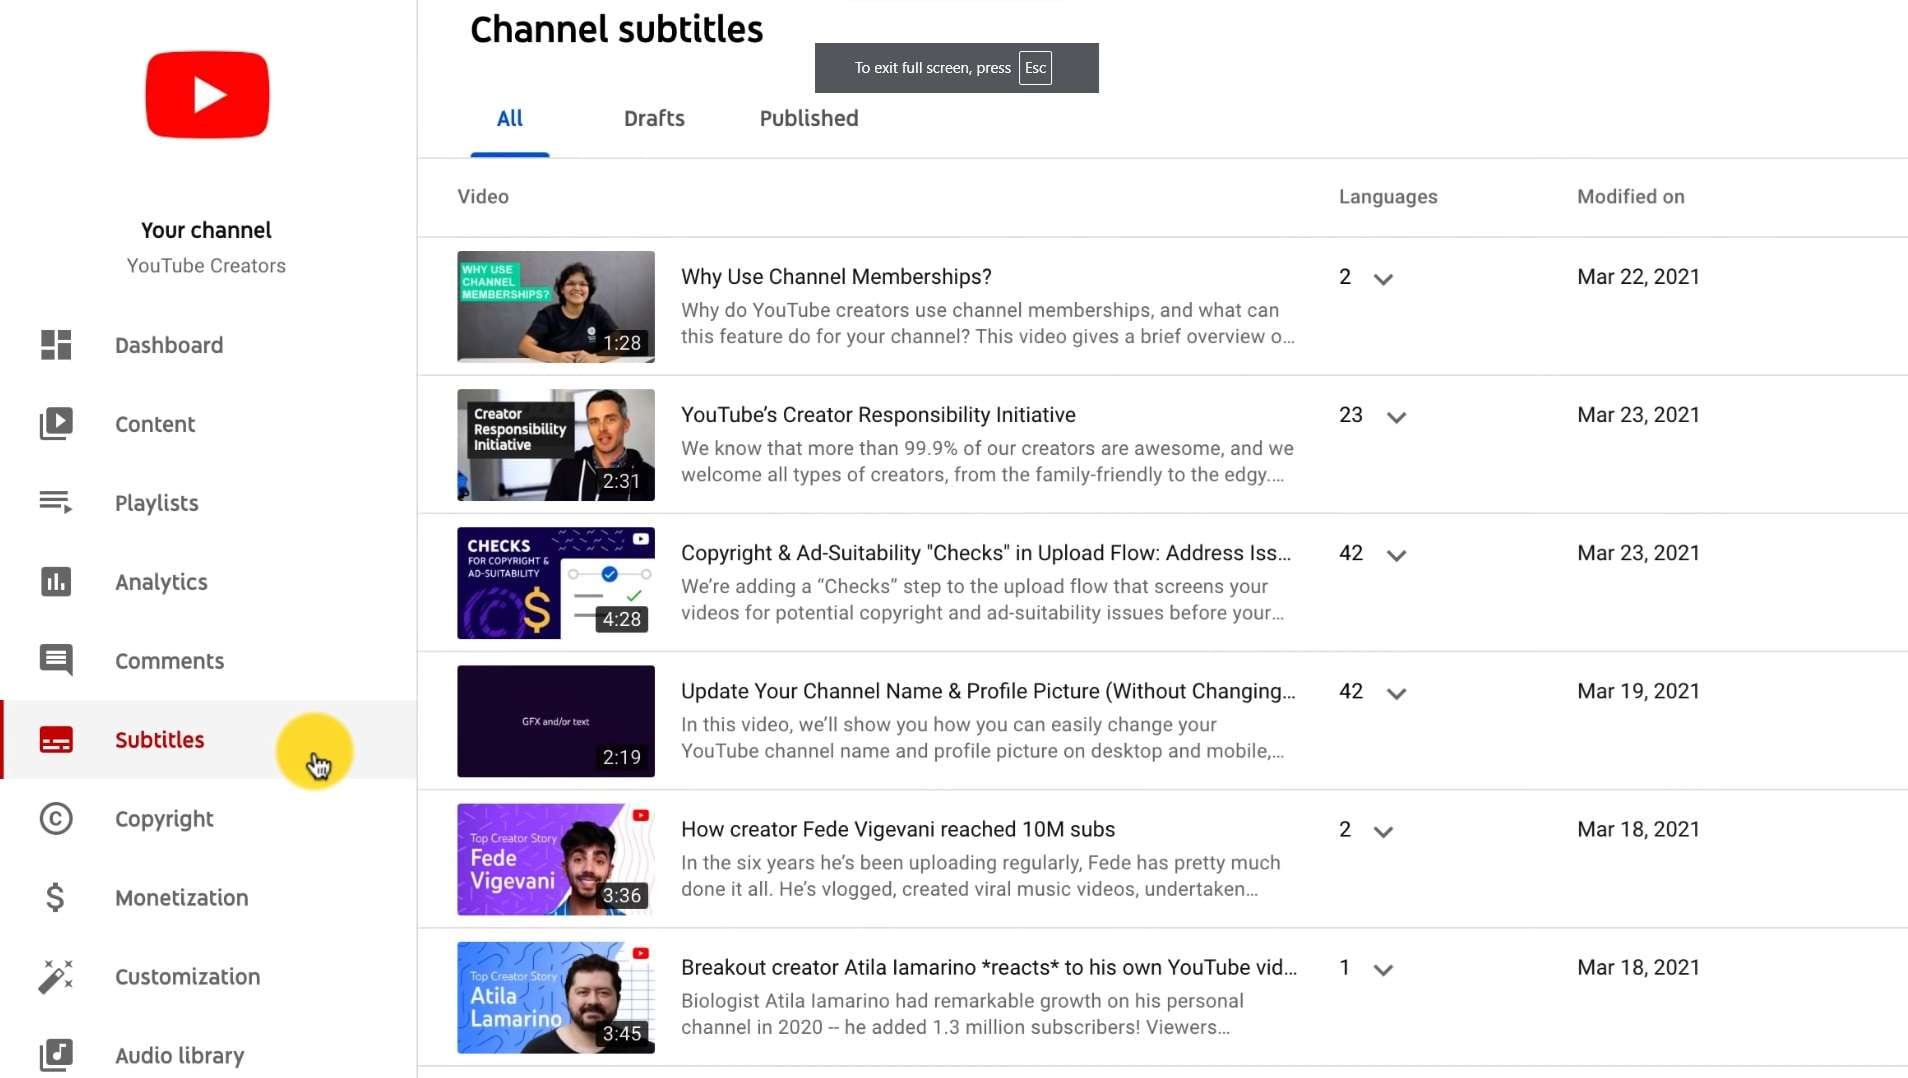
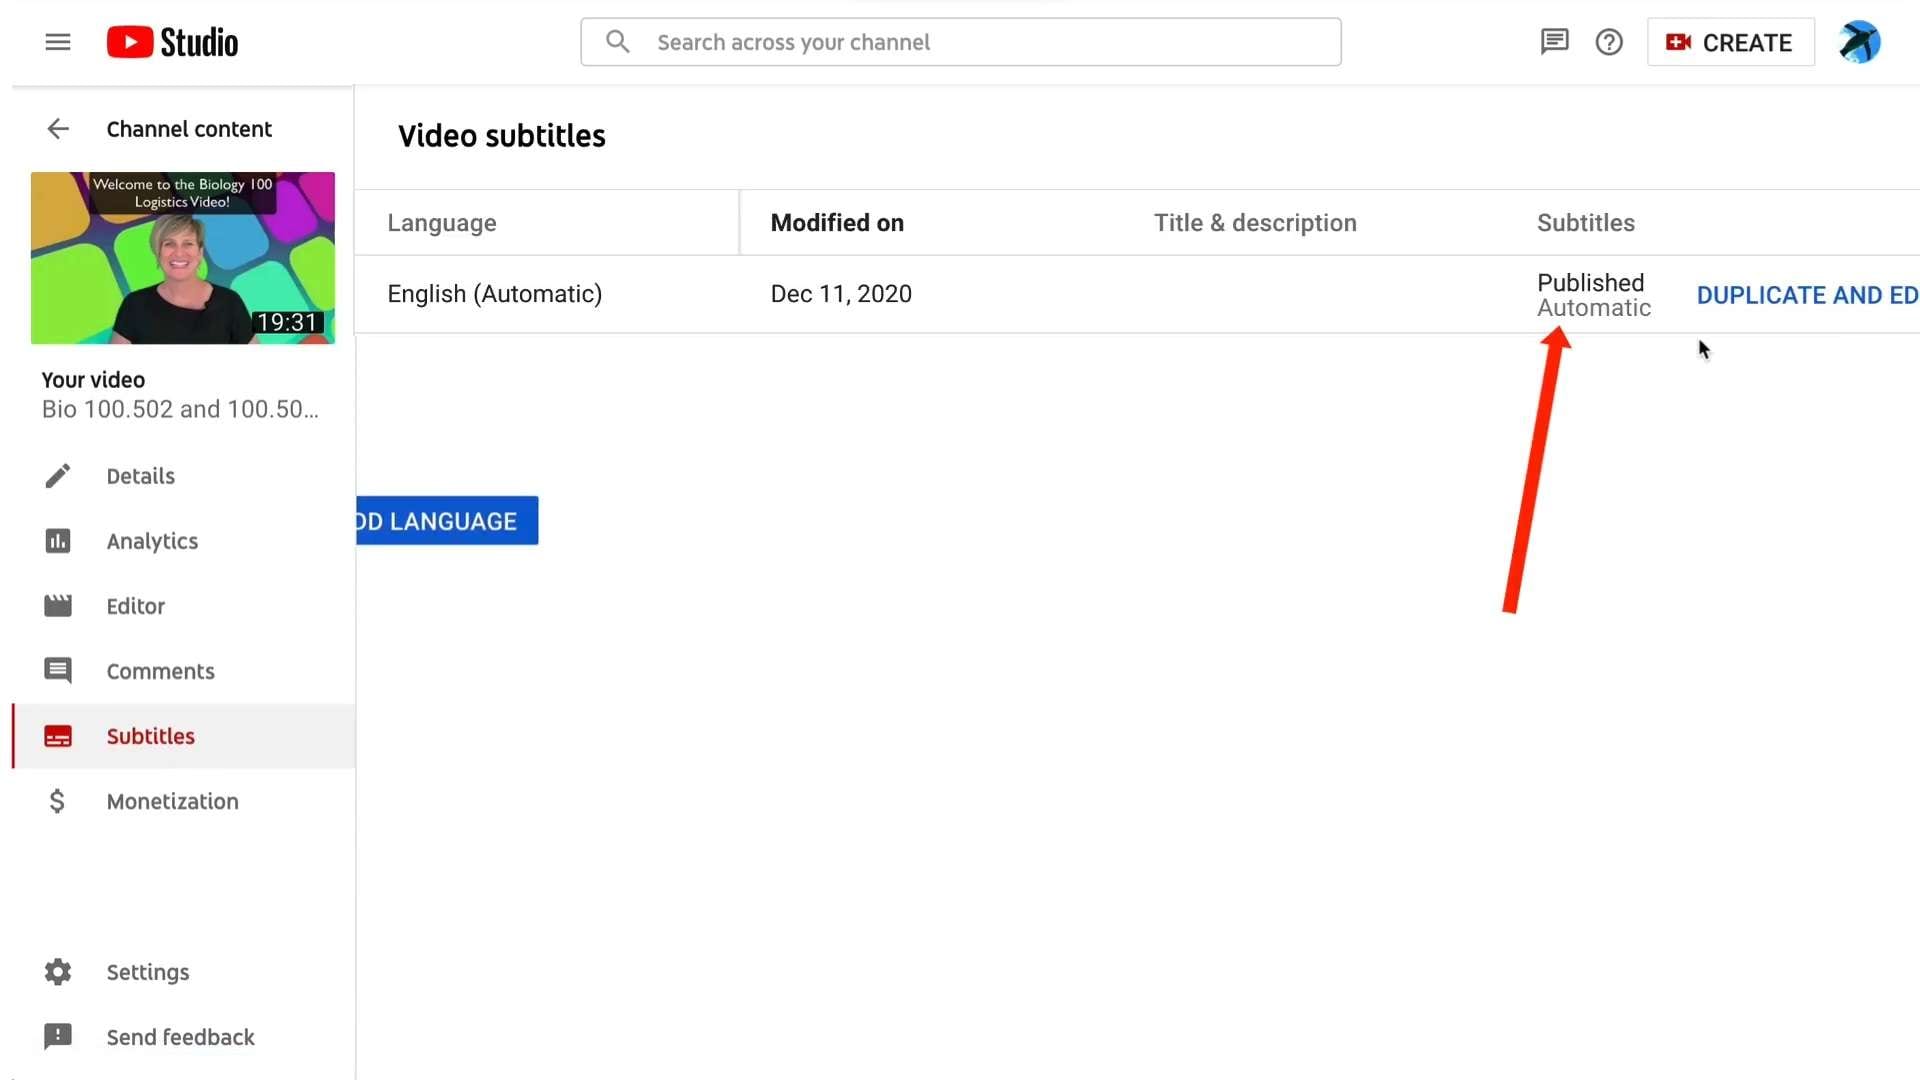
Step 3: Tap the Add button if the video has no subtitles. Alternatively, hit Duplicate and Edit if the video was published with automatic subtitles.
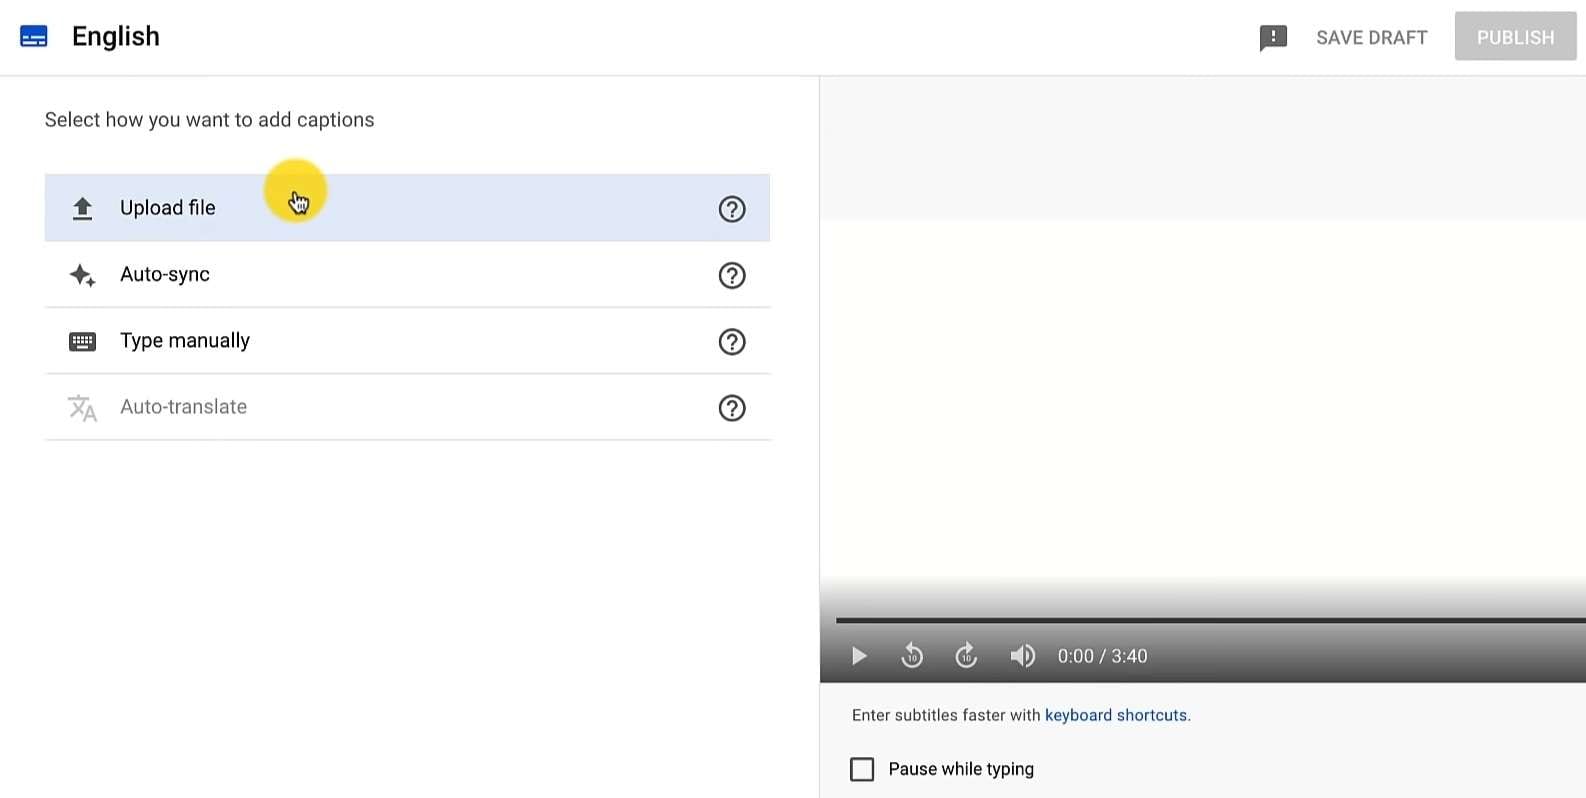
Step 4: Choose whether to upload an.SRT file, auto-sync captions to your video’s audio track with Google’s AI, manually input your subtitles or auto-translate from one language to another.
How to Manually Add Captions to Videos on YouTube
While they’ve massively improved in recent years, YouTube’s auto-subtitles aren’t the best for videos that aren’t in English. Whether you’re creating content in another language or prefer to add captions to your YouTube videos manually, you can do that by following these steps:
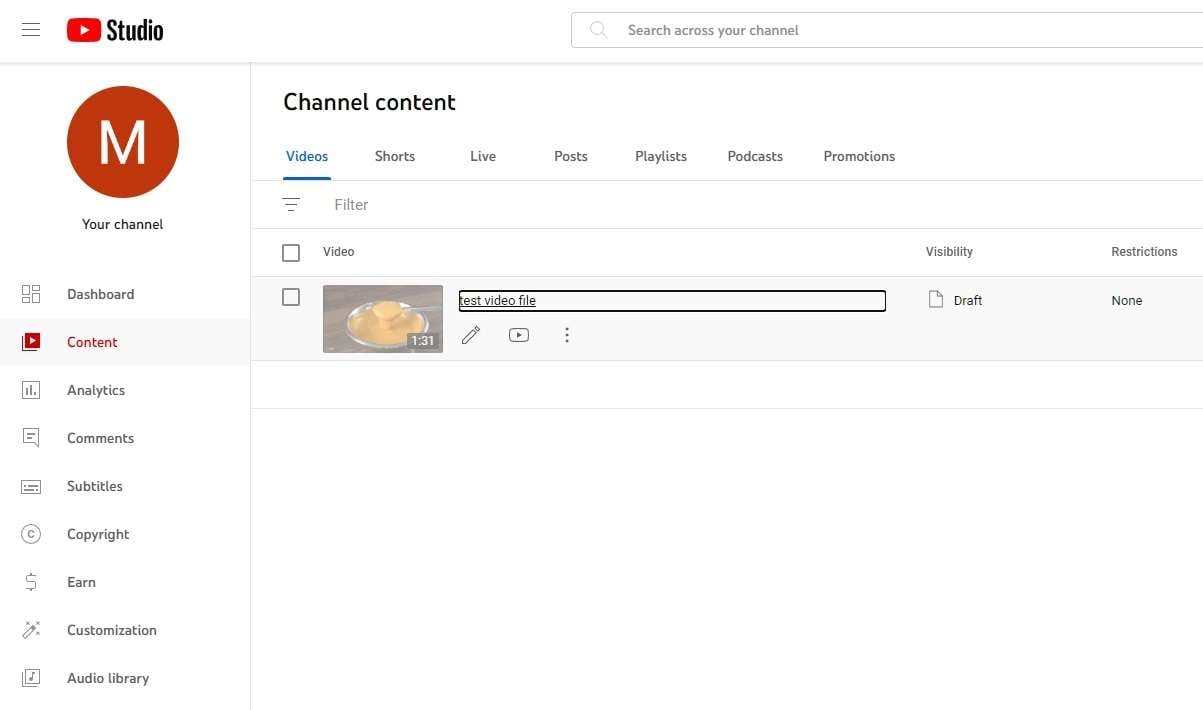
Step 1: In YouTube Studio, head to Content > Videos and click the YouTube video to add captions.
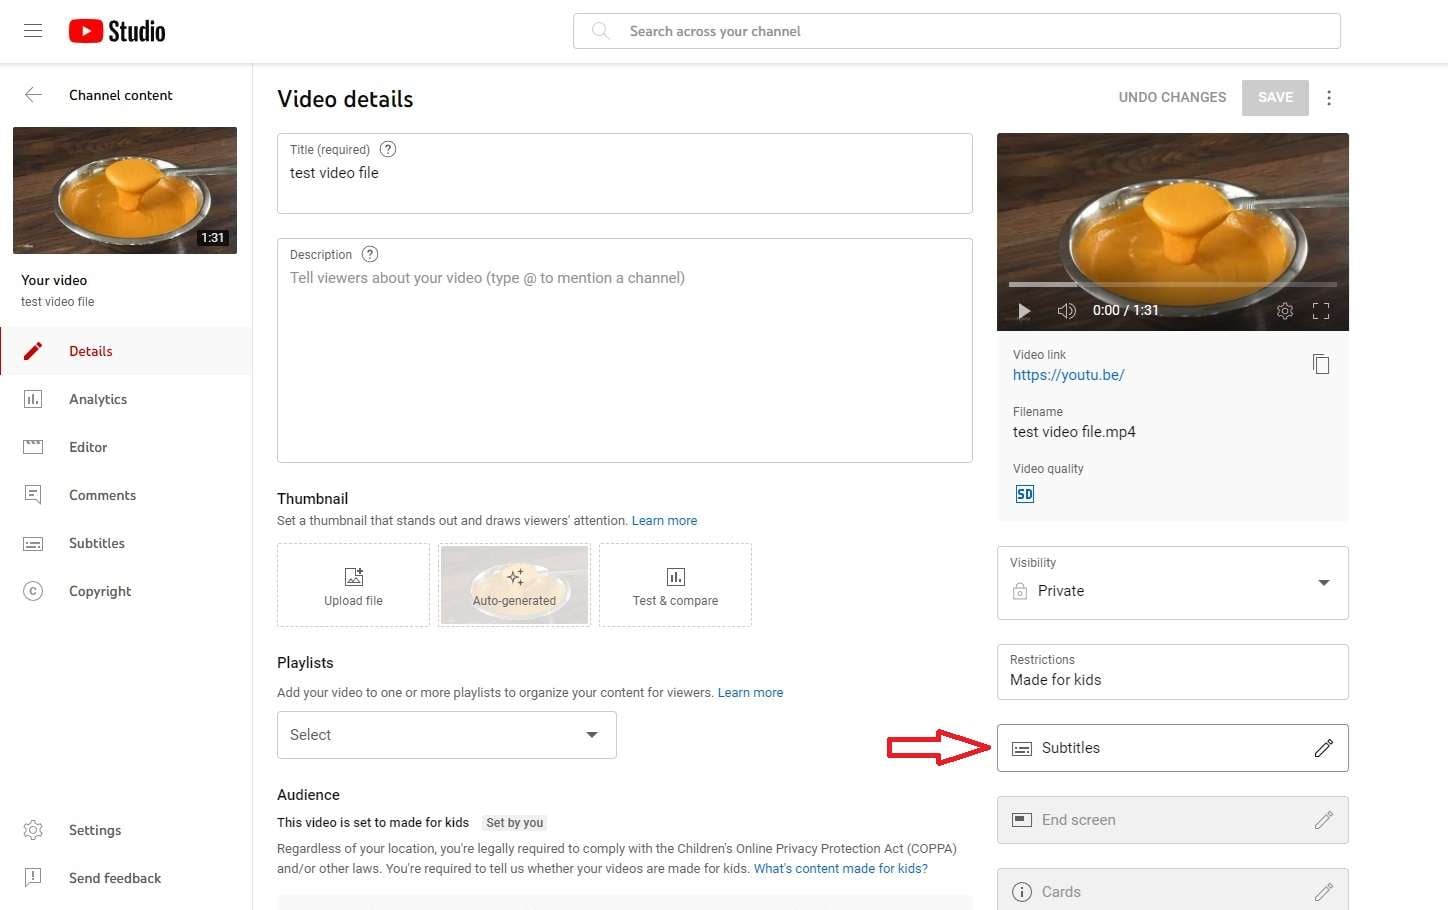
Step 2: In the bottom right corner, tap the Subtitles option.
Step 3: Tap the Type manually option.
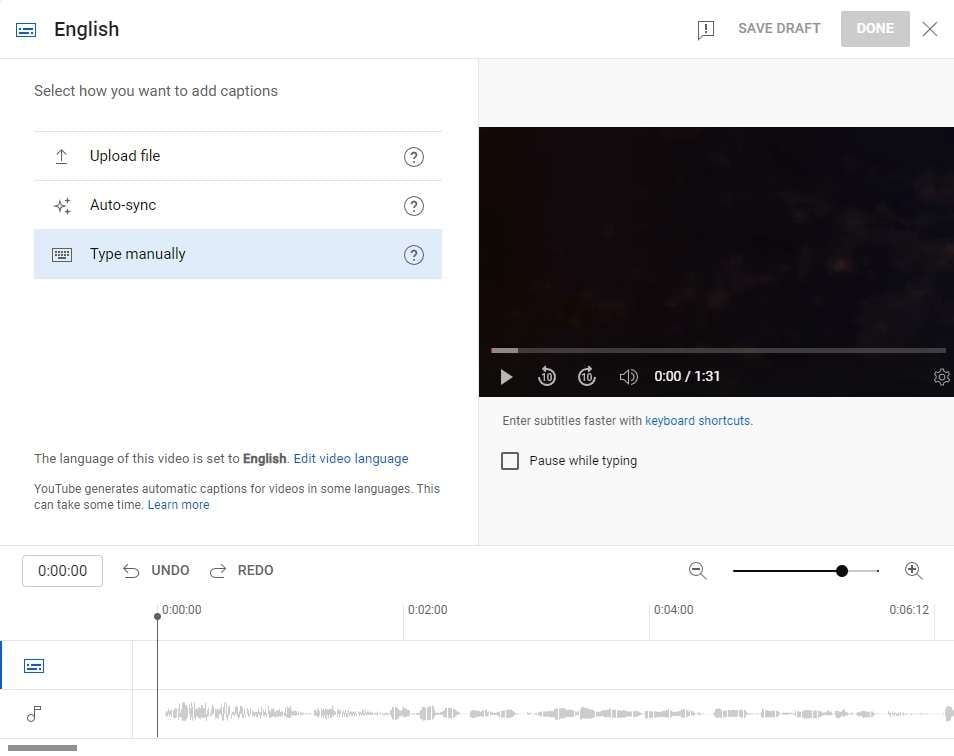
Step 4: Add your captions and adjust their timing manually.
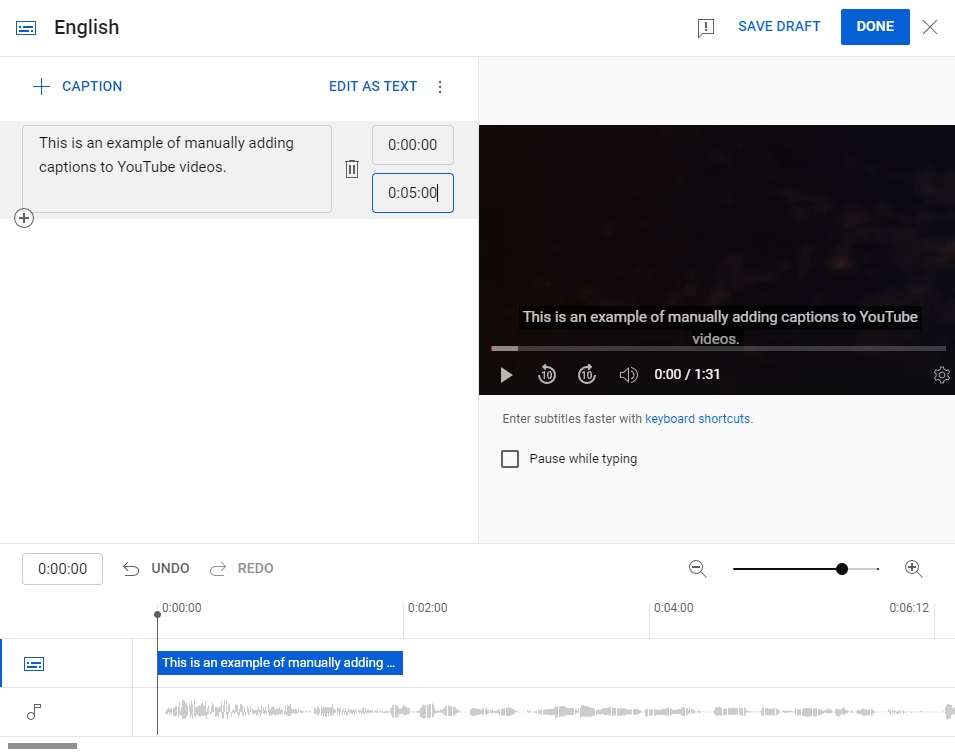
Once satisfied, tap the Done button in the top right corner and let YouTube Studio handle the rest.
How to Add Captions to YouTube Videos Automatically
Manual captions also have drawbacks, as they take time and effort. As a result, many video content creators are turning toward highly accurate automatic captioning tools, where Wondershare DemoCreator reigns supreme.
This powerful video recording and editing software is a content creator’s heaven. It allows users to record YouTube videos with a few clicks and edit these clips with the app’s AI-driven features for maximum engagement and viewership.
The app’s Auto-Caption tool is also easy to use, allowing YouTubers to generate highly accurate captions and subtitles for better video accessibility, viewer retention, and SEO.
Here’s how to add captions on YouTube content with DemoCreator:
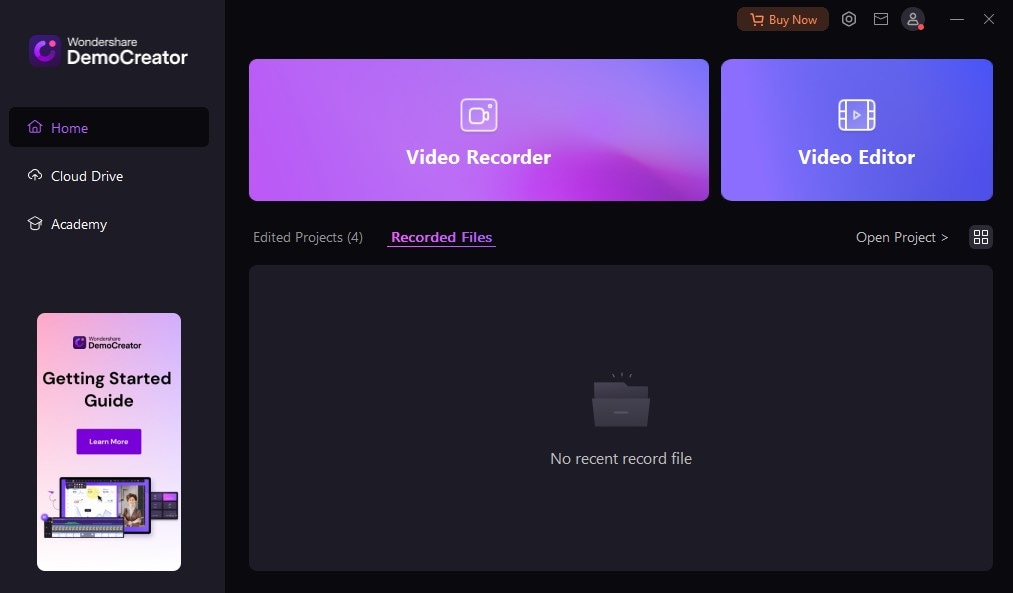
Step 1: Download and install Wondershare DemoCreator from the official website. Then, launch the app on your computer and tap the Video Editor button.
You’ll see a beginner-friendly Video Editor with four distinct areas.
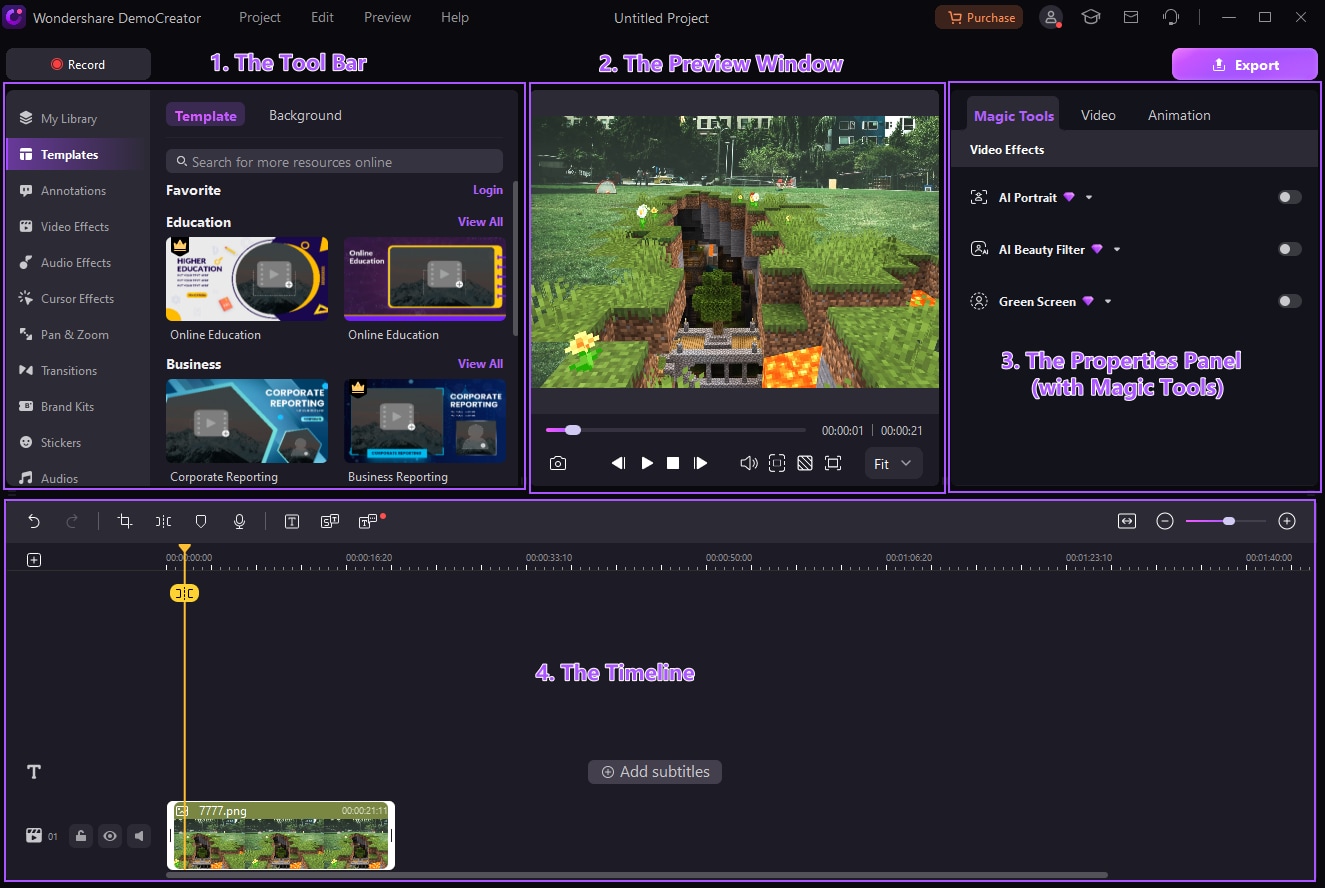
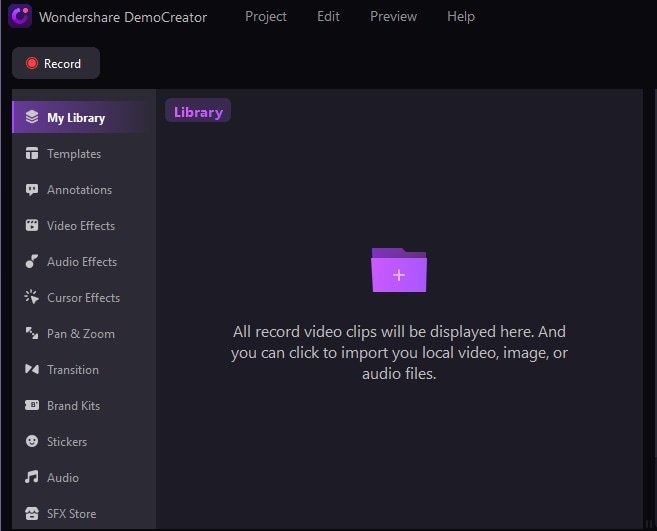
Step 2: Double-click the Media Library in the ToolBar to import a clip.
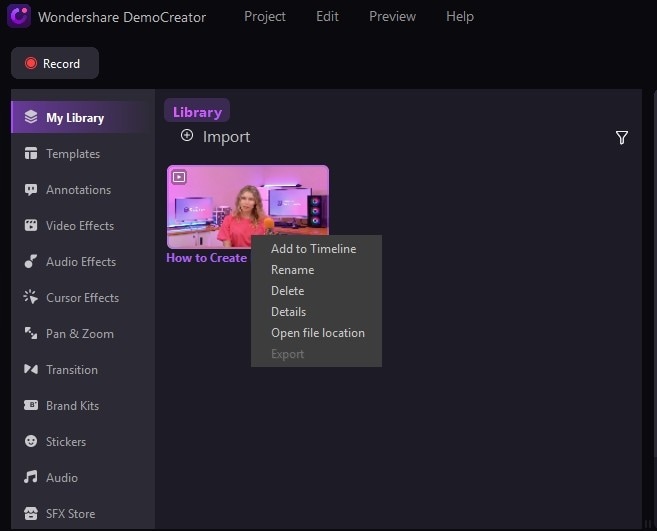
Step 3: Right-click the video and select Add to Timeline. You can also drag and drop the clip from the Media Library to the app’s Timeline.
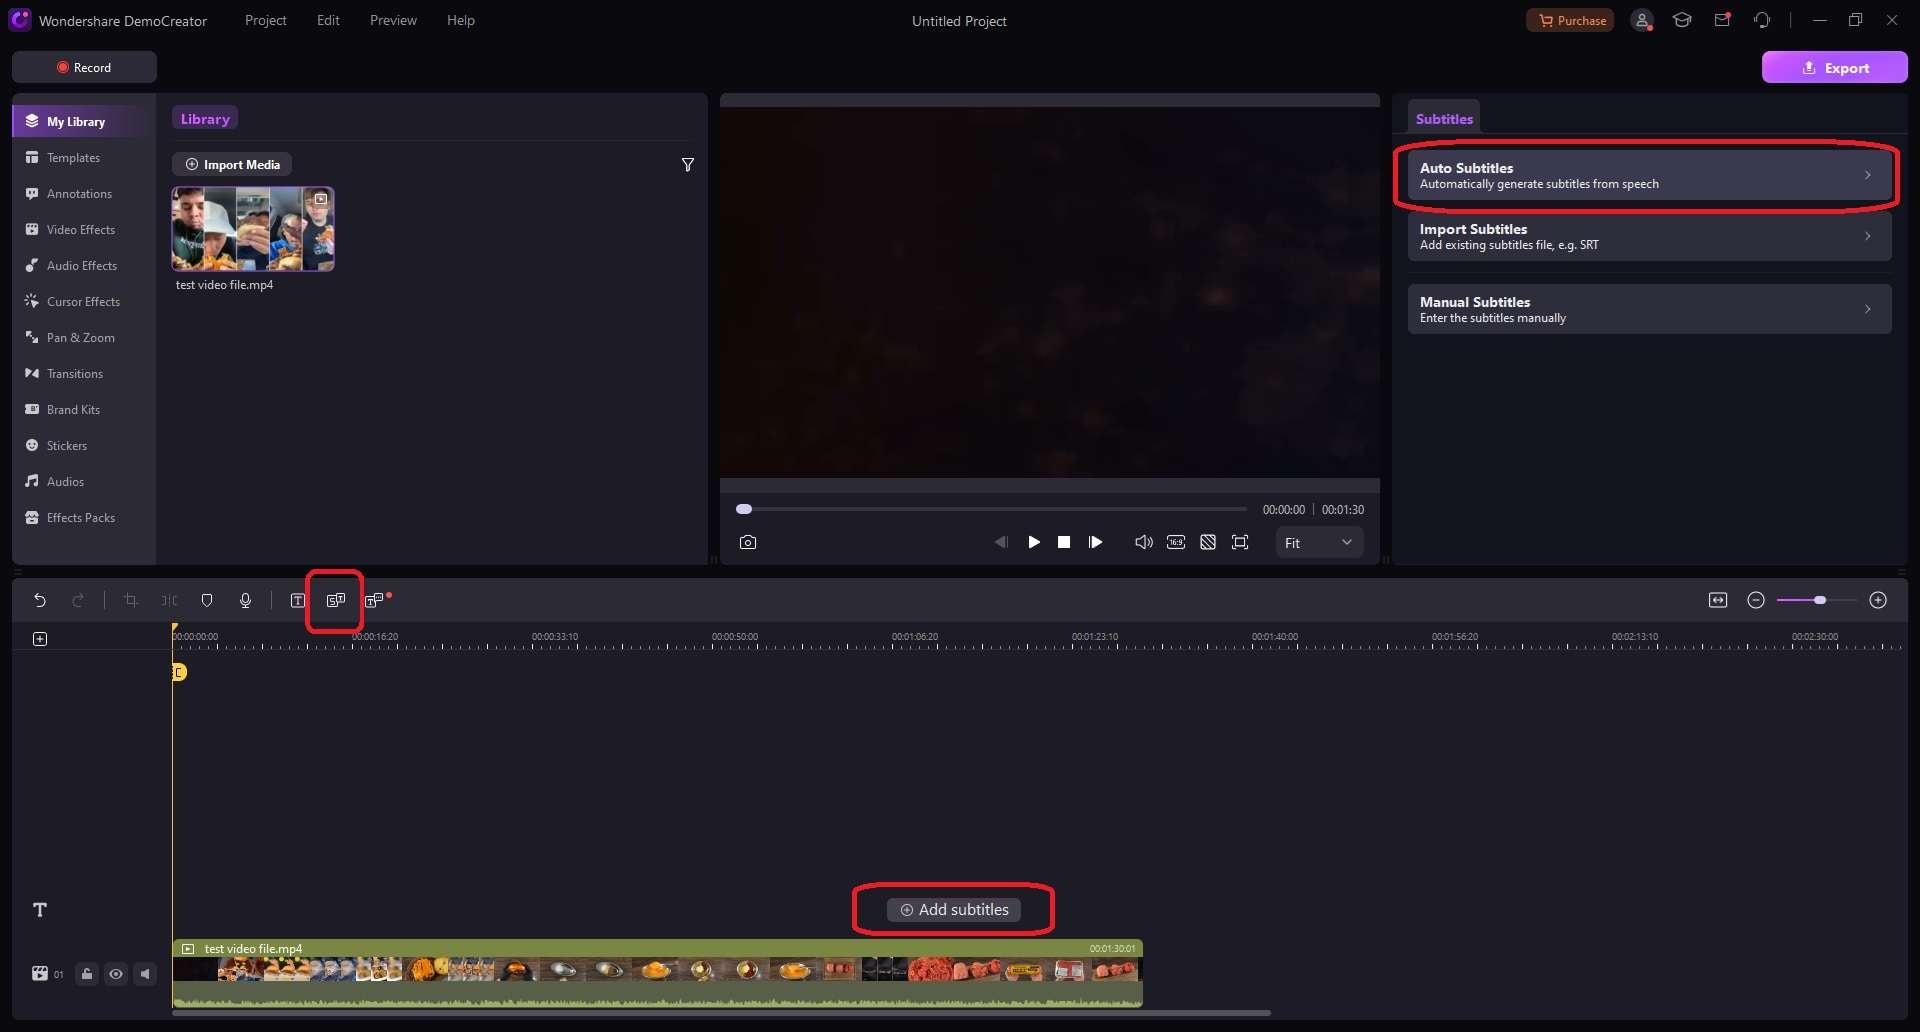
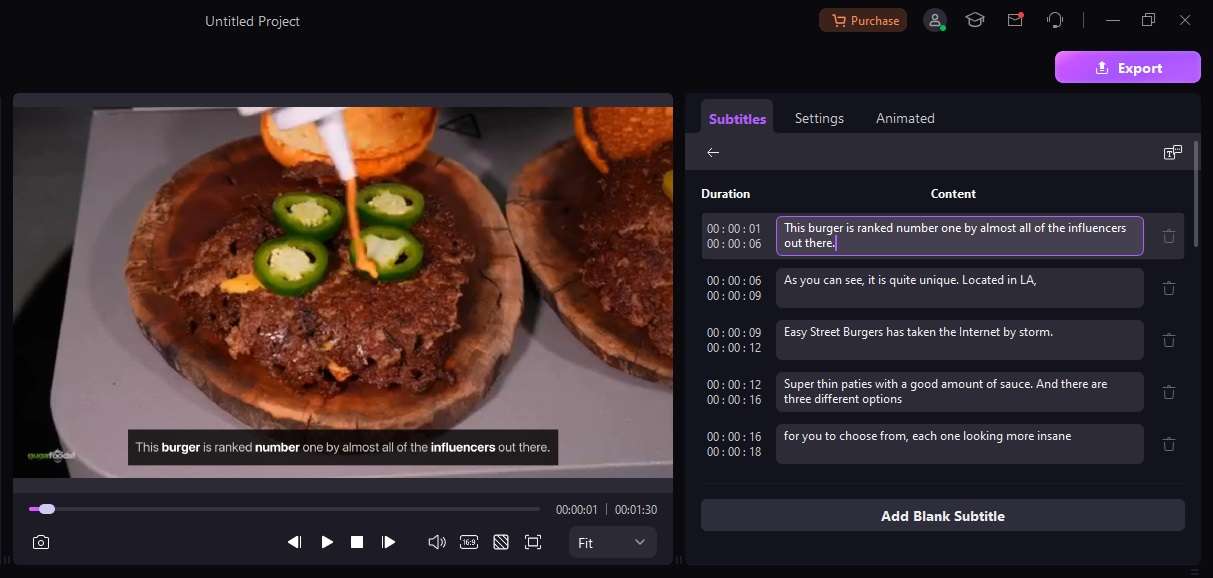
Step 4: Click the Add Subtitles button near the video in the app’s Timeline. Alternatively, click the Subtitle button above the Timeline. Then, choose Auto Subtitles in the top right corner.
Step 5: Select a language and tap Start.
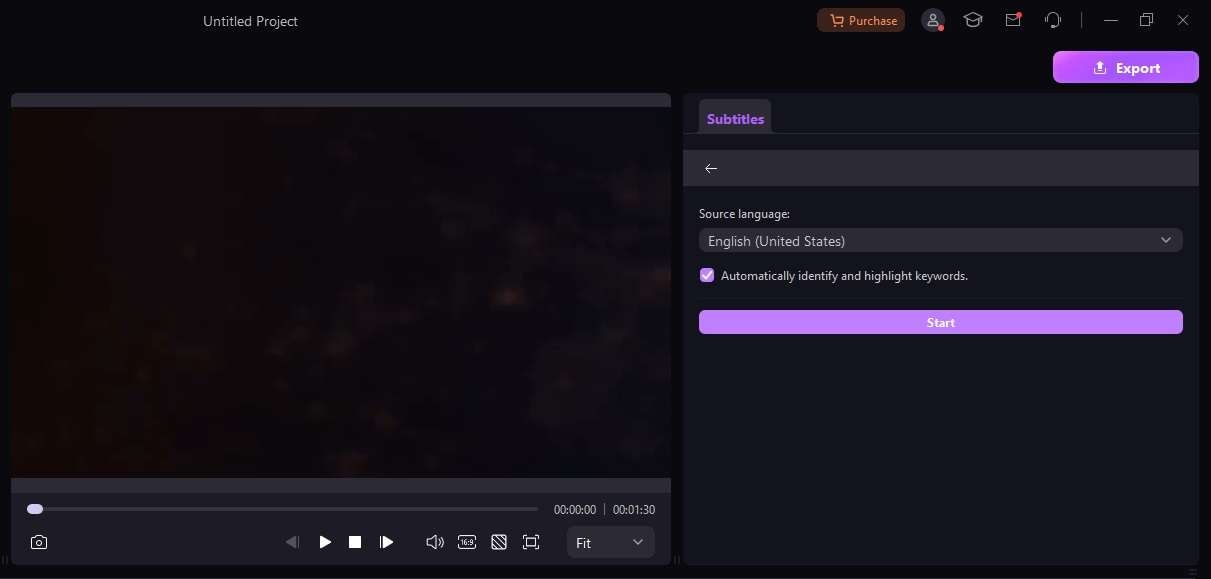
DemoCreator will use the latest and greatest AI language models to transcribe your video’s audio track accurately. Nonetheless, you should review the automatically generated subtitles and correct any mistakes, as no AI model is 100% accurate.
You can also access the Settings tab and adjust fonts, colors, letter spacing, and more. At the same time, the app’s Animated tab lets you add exciting animations and effects to your subtitles, making your videos far more engaging for the audience.
How to Edit Captions on YouTube
Let’s face it. YouTube’s auto-generated captions aren’t the most accurate. More often than not, you’ll have to go back to your video and adjust these textual elements so they accurately convey what your video’s audio track is saying.
Because of these inaccuracies, we’ll also show you the caption editing process on YouTube Studio. Here’s how to edit captions in YouTube Studio:
Step 1: Navigate to YouTube Studio, tap Content, and select a YouTube video to edit its captions.
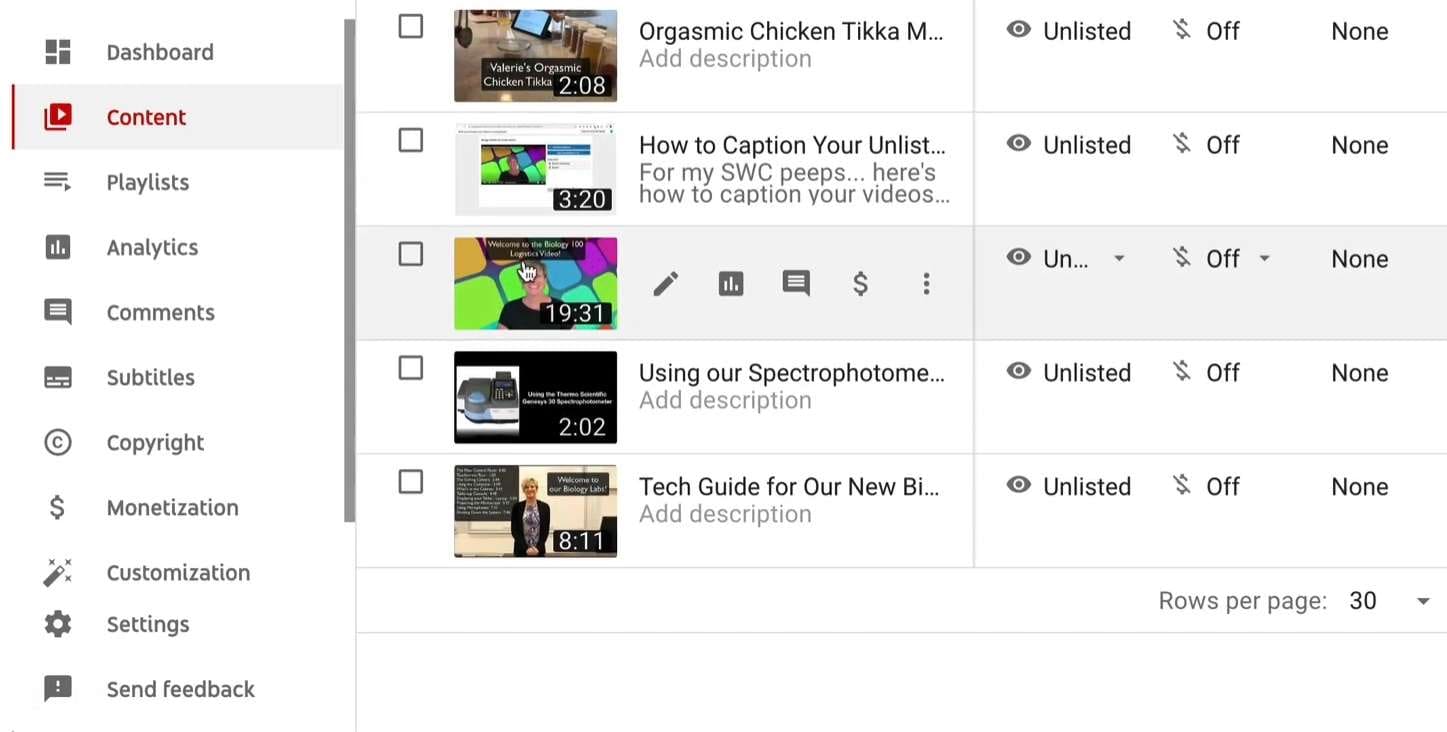
Step 2: Hit Subtitles and click the Duplicate and Edit button next to Subtitles (Published, Automatic).
Step 3: Tap Edit as Text and make all the corrections you need to make.
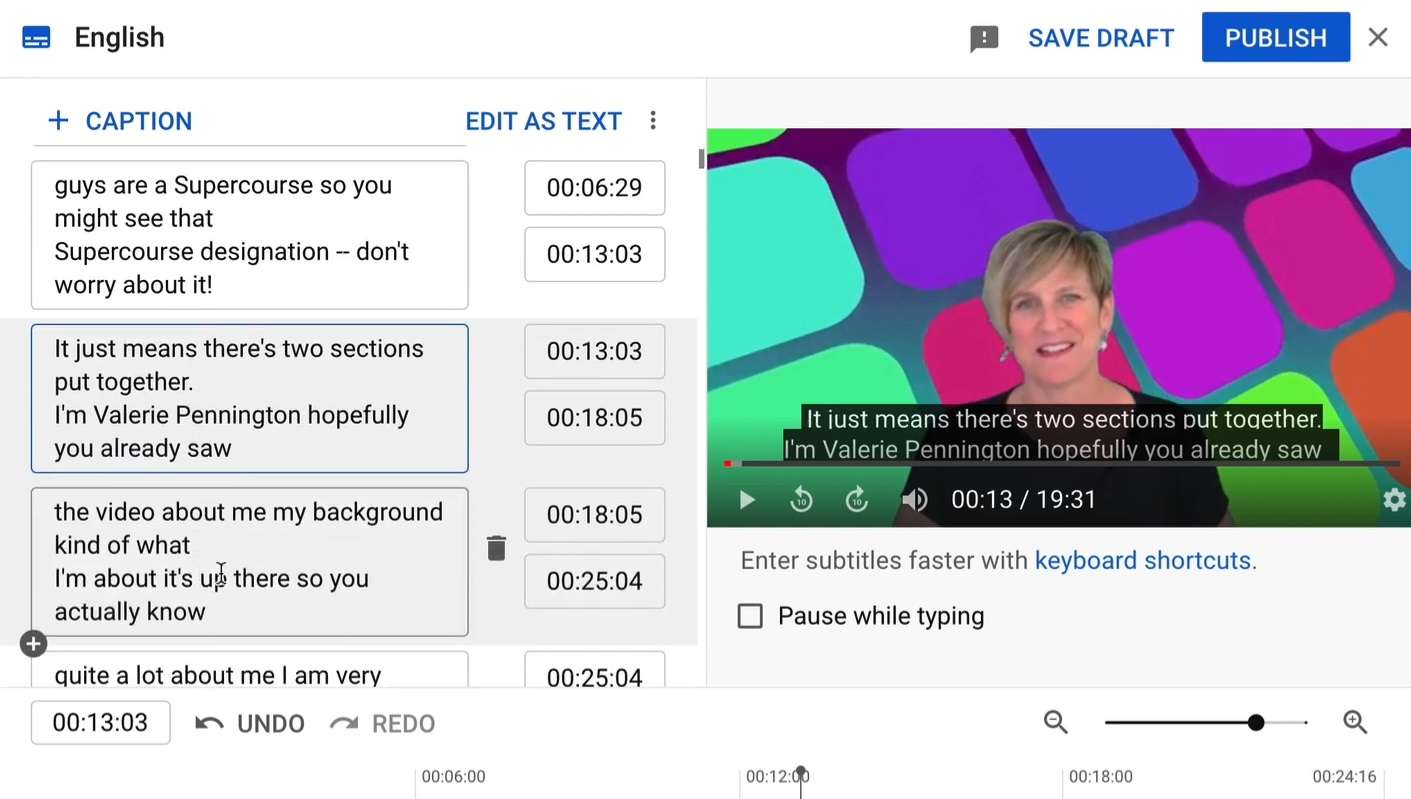
Step 4: When ready, tap the Publish button in the top right. Then, delete the automatic captions to prevent duplicates.
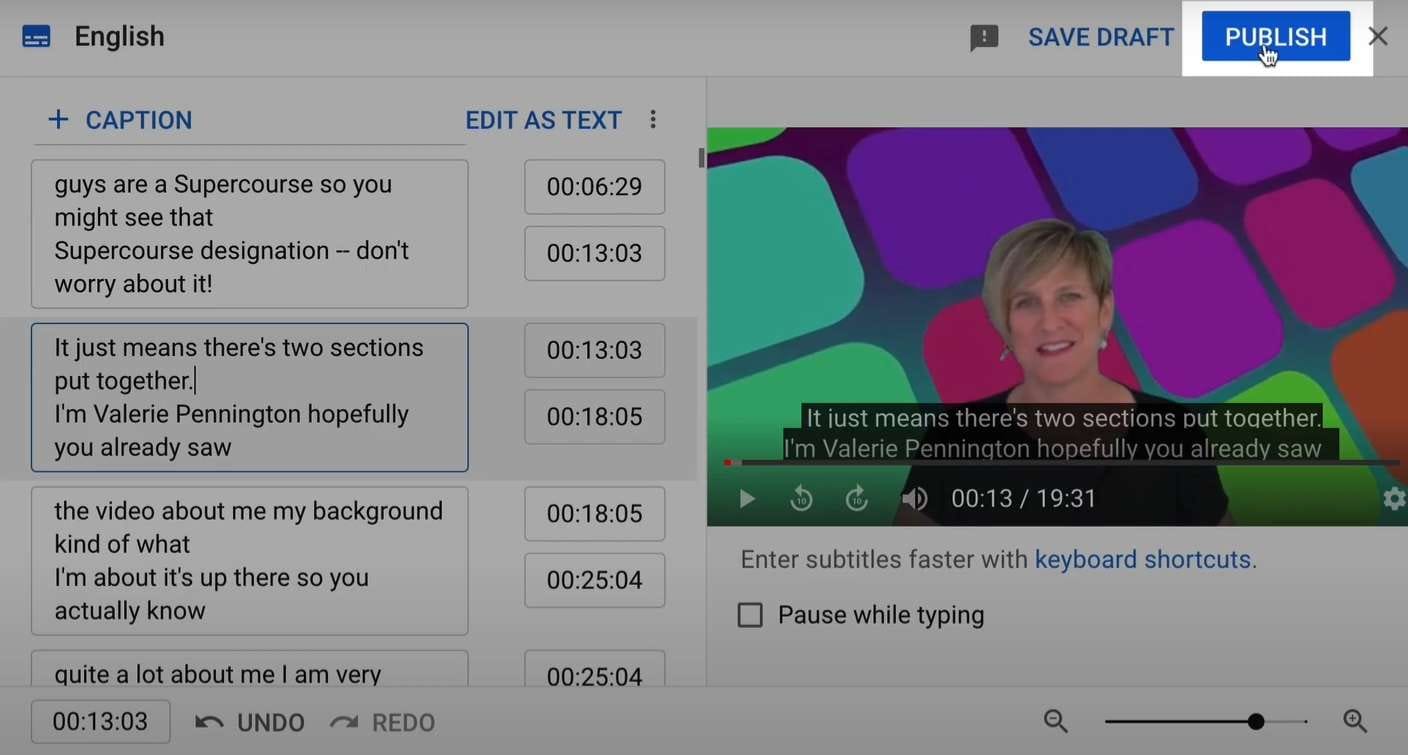
Capitalization, punctuation, and error correction can significantly improve your video’s engagement and SEO, so ensure you’ve spent a few minutes thoroughly checking your YouTube video subtitles.
Best Practices for Adding YouTube Captions & Subtitles
As we’ve established, captions for YouTube, as well as YouTube video subtitles, play a pivotal role in engaging your viewers, boosting your SEO, and making your content more accessible. That’s why we’re also including a few tips for those who now know how to add captions to YouTube videos.
They include the following:
- Closed captions are often a better idea than open ones since they let users choose to use them or turn them off entirely;
- Combining subtitling and captioning techniques is an excellent idea if you’re doing videos in different languages but still want them to engage hard-at-hearing users;
- Thoroughly checking captions for YouTube and manually editing YouTube video subtitles are vital parts of the process as they eliminate grammatical, capitalization, and punctuation errors;
- Timing adjustments mustn’t be forgotten, as incorrectly placed subtitles or captions can often feel worse than no captions at all;
- Reaping the SEO benefits requires placing keywords in captions for YouTube videos, but you shouldn’t overdo it.
Combining these tips will make your videos significantly more engaging and accessible, while properly done captions will increase viewership significantly.
Conclusion
Figuring out how to add subtitles to a YouTube video can be a handy skill, as many YouTube videos are played during commutes or in public. As a result, users regularly play them at low volume or on mute, creating the need for YouTube video subtitles. Hard-at-hearing users also need these textual elements.
Fortunately, modern-day apps like Wondershare Virbo make it easy to figure out how to add subtitles to YouTube videos. This robust tool can automate video content creation, allowing users to quickly generate videos and captions for these clips in just a few clicks.
Google’s YouTube Studio is also a decent option for handling captions for YouTube videos. It lets users add subtitles automatically, manually, or through SRT files. The web app can also auto-translate your videos to other languages or help you edit the automatically generated subtitles and correct mistakes.
For those who’d like to skip inaccurate automatic subtitles or manual editing, Wondershare DemoCreator’s Auto-Caption feature is a tremendous option. With this tool and its fantastic AI language models, you’ll effortlessly create highly accurate automatic captions for YouTube videos.


