Photos are not just static pictures anymore. We can turn photo into live photo, a captivating format that brings images to life with motion and sound.
A live photo captures three-second snippets before and after you press the shutter button. This can add depth and context to traditional pictures. Live photo images not only preserve the visual but also the ambient atmosphere around the shot, such as the rustle of leaves in a park or shared laughter among friends.
In this post, we'll explore how to make a live photo from video. We will explain the difference between still and live photos, how to capture live photos, and how to simulate the moving effect on devices that don't support this feature. Most importantly, we will recommend you a live photo generator, which can not only make still pictures move, but even make them speak!
In this article
Part 1. Differences Between Still Photo and Live Photo?
A still photo captures a single moment in time without any movement or sound. It's a simple picture that shows a scene or subject frozen in time. Still photos are small in size and easy to share on different devices because they use common formats like JPEG or PNG.
On the other hand, a live photo is more than just a picture. It's like a mini video clip that includes a few seconds of motion and sound before and after the photo is taken. This extra data adds life to the photo, showing more of what was happening around the moment it was captured. Live Photos are bigger files because they include video-like elements and are usually saved in formats like HEIC on Apple devices.
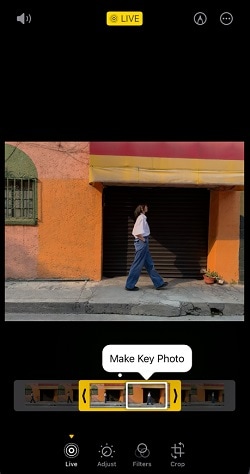
Live photos can be interacted with on iPhones and iPads. When you touch and hold a Live Photo feature, it plays the motion and sound. This makes looking back at memories more engaging compared to still photos, which stay the same every time you look at them.
The experience of viewing a live photo feels more real and immersive because it includes movement and sound. However, live photos can only be shared and viewed easily on Apple devices. They might not work or look the same on other devices, unlike still photos that work universally.
Here we summarize the difference between still photos and live photos.
| Still Photo | Live Photo | |
| Nature of capture | Single and static image. | Dynamic image with motion and sound. |
| Size | Small size. | Larger size. |
| Format | JPEG or PNG. | HEIC (on iOS) or a combination of image and video files. |
| Interactivity | No interactivity features. | Can be interacted with supported devices. |
| Experience | Lack additional depth and immersion. | Provide a more immersive experience with its motion and sound. |
| Compatibility | Universal. | Primarily on Apple devices. |
Part 2. How to Take a Live Photo Image?
To take a live photo image on an iPhone, you can follow this step-by-step guide.
1. Open the Camera App
Launch the Camera app on your iPhone. You can access it from the Home screen or Control Center.
2. Enable Live Photos
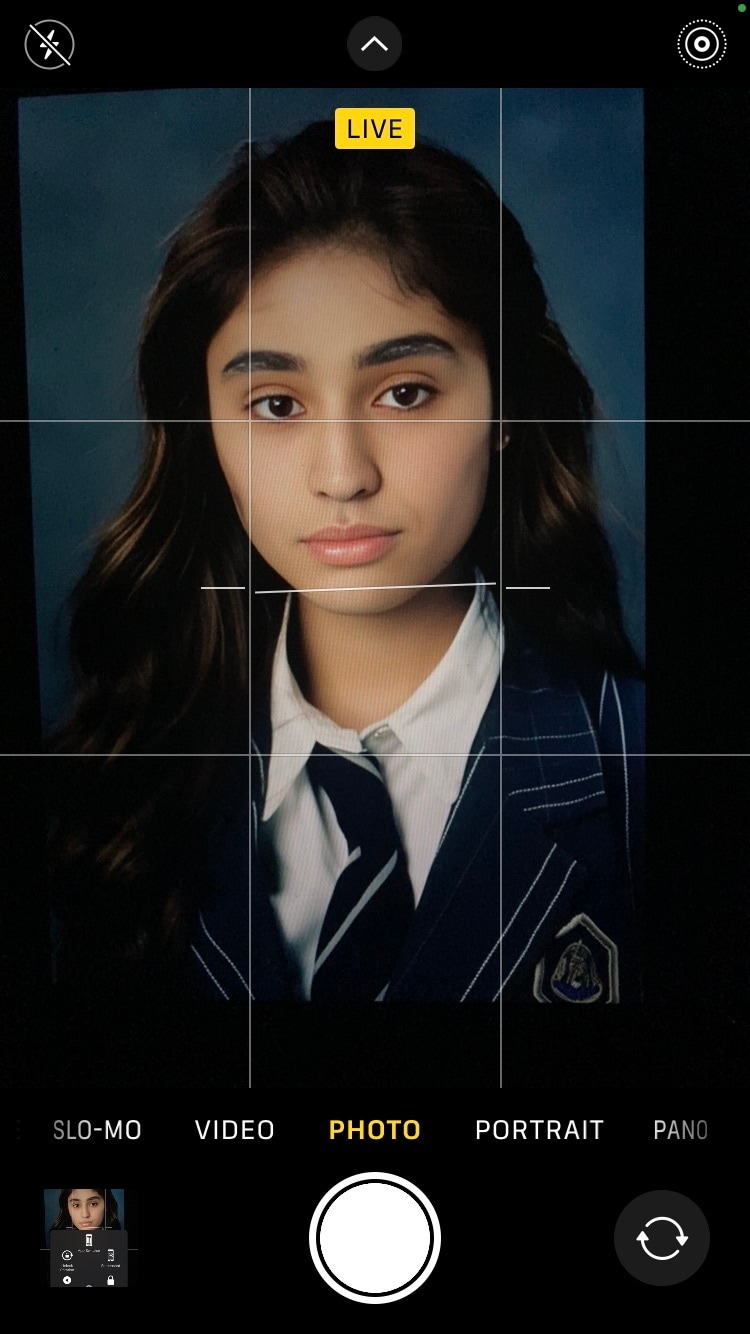
Look for the Live Photos icon, which resembles three concentric circles at the top of the Camera app interface. If the icon is yellow, Live Photos are already enabled. If it's white with a line through it, tap it to turn Live Photos on.
3. Take the Photo
Press the shutter button to capture the photo. While taking the Live Photo, try to keep the camera steady for a few seconds before and after pressing the shutter button to capture the full motion.
4. View Your Live Photo
After taking the Live Photo, go to the Photos app to view it. Open the photo you just captured, then press and hold on to the screen to see the motion and hear the sound that was recorded along with the photo.
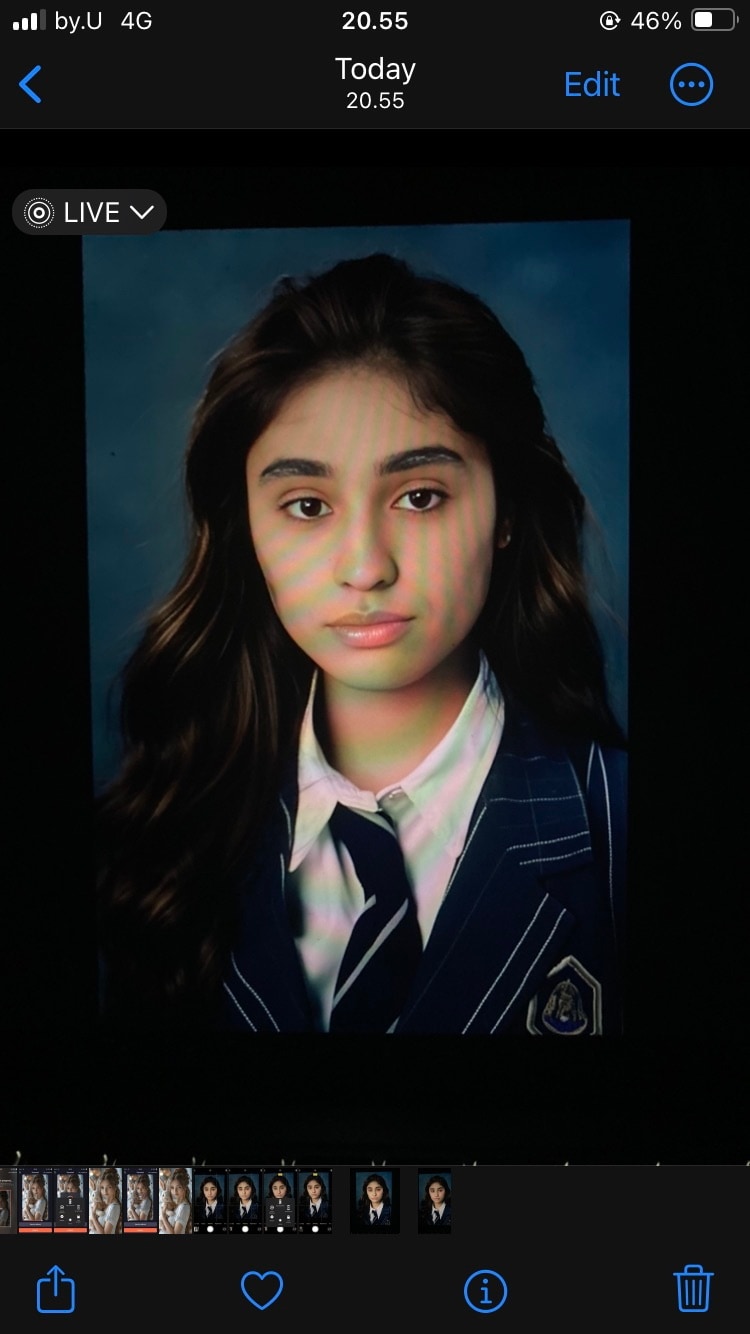
You can enhance your live photos by applying effects to them. Simply tap the Live Photos button at the top of the screen and choose from three exciting effects.
- Loop: Transform a favorite Live Photo into a captivating video loop.
- Bounce: Add a playful rocking motion to your Live Photo.
- Long Exposure: Capture the essence of movement and time with this effect.
Part 3. How to Turn Still Photo into Live Photo?
You can transform your regular photos into captivating Live Photos using various apps and software available. Here are some methods you can try:
Method 1: Virbo AI Photo to Live
Virbo AI live photo converter is the best app that lets you create high-quality live photos from image and text prompts. Here's how you can use Virbo AI:
Step 1: Launch Virbo AI live photo maker on your iPhone or Android.
Make Live Photo Now Make Live Photo Now
Step 2: Choose and upload a photo you'd to turn into live.
Step 3: Input text prompts to customize the photo animation effect.
Step 4: Click "Generate" to let AI turn your static photo into live instantly. It's that simple!

Method 2: LivePapers
LivePapers is an app that lets you convert any static photo into a Live Photo. You can download LivePapers from the App Store for $1.99. Here's how you can use LivePapers:
Step 1: Launch LivePapers on your device.
Step 2: Choose to either take a new photo or select an existing photo from your device's Camera Roll.
Step 3: Select the photo you want to turn into a Live Photo.
Step 4: Adjust the photo by centering it or zooming in, then tap Next.
Step 5: Once the preview generation is complete, 3D Touch the completed photo to see a preview. For other iPhone models, simply long-press the photo to see the preview.
Step 6: Customize your Live Photo by tapping on the wand icon in the lower left-hand corner to choose from various animation effects.
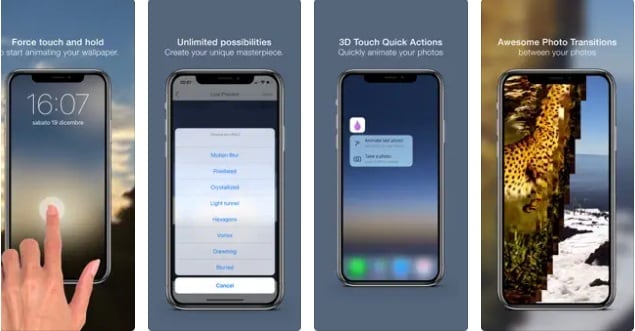
Once satisfied with your Live Photo, tap Save, and it will be exported to your Camera Roll.
In the software we just introduced, you’ve witnessed the incredible transformation of static photos into dynamic Live pictures. But technology never stands still, and if you’re searching for an even more powerful and captivating way to create, the next feature I’m about to introduce will truly impress you.
Imagine your static pictures not only coming to life with movement but also speaking! This cutting-edge technology breathes new vitality into your photos, making them visually vibrant while also allowing them to convey emotions and information through sound. Keep reading!
Part 4. Bring Photo to Life: Create Live Images with Sound
Now, AI technology brings innovation to enhance your photo experience. Besides creating live photos, you can also make a photo into live video with talking voice with tools like Wondershare Virbo. Virbo has a Photo Talking tool that allows your photo to talk and move according to the inputted text or audio recording.
Virbo Talking Photo AI has several key features:
- Create realistic AI headshots or virtual avatars to your liking
- Make your photo animate and talk with text-to-speech features
- Add your own audio recording for better personalization
- Add background music to create a more immersive experience
- Enjoy efficient video creation and seamless editing
- High-quality audio delivered by versatile AI avatars to accompany your photos
- Tell stories in multiple accents and languages to reach a global audience
Here are the usage guides for both mobile and PC versions. If you are interested, please click the button below to try it!
To make pictures talk online, follow these steps:
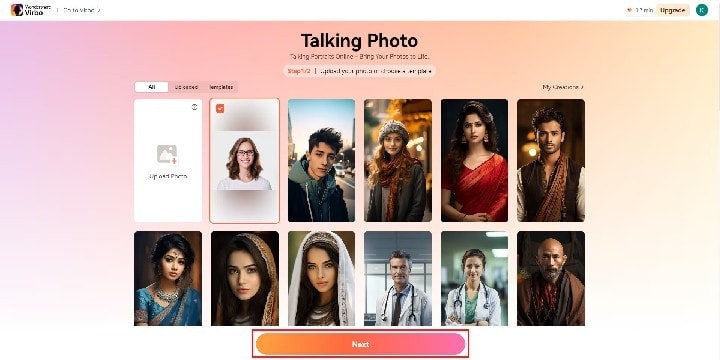
Step1 Visit the Virbo AI website, launch the platform, and select the "Talking Photo" feature.
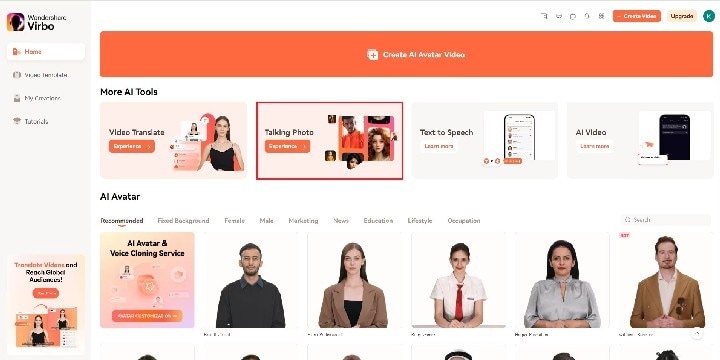
Step2 You'll have 3 options: choose from the images provided by the talking photo app, upload your own image or generate AI photo from existing image or text prompts.
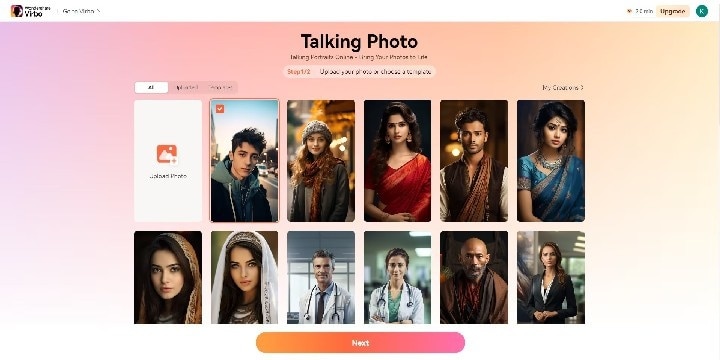
Step3 To upload an image, click on the "Upload Photo" icon, and make sure to review the User Agreement and Privacy Policy of Wondershare Virbo. Check the box to agree to the terms.
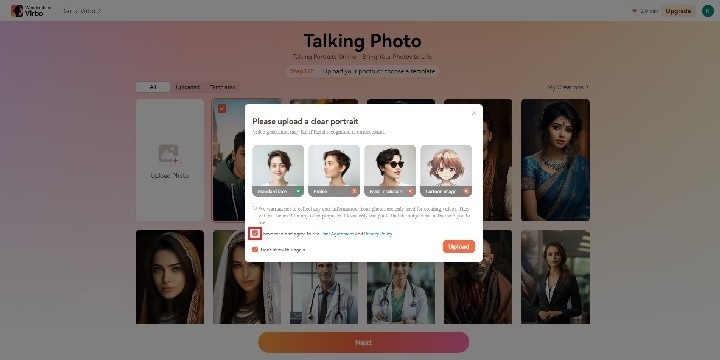
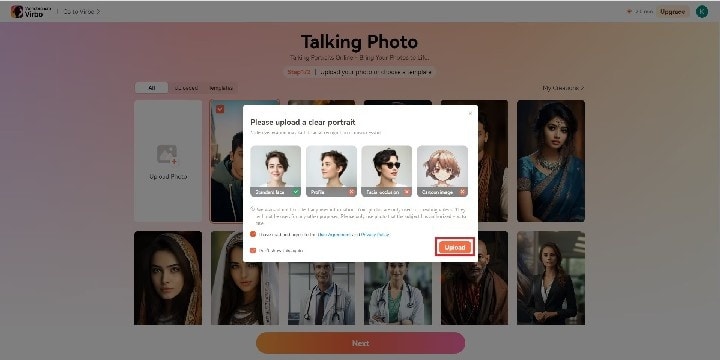
Step4 Then, click the "Upload" button to select and open your image from the computer. Tip: For best results, choose a photo with a single person's face.
Step5 Once your image is uploaded, move your cursor to the "Next" button to allow the app to set up your studio.
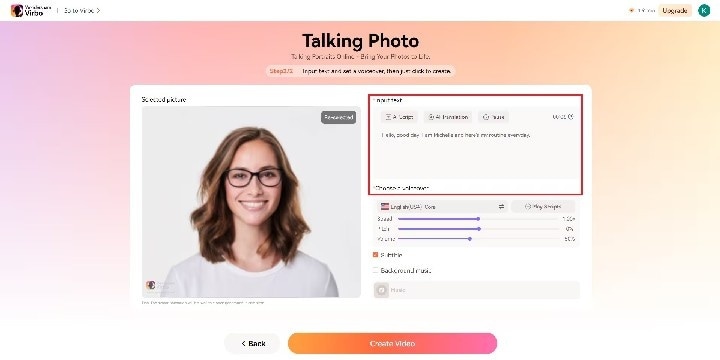
Step6 When you're ready, enter the text you want your photo to say in the "Text Script" section. After entering your script, adjust the voiceover settings in the section at the bottom right of the page.
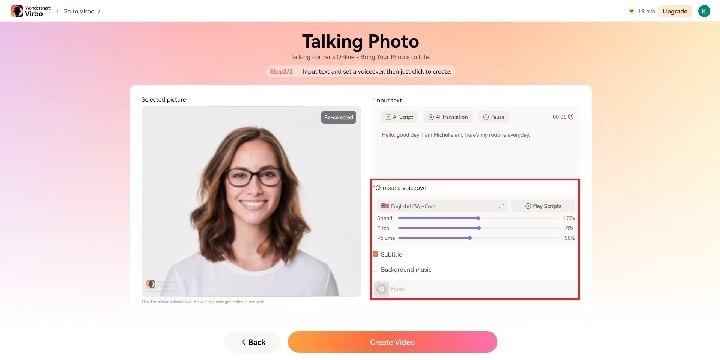
Step7 Here, you can tweak the speed, pitch, and volume of the audio. Select the desired language and gender for your voice, then click "OK."
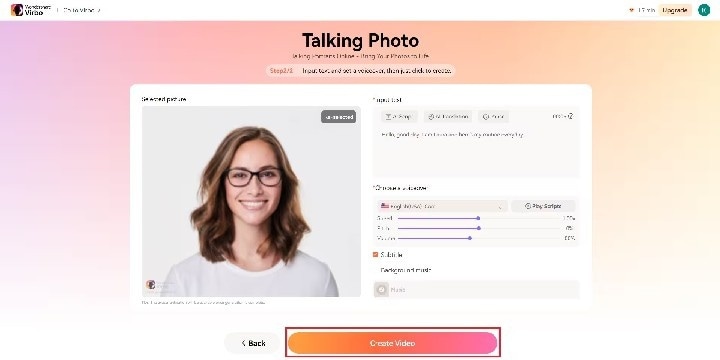
Step8 Experiment with different voices and scripts to find the perfect match for your photo. Once you're satisfied with the edits, click the "Create Video" button to finalize your talking photo.
Conclusion
Turning a regular photo into a lively Live Photo adds more interest and depth to your visual memories. Live Photos go beyond a single moment by capturing motion and sound, giving a richer experience to your pictures.
Although Live Photos are mostly used on Apple devices, tools like Virbo AI Photo Talking provide an exciting way to make interactive and talking photos with audio on different platforms. It lets you create stunning portraits, convert text into speech, add background music, and personalize voices, giving you the chance to bring your photos to life and create engaging stories for your audience. I know you will be interested, so give it try today!
FAQs about Live Photo Maker
-
1. How to turn a Live Photo into a still photo?
Turning a Live Photo into a still photo is simple on an iPhone. Open the Live Photo in your Photos app, tap "Edit," then disable the Live feature by tapping the yellow "Live" icon at the top center. After saving the changes, the Live Photo will become a static image without motion or sound. -
2. How to make a live photo from a video clip online?
To create a Live Photo from a video clip, you can use apps like VideoToLive. Simply visit the app, select your video, and trim it to about 3 seconds if needed. Then, choose the option to convert it into a Live Photo and save it to your camera roll. Alternatively, you can upload your video to TikTok as a private post, then save it as a Live Photo directly from the app. This process allows you to easily transform short videos into dynamic Live Photos on your iPhone. -
3. Do Android devices support Live Photos?
Live Photos are exclusive to Apple devices like the iPhone, iPad, and Mac. Android devices do not natively support Live Photos, but you can view Live Photos sent from an iPhone on platforms or apps that offer compatibility. Some Android devices may have similar features through third-party apps. -
4. Can you edit Live Photos?
You can edit Live Photos on compatible devices such as iPhones. Open the Live Photo in the Photos app, tap "Edit," and apply edits like cropping, filters, or adjustments. After saving your changes, the Live Photo will retain its motion and sound elements even after editing.


